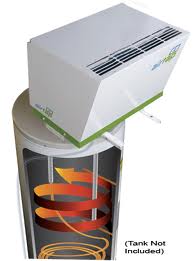
Xringer has finished up yet another project. This time around he has installed an air source heat pump water heater called an A7 AirTap. Its a retrofit kit that allows you to add a heat pump that is installed on a conventional electric hot water tank (or any water tank really). The AirTap will be used in an effort to reduce/eliminate the use of his oil burning boiler which is quite expensive to run.
So, lets take a closer look at how this water heater operates. It is a heat pump, which means it only moves heat around. It does not create heat like a regulator water heater would do by using an electric heating element or a gas, wood, or oil burning does. This operates exactly how a conventional air conditioner does. It moves the heat from in your house to the outside. In this case the AirTap is moving heat from where it is and putting that heat into the water tank. Xringer has the tank located in his basement. He is hoping that a side effect of using the water heater is some dehumidification of his basement.

So, lets get to the installation. First step was to find a hot water tank. Xringer decided on an inexpensive 40 gallon GE electric water heater from the local big box store. The water heater was put into the desired position with a drain pan under it.

The next step was adding the AirTap mounting brackets and pipe fittings to the top of the tank.

With the water heater ready to recieve the AirTap, it was mounted on the top of the water heater. To get the heat into the water tank, the heat exhanger needed to be inserted. This comes in the form of a copper tube that is pushed in through the an opening in the top of the tank.

Once the tube is fully inserted, the top of the pipe is sealed with a special nut that makes everything water tight.

With the bulk of the install done, all that is left to do is install a drain so that when the AirTap condenses any water, it has a place to go.

And, last but certainly not least, you have to connect the inlet and outlet to the water tank just as you would any ‘ol water heater.
A nice feater Xringer decided to add was a bypass so he can opt not to use the heater if he decides it doesn’t work well in winter time. Pulling heat out of a cold basement may not be the best option. We’ll see how that works out come winter time.
For now, the heat pump water heater has been working amazingly well for Xringer. During the Summer and Fall months so far, the AirTap has been using a little less than 1 kWh per day to provide Xringer and his wife with hot water. This is opposed to using 1/2 a gallon of heating oil. During his two month update, he noted that he has saved roughly $125 in heating oil by switching to the AirTap.
For more detailed info, see Xringer’s thread on the install.


{ 1 trackback }
{ 1 comment }
Indeed a very nice post. I am also associated with Heat Pump , Air Source Heat Pump , Domestic Heat Pump . Thanks for writing such good posts and as I have subscribed to your blog, I do expect that you will be posting nice posts like this on a regular basis.
Comments on this entry are closed.