In part one, we cut out the concrete floor where we needed to run the drain tile. Then, we removed the concrete and dug down to make a trench for the drain tile to sit in.
The next step was to put down some rock. This allows water to more freely flow around and get to the drain tile quicker. We ended up using some ~1″ riverstone as that was the closest thing we could find at the home improvement store and we didn’t need a ton.
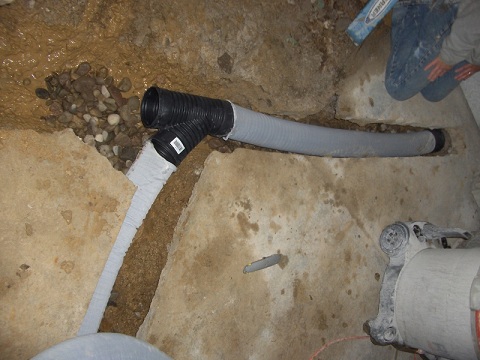
After a layer of stone is down, we laid the drain tile down into the trench. It was cut to length from a 100 foot roll and connected up to the sump.

To keep that area around the drain tile free flowing, we needed to add more rocks on the sides of the tile and on top of it. Again this is so that the water can more easily get to the drain tile to move it away from the house.

With the additional rock on top of the drain tile, it is time to put plastic over the top. This will stop the concrete from seeping down into the rock we just put down.

The last step is to pour the concrete and smooth it all out.
The results from doing this work have been very good so far. The basement humidity is usually around 80% without the dehumidifier running. It has been quite rainy here lately, enough to keep everything outside wet, and the basement humidity is a wonderful non-musty 60%. I’m hoping the dehumidifer will no longer be needed at all and that I can stop it from sucking down 1-2 kWh of electricity every day in summer. The energy savings are only augmeted by the health issues that can arise from having a musty basement that gives a perfect environment for mold and dust mites to live.


Comments on this entry are closed.