
|
 03-30-09, 09:11 AM
|
#1 | |
|
Supreme EcoRenovator

Join Date: Mar 2009
Location: Portland, OR
Posts: 4,004
Thanks: 303
Thanked 724 Times in 534 Posts
|
Hello all,
Quote:
* * * I live in an older small house (< 1000 square ft.) built in 1892. I am going through the whole house, meticulously insulating it with expanded poly styrene board. I tore off the lath & plaster, increased the thickness of my walls, and I'm layering in 6 inches of rigid foam into the walls, ceiling, and under the floor. So I'm thinking ahead to a highly efficient heating system. As best as I can determine, a Ground Source Heat Pump (AKA: GSHP) running warm water through a thin (1.5 inch), radiant concrete floor is my best bet. [* NOTE: Subsequent study suggests that a 'sandwich' style hydronic floor with close-spaced aluminum spreaders will be easier to build and at least as efficient as a thin suspended concrete floor, but that comes much later in the story. *] I don't have much money, but I am resourceful and very stubborn. I have found out that the approximate size of a heat pump I'll require is slightly under 12,000 BTU/hr. In HVAC speak they call 12,000 BTU/hr a 'Ton' of Air Conditioning. Your mileage may vary. I have also found out that here in Western Oregon (Portland), a GSHP will require a borehole about 200 feet deep. It could also be two boreholes about 100 feet deep, etc... Again, your mileage may vary. I also found out that heat pumps are classed as Air-to-Air, Water-to-Air, and Water-to-Water. The kind I need is Water-to-Water. The kicker is, that the smallest I have been able to find is four ton (48,000 BTU/hr). So this means that in order to proceed with the project, I'll have to build my own heat pump. In HVAC, bigger is not better... just slightly smaller than big enough is best, economically speaking. I have built a proof of concept unit that works. Here's a photo: I built this unit last summer and did some testing. Here's a performance graph: The COP is calculated for each measurement period, and changes quite a bit, but the overall COP is quite good. So, is anyone interested in such a project? I have already built a prototype heat pump, it is working and I have tested it and the test results are very encouraging. I have attached photos and performance data at the end of this post. I am now in the hole drilling phase. I built an earth auger, which would have worked really well in other parts of the country, but in Oregon, where I live the drilling is not so easy. I have increased the power of my auger 20X and I'm getting ready to dive back in. A properly designed system as I'm describing should be able to operate at an efficiency of over 300%. My prototype has actually shown efficiency over 400%. In HVAC, efficiency can go over 100%, because the electrical energy that is input is not directly converted to heat, but is being used to move heat from one place to another. Strange but true. So, there are four parts to the project: 0. Determining your heating load. Free software is available on the web for this. It is also possible to measure directly, the energy you are using. I have done both. 1. The Ground source loop field. Here in Oregon, where I live, an 80 foot long, three foot wide, by four foot deep trench containing about 300 feet of slinky loops of plastic pipe, per Ton (12,000 BTU/hr) is required. (* or *) Two hundred feet of borehole per Ton is required. 2. The Heat Pump. I have found that air conditioners and de-humidifiers can serve as a starting place for DIY heat pumps. These can be had for cheap to free. German children are using Propane gas as a refrigerant for cooling CPUs so they can play video games faster. What a concept! 3. The radiant floor system. From all I have read, nothing beats PEX in concrete for efficiency. This is seriously messy, but the technology involved is very straight-forward. I'd really like to get other people interested in this kind of project. Commercial units installed run $15,000 to $45,000 and up. I'm estimating that I can get mine going for under $2,000. Maybe under $1,000. So far I've spent about $400. So, let me know if there's interest... I have loads and loads of information I'd like to share. If we are not the people who can re-purpose pieces of junk that are now headed to the scrap yards and turn them into state-of-the-art high-efficiency home heating systems, who's going to do it? Humbly Yours, - AC_Hacker P.S.: Here's a link to a PDF which will serve as a good overview to our project: %%%%%%%%%%%%%%%%%%%%%%%%%%%%%%%[/CENTER] Last edited by AC_Hacker; 09-11-17 at 03:14 PM.. Reason: in-line images, better performance graph |
|

|

|
| The Following 15 Users Say Thank You to AC_Hacker For This Useful Post: | BillG (07-19-16), castlusion (03-02-13), cia (08-11-10), greenhouse (03-11-12), IamIan (10-28-12), Jim_UK (07-28-14), Mobile Master Tech (06-08-13), phreich (07-02-14), rhizomatic (07-03-12), sparkchaser (11-16-11), Spiv (06-22-16), Tom Brown (07-17-19), vann (10-04-13), where2 (10-17-13) |
|
03-30-09, 09:25 AM
|
#2 |
|
The Gardener
Join Date: Oct 2008
Location: Manitoba - Canada
Posts: 492
Thanks: 17
Thanked 8 Times in 7 Posts
|
Welcome AC_Hacker. I don't know if my city would let us do this where I live in Canada, but I'm really interested in what you've written so far. So, for those of us who may not be able to do something like this, please still keep us posted on your status, or if you've got any other ideas you'd like to share.
Where did you learn to invent stuff like this? I wish I knew how to put things like this together, but I wouldn't know where to start. I really commend you for building things like this. |
|
|
|
|
03-30-09, 10:00 AM
|
#3 |
|
Supreme EcoRenovator
Join Date: Mar 2009
Location: Portland, OR
Posts: 4,004
Thanks: 303
Thanked 724 Times in 534 Posts
|
Higgy,
There is tremendous interest in GSHP in Canada. I learned a large part of what I know about GSHP from websites provided by your fair government. Thank you! > Where did you learn to invent stuff like this? Lots of reading, being willing to try something, welcoming failure as also a learning moment. I have friends that like to sail. I've noticed that their best stories are all about near-disasters. Of course, they DID live to tell the tale. Best of Luck in your own adventures! Cheers, -AC_Hacker |
|
|
|
|
03-30-09, 11:46 AM
|
#4 |
|
Administrator

Join Date: Aug 2008
Location: Germantown, WI
Posts: 5,525
Thanks: 1,162
Thanked 374 Times in 305 Posts
|
Welcome to the site AC Hacker. I'm in a similar boat. I have an older 1800s house that I'm just starting to remodel to get additional insulation into the walls (also thickening them for added insulation). I was also planning on going with in floor radiant heat. One room of the house already has it and it is simply wonderful. Its currently running off the hot water heater (blah). I was thinking about going with a conventional high efficiency boiler as a backup for solar hot water heat. But, your heat pump is very fascinating and I'm excited to see where it goes! Feel free to bounce any ideas around on here. We'll do what we can.
 |
|
|
|
| The Following User Says Thank You to Daox For This Useful Post: | AC_Hacker (08-17-10) |
|
03-30-09, 01:09 PM
|
#5 |
|
Supreme EcoRenovator
Join Date: Mar 2009
Location: Portland, OR
Posts: 4,004
Thanks: 303
Thanked 724 Times in 534 Posts
|
Daox,
Thanks for your post. Commercial GSHP + hydronic floor heat setups in Europe are claiming COPs as high as 5.5. If you have the cash to hire it all done by experts, save yourself some grief. If you're on a limited budget, like I am, then the fun begins... > But, your heat pump is very fascinating and I'm excited to see > where it goes! Is there some aspect of my project you'd like to know more about? There's so much to it, I hardly know where to begin... Best Regards, -AC_Hacker |
|
|
|
|
03-31-09, 12:11 PM
|
#6 |
|
Administrator
Join Date: Aug 2008
Location: Germantown, WI
Posts: 5,525
Thanks: 1,162
Thanked 374 Times in 305 Posts
|
Oh gosh, I barely know where to start too haha. How about explaining your drilling rig there? Did you make it yourself? How large of a diameter does the hole need to be? I'm really not familiar with how you do these things.
|
|
|
|
|
03-31-09, 04:42 PM
|
#7 |
|
Supreme EcoRenovator
Join Date: Mar 2009
Location: Portland, OR
Posts: 4,004
Thanks: 303
Thanked 724 Times in 534 Posts
|
The drilling rig...
I started some notes on the thread over at EcoModding you might want to look there too. At some point, I'll put everything on one thread, probably here. See the EcoModder thread: The Homemade Heat Pump Manifesto... - Fuel Economy, Hypermiling, EcoModding News and Forum - EcoModder.com But here's the story... A local farmer told me that he was able to drill a 35 foot well by using 2 friends an 2 cases of beer (smart farmer). I started by making a T-handle test drill, that used a water hose, connected by a swivel coupling.  auger-T-handle-test(small).jpg - This is my first test drill, only with a shorter piece of drill pipe, so you can see what's going on. I actually used a 6 ft. section of pipe and when the auger advanced about 5 ft., I added an additional section of pipe. I was able to advance about 13 feet in about 35 minutes. One problem I encountered was that the hose kept kinking, so I had to hold it up with one hand and I turned the auger with the other hand. So I was able to advance 13 feet with only one hand. The other, and more serious problem was that because of the high sand content of the soil, I was having cave-in problems. I didn't know what was causing it, I just knew that my auger was getting stuck and was very hard to pull out of the ground. Later I would discover that drilling mud would solve the cave-in problem.  auger-T-handle-test_upper-detail(small).jpg - This is a detail of the swivel end of the auger. The swivel adapter is not eactly the same as 3/4 pipe thread, but by loading lots of teflon tape onto the threads, I got a satisfactory seal.  auger-T-handle-test_lower-detail(small).jpg - this is a detail of the business end of the auger. The water gushes through the pipe and flushes out the drill-cuttings. I have come to understand that the water is definitely part of the tool. It contributes more to the advancement of the drill than any effort on my part. I live at the top of an 80-foot bluff and look down at a local river. I did notice that I was hitting rocks at about 12 to 13 feet. What I didn't realize at the time, but have come to know that every well driller understands very well, is that 14,000 years ago, an ancient flood deposited about a foot of clay mixed with basalt river gravel which over fourteen millenia has consolidated in what the locals know as 'hardpan'... it's tough stuff. %%%%%%%%%%%%%%%%%%%%%%%%%%%%%%%%%%%%%%%% AC_Hacker's Update, Sept 6, 2009: At the time this was written, I thought I had, indeed hit hardpan. Later work, using tools that didn't obscure the nature of the soil I was digging through, revealed that I had actually hit an area of fist-sized rocks left from a 10,000 year old geological event. I developed a tool (the "steel claw"), shown later, that enabled me to remove the rocks and advance town to a depth of 17 feet where there was very wet, coarse black sand, very good for Ground Source Heat Pump work and worth the extra digging. At that depth, I was actually able to look down boreholes and the see the hardpan layer. %%%%%%%%%%%%%%%%%%%%%%%%%%%%%%%%%%%%%%%% You may not have anything like this where you live. In fact, a couple of blocks from here, thing might be much better, or much worse. 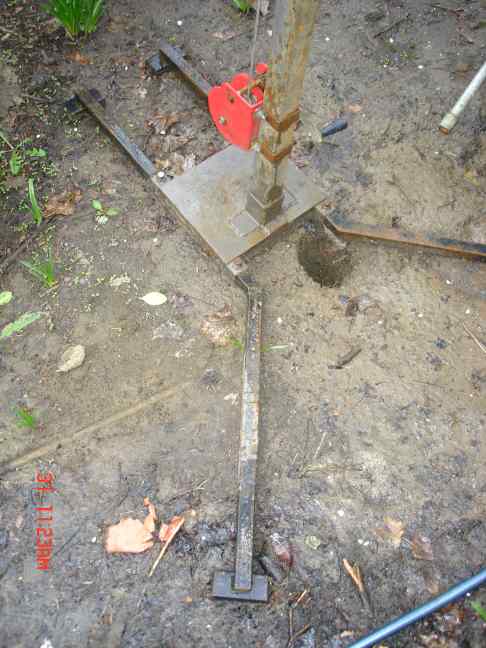 auger-base(small).jpg - This is the base of the gearmotor auger I put together. Based on my hand-drilling experience, I figured a small motor would do the job, so I got a 1/4 HP 25:1 permanent magnet gearmotor off ebay for $70. A 1/4 HP motor doesn't require a huge amount of structure to support and control, so fabrication was pretty easy. 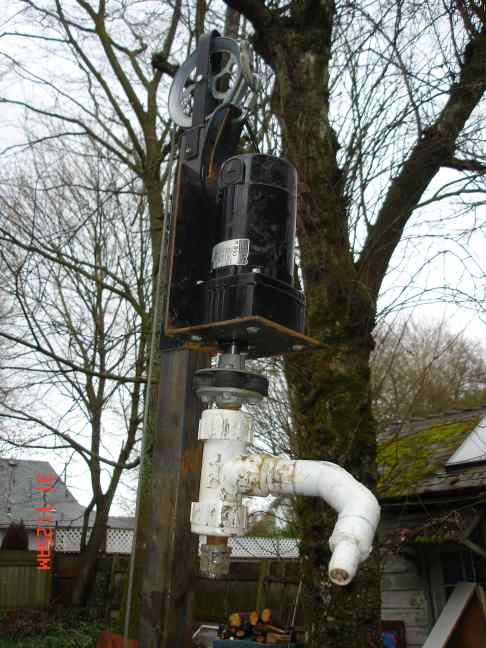 auger-head(small).jpg - This is the gear motor head. I fabbed an 'L' bracket for the motor and used a 2" square tube for the vertical, and a close-fitting 2" inside receiver tube welded to the L bracket. it slides up & down well and doesn't have too much slop. You can see the hand cranked wench to raise and lower the gearmotor head. It's not optimum, but it works OK. (By the way, I'm a terrible welder. I have a stick rig, which I have tried repeatedly to master, but it has won every time. So, I bought a crappy little wire-feed welder for $100 and it has worked wonders. Highly recommended.) The gearmotor I chose is permanent magnet, so I can reverse the direction to unscrew pipe... very handy. I also have a bench test variac that I use to control speed. Works great. Next post will detail the auger-head swivel... it's surprisingly important. Best regards, AC_Hacker Last edited by AC_Hacker; 09-06-09 at 10:59 AM.. Reason: AC_Hacker's Update, Sept 6, 2009 |
|
|
|
| The Following User Says Thank You to AC_Hacker For This Useful Post: | cia (08-12-10) |
|
03-31-09, 11:40 PM
|
#8 |
|
nail bender

Join Date: Sep 2008
Posts: 9
Thanks: 0
Thanked 0 Times in 0 Posts
 |
Here on the ocean front the HVAC companies are starting to sell Geo Thermal systems that are really pump and dump units.
They drill your back yard to around 150 foot and pump the water to a storage tank that is used to pre-cool or pre-heat your HVAC unit. Ground water here flows out at around 55 degrees year round so this works really well in the summer and reasonably well in the winter. (We seldom see below 50 degree days and below 30 degree nights.) Unbelievably expensive Starting at $20,000 for the simplest of units. There are , however, quite a few of them in my neighborhood. (The developer had a deal with the HVAC installers and the prices were financed into the original purchase price) I have often wondered how hard it would be to make something like that on my own. I would just bury some 55 gallon plastic drums in the yard about 50 foot down and use that as my storage facility, (removes them from the house and reduces the need for insulation) then move the water to the furnace as necessary. So that being said, I am very interested in your project and will keep watching for stuff I think I might be able to implement. S.
__________________
Electricity is really just organized lightning. To view links or images in signatures your post count must be 0 or greater. You currently have 0 posts. |
|
|
|
|
04-01-09, 02:16 AM
|
#9 |
|
Supreme EcoRenovator
Join Date: Mar 2009
Location: Portland, OR
Posts: 4,004
Thanks: 303
Thanked 724 Times in 534 Posts
|
metroschultz,
Pump & dump? I'm not so sure I follow what you mean... I see this term in geothermal usually meaning that an 'open loop' system is being used, and water is being drawn from the ground or river or other water source then heat is extracted and the water is then pumped on to a lake or a river or a different well where it is absorbed back into the earth. Is this how you mean the process works? Regards, -AC_Hacker |
|
|
|
|
04-09-09, 02:19 AM
|
#10 | |
|
Supreme EcoRenovator
Join Date: Mar 2009
Location: Portland, OR
Posts: 4,004
Thanks: 303
Thanked 724 Times in 534 Posts
|
I've been wracking my brain, trying to figure out how to join the pipe that will eventually become my ground-source heat exchanger.
I know that PEX is pretty good stuff, but because of the way the PEX plastic is made, it can't be welded. PVC and CPVC is out of the question because it gets brittle. I've noticed that in all the sources I have read, High Density Polyethylene (aka: HDPE) is the pipe of choice, with 3/4" being the size often used for small, home-heating applications. If the Ph of your soil is not acidic, copper would be good too, but very expensive. So in practice, HDPE seems to be the choice, with life-spans of 50 years guaranteed, and life-spans of 200 years expected! The only catch is that many states require that the HDPE have all joints & couplings being welded. Since I'm going to be doing this myself, I have considered many alternatives to welding, including barbed connectors and stainless steel hose clamps... should last a good long while. So, I was at the local gigantic home-improvement store, looking over various kinds of plastic pipe, and I saw big rolls of black polyethelyne water pipe. I zeroed in on the 3/4 pipe and saw that they have two grades, schedule 40 (100 psi) and schedule 60 (160 psi). The schedule 40 was too thin to consider, looks like it could be crushed by the force of the earth above. The schedule 60, however looked really pretty good. So I bought a short length of the schedule 60 and went looking for possible joining solutions. At a high quality (professional) plumbing store, I did find some very nice looking brass barbed joints which would use stainless hose clamps. I also did some asking about as to welding tools. Turns out that there's a company named McElroy that makes a tool called MiniMc (pronounced 'mini-mac'), that consists of a teflon-faced heating tool, a ratcheting facing tool, and a gripper/slider tool that holds the pipe while it is being faced, heat-melted, and fused. See photos, etc here: (McElroy MiniMc Fusion Machine Overview). Also check out the manual, photos, animations, movies, etc. Quite an education! The local outfit sells the tools for nearly $2000 (OUCH!) they'll also rent them for $45/day or $180/week (gasp). But this doesn't really look like rocket science... So, on the way home, I stopped at my favorite junk store and got a teflon skillet, to try a wee bit of free-style polyethelyne welding. I put a chunk of aluminum plate on the stove burner, and put the teflon skillet on top of that and set the gas flame as low as it would go (my stove has 35,000 burners). I used an infra-red thermometer and set some short lengths of Polyethelyne upright on the skillet. When the heat got up to about 300 degrees, I noticed a small bead forming on the pipe end, where it met the skillet. I picked up the pipe in my hands and pushed the hot ends together, and to my amazement, welding was happening! 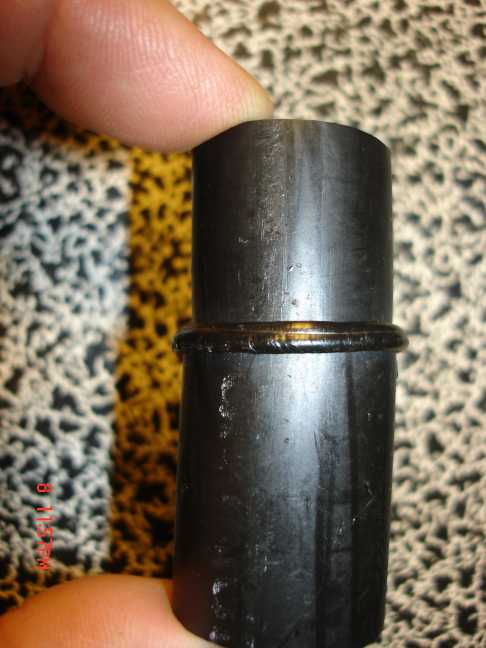 Photo of my first try  Photo of my second try This stuff ain't rocket science. I mean if I can get this close on two tries with a teflon skillet, this is possible! Now, can anyone think of a way to make a heater tool and a device to hold the pipe securely while it is fusing? This welding problem is sort of the missing link in the ground source loop field phase of the GSHP project. Quote:
-AC_Hacker Last edited by AC_Hacker; 11-29-11 at 10:41 AM.. Reason: In-Line images... |
|
|
|
|
 |
| Tags |
| air conditioner, diy, gshp, heat pump, homemade |
|
|


 Linear Mode

