
|
 12-29-16, 09:18 AM
|
#71 |
|
Home-Wrecker
Join Date: Sep 2008
Location: SE Wisconsin
Posts: 546
Thanks: 3
Thanked 165 Times in 96 Posts
|
I'll be doing standing seam metal roofing. It's durable, looks nice, and is recyclable at end of life.
Typical asphalt shingles don't last as long as the solar panels do, which means all panels need to be removed, the building re-roofed, and then the solar panels re-installed. No thank you! I'm planning on using the S-5! clamps that mount to the seam of a standing seam metal roof. A metal roof, with S-5! mounts clamped to it means ZERO penetrations in the roof!
__________________
To view links or images in signatures your post count must be 0 or greater. You currently have 0 posts. To view links or images in signatures your post count must be 0 or greater. You currently have 0 posts. |

|

|
|
12-29-16, 01:49 PM
|
#72 |
|
Steve Hull
Join Date: Dec 2012
Location: hilly, tree covered Arcadia, OK USA
Posts: 826
Thanks: 241
Thanked 165 Times in 123 Posts
|
Ben,
You may want to reconsider EPDM roll roofing as it lasts longer than 3-tab and is a LOT less expensive than standing seam. If the roof is completely covered with panels, then why invest in a high cost standing seam room (on the south side)? I agree that standing seam is a superb roof - when it can be seen! Steve
__________________
consulting on geothermal heating/cooling & rational energy use since 1990 |
|
|
|
|
01-03-17, 12:49 PM
|
#73 |
|
Home-Wrecker
Join Date: Sep 2008
Location: SE Wisconsin
Posts: 546
Thanks: 3
Thanked 165 Times in 96 Posts
|
There's always going to be at least a little bit of roof showing.
In my area, rubber roofing is NOT used on pitched residential roofs AT ALL (with the rare exception of an odd small porch roof, or something else where sheet rubber is used as a "problem-solver"). A pitched rubber roof would simply look bad and unfinished. I'm on a corner property, off a fairly busy road. I really want my solar system and the garage to look GOOD, so as to help PROMOTE renewable energy. There's already enough people out there who are anti-R.E. for something as simple as their opinion on the looks of it. If I'm NOT using standing seam roofing, that means that lag bolts or screws have to penetrate whatever roofing materials that I am using. That's more opportunities for leaks and long-term damage to the roof. Rubber roofing has some of the shortest life span of any roofing material. At some point, all the solar panels would need to be removed for re-roofing, then re-installed - quite a bit of labor that would be saved simply by installing a longer-lasting roof. Doing something like metal roof on one face and a rubber roof on the other would also complicate things a bit. What material do you use on the ridge for example? Also, what roofer will you hire to do HALF a metal roof? Also, I still need edging, gutters, and all of the other little bits that make a roof finished and look nice. Put all that together and I think I would much rather have a very nice-looking roof which is high quality, not leak, and last a long time. Yes, it's expensive, but that's the price of buying good quality stuff.
__________________
To view links or images in signatures your post count must be 0 or greater. You currently have 0 posts. To view links or images in signatures your post count must be 0 or greater. You currently have 0 posts. |
|
|
|
|
01-03-17, 01:51 PM
|
#74 | ||
|
Less usage=Cheaper bills

Join Date: Nov 2010
Location: Minneapolis, MN
Posts: 939
Thanks: 41
Thanked 116 Times in 90 Posts
|
Quote:
Quote:
Regarding roof penetrations, the mounts for asphalt roofing shingles are flashed in place, so it's basically like having a metal shingle covering the penetration. This is more water tight than turtle vents, sunroofs, satellite dish mounts, and chimneys that penetrate roofs. The old method of running a screw directly through the shingles and applying sealant has not been a common practice for well over a decade. Don't get me wrong though, standing seal metal roofs look great and last a very long time if you can ignore hail pocks when they happen. I almost went with a metal roof but didn't due to thoughts about the neighborhood aesthetic and my insurance company paid for all but a grand of it. If it was new construction, a decision to go metal would have been much easier. I've heard on a house your insurance rates are less because of their longevity. One very important thing to keep in mind. My solar installer told me that if I went metal that you must tell your installing contractor to use all of the fasteners specified for a full load bearing installation otherwise you risk the metal pulling loose in the wind. Apparently it's a very common practice to not do use all of the fastener locations if nothing will be attached to the roof. So be very specific that all of the fasteners specified need to be used and that you will have additional weight and wind loads on top of the roof due to a solar system being installed on it. As an aside, I think EPDM is great and with a proper installation can last longer than pretty much anything including metal but IMO only when installed on a flat roof and covered in aggregate to protect it from sun, hail, and wind, like it's supposed to be. ..this type of roof clearly doesn't apply to your project though and requires different type of construction methods, flat roofs always bear snow until it melts. |
||
|
|
|
|
01-03-17, 08:38 PM
|
#75 | |
|
Home-Wrecker
Join Date: Sep 2008
Location: SE Wisconsin
Posts: 546
Thanks: 3
Thanked 165 Times in 96 Posts
|
Quote:
For the latest on the garage, check out the blog at: Garage Progress, Jan 3 2016 Lately, we got the ends of the upstairs studded in and sheathed, cut out the window holes, put up the fascia, foamed the exterior with 1/2" urethane foam (with seams staggered from the sheathing, and the seams of the foam taped), installed the windows, and installed skylights. That's right, SKYLIGHTS. In a garage. Ok, well, really it's in the upstairs which is going to be my home office or writing studio or whatever it is that I actually end up using it for. The skylights let in lots of natural light and I've always loved skylights wherever I've had them. 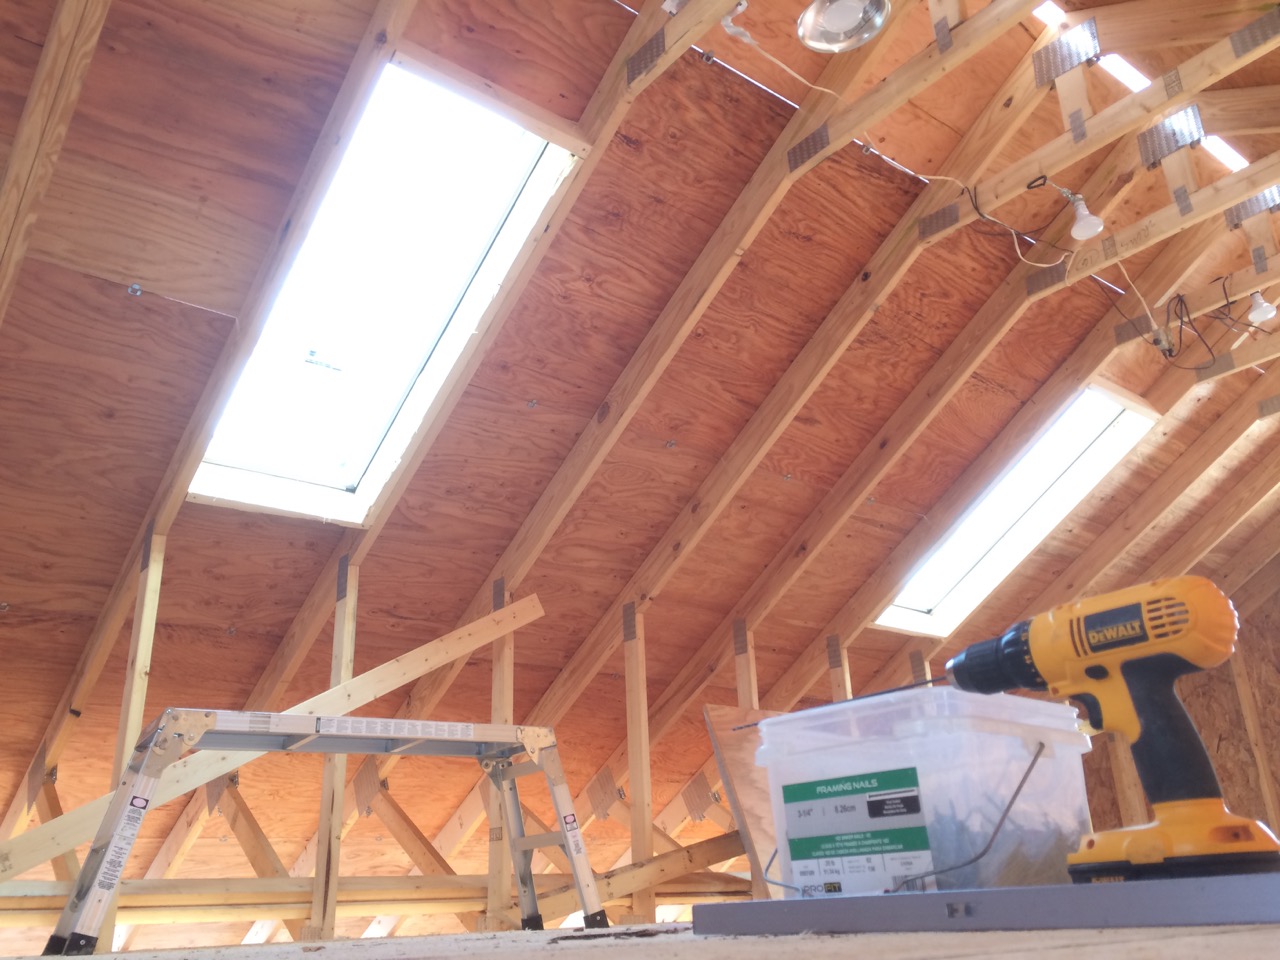
__________________
To view links or images in signatures your post count must be 0 or greater. You currently have 0 posts. To view links or images in signatures your post count must be 0 or greater. You currently have 0 posts. |
|
|
|
|
|
01-03-17, 08:52 PM
|
#76 |
|
Home-Wrecker
Join Date: Sep 2008
Location: SE Wisconsin
Posts: 546
Thanks: 3
Thanked 165 Times in 96 Posts
|
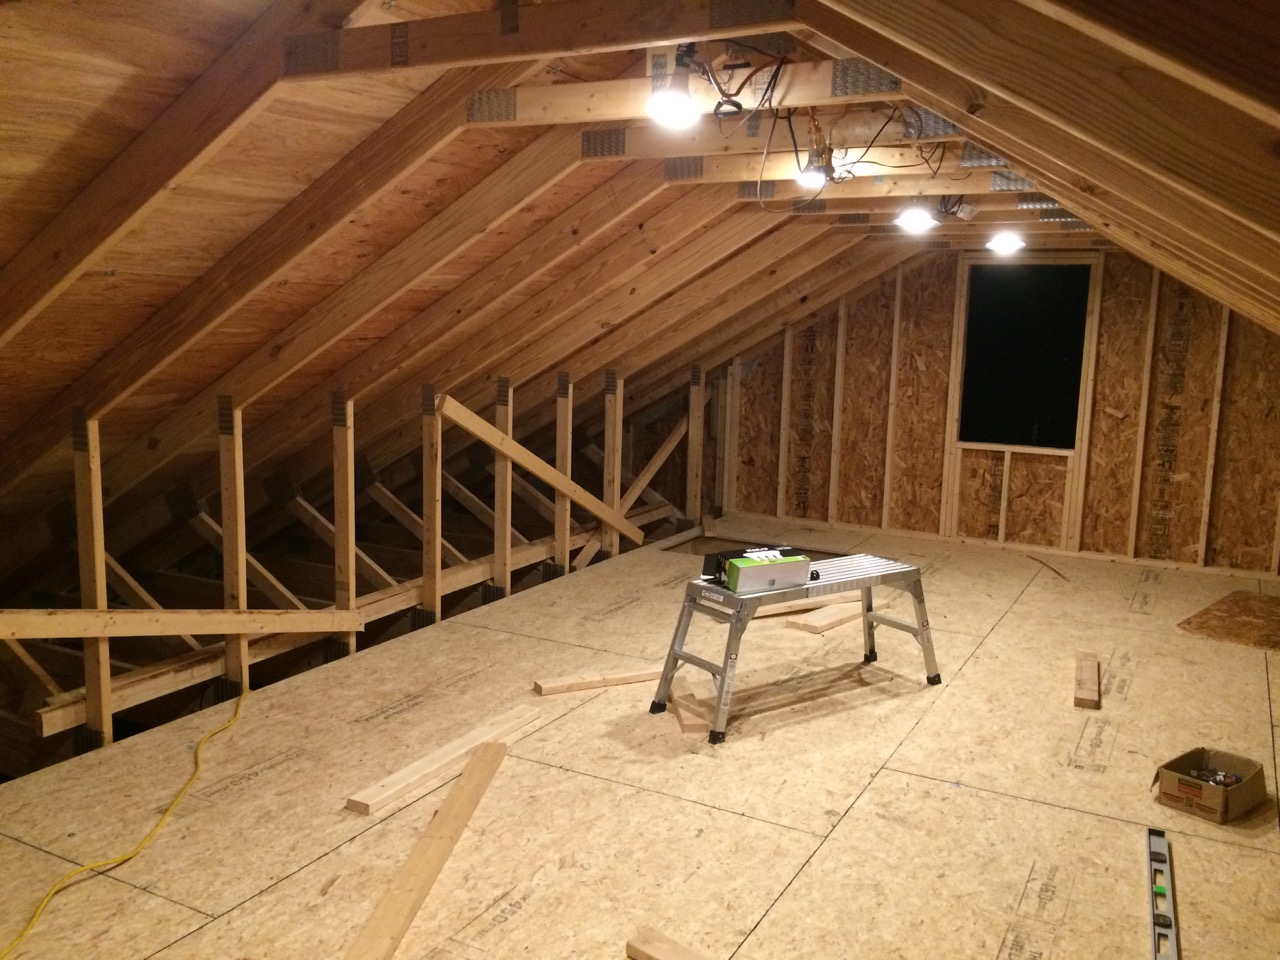 I also played around with the upstairs lighting a little bit. The ceiling will be relatively low, so I want to put in recessed can lights. I used some "clamp lamp" lights to simulate the position of where those lights would go, I had five of them, and evenly spaced them out across the upstairs. (In the photo, you can see four and the fifth is just above my head, outside of the photograph.) The bulbs I used were 650 lumen BR30 LED bulbs, rated at 8 watts each. With 5 lights evenly spread out, the lighting was great, nice and bright AND even. I experimented a little bit, turning a light or two off and re-spacing them. With anything fewer than 5 lights, the light no longer looked even, or the corners looked shadowy. What I might want to do is install 6 lights. That will be plenty bright and the spacing would work out a little simpler with 6 instead of 5. I could then put those on a dimmer. If 6 is too bright in some situations, I could bring it down with the dimmer. I can see using this loft as a "guest room". The height of the side walls and limited stairwell access means I'd never get a real sofa upstairs anyways, but a FUTON would be great! I could put a flatscreen TV opposite of the solar and have a nice move-watching area and guest sleeping space. 6 lights would be way too bright for a movie or a garage party. A dimmer switch would make the mood! And yes, these bulbs are dimmable. They were also $2 for a four pack! Wow, can't beat that price! 
__________________
To view links or images in signatures your post count must be 0 or greater. You currently have 0 posts. To view links or images in signatures your post count must be 0 or greater. You currently have 0 posts. |
|
|
|
| The Following User Says Thank You to bennelson For This Useful Post: | Daox  (01-04-17) (01-04-17) |
|
01-07-17, 08:22 AM
|
#77 |
|
Home-Wrecker
Join Date: Sep 2008
Location: SE Wisconsin
Posts: 546
Thanks: 3
Thanked 165 Times in 96 Posts
|
Been very cold this last week. No further work on the garage.
However, I have been thinking about FLOORING for the upstairs. I'm putting so much work and money into this building already that it seems like a shame to NOT finish the upstairs and have it look really nice. The sub-floor we put in is 3/4" OSB. It's pretty solid, but seeing as how the building uses two-foot centers, I do get a little bit of bounce in the middle of the room. Also, in my research, not too many types of flooring can go straight over OSB - it's just too rough. Most flooring types will require a thin, smooth underlayment. So, I either want flooring that isn't too heavy, or something that stiffens up the floor. I don't want carpet. It gets dusty, needs vacuuming, my wife has allergies, etc. Also, the room is 14 feet wide. Rolled material like carpet and vinyl come as 12 foot rolls. So, if I did either of those, I'd have seams and plenty of wasted material. I probably want some sort of material that comes in small pieces and naturally has seams anyways. Some sort of a light-weight tile, laminate flooring, or hardwood would all work well. It's quite a lot of floor-space; 27'x14' = 378 square feet. So, I also need something that's not too pricey. Ideally, I'd also like something that's creative, re-purposeful, or Do-It-Yourselfy. I posted about this on Facebook, and got the most ridiculous replies from people, especially "tile it with pennies!" Thanks Pinterest! (Sarcasm.) Pennies are the stupidest thing ever for flooring. I actually had to run the numbers just to provide how dumb it would be. Pennies are 3/4 of an inch each, so a grid of 16x16 makes a square foot. 256 pennies to the foot. $2.56 per square foot. That means it would cost me $1,000 in pennies to cover the floor - just for the actual cost of the pennies! (None of that includes the glue, clear-coat, or ridiculous amount of labor involved...) But people see some photos on the internet and think it's the most AMAZING thing EVER! (/END_RANT) Anyways, I did find that there's something called "utility grade" oak flooring. It's all the seconds from manufacturing oak flooring, and costs about a buck a square foot. It's dirt cheap, but would be a lot of labor to install. Also, all the boards are VERY short. It would be a great look, but I'm not sure about the labor. I love the idea that it's basically a "waste product" from the manufacturing of flooring. In general, I'm told that there's usually about 20% of the boards just won't be usable. That would bring cost up to $1.20 per foot, which is still super-cheap for a real oak floor! The other thing that I found was some cork flooring! I was looking at both cork and bamboo laminates and ended up finding 1/4" thick cork flooring on Craigslist. It's at a Habitat for Humanity "ReStore". This is glue-down. It's just cork itself, not a laminate, not snap-together. I looked up how to install cork, and it looks pretty straight-forward. It just uses water-based contact cement and sealer. Finding some photos of glue-down cork, the finished overall look is GREAT! The best part is that the cork is brand-new and only 25 cents per square foot! For $100 in materials (plus glue and sealant) I could do the whole garage loft! Unfortunately, I haven't seen the cork in person yet. The Craigslist ad only showed photos of the unopened crates of cork. It was advertised as a cream color, so it should be light and airy, and I could probably stain it if I wanted to. Today, I'm out running errands and doing some Craigslist purchases. At this point, I'm planning on buying the cork. It's so cheap, I could use it as underlayment for some other type of flooring if I changed my mind.
__________________
To view links or images in signatures your post count must be 0 or greater. You currently have 0 posts. To view links or images in signatures your post count must be 0 or greater. You currently have 0 posts. |
|
|
|
|
01-09-17, 10:50 AM
|
#78 |
|
Administrator

Join Date: Aug 2008
Location: Germantown, WI
Posts: 5,525
Thanks: 1,162
Thanked 374 Times in 305 Posts
|
Cork sounds cool! I contemplated it for my office, but it didn't fit the feel of the rest of the house. I really like how the bamboo looks that I have, but installing it was a huge pain. I would have much rather gone with a snap together bamboo solution vs what I had which was a nail down tongue and groove board.
__________________
Current project - To view links or images in signatures your post count must be 0 or greater. You currently have 0 posts. To view links or images in signatures your post count must be 0 or greater. You currently have 0 posts. & To view links or images in signatures your post count must be 0 or greater. You currently have 0 posts. |
|
|
|
|
01-10-17, 05:32 PM
|
#79 |
|
Home-Wrecker
Join Date: Sep 2008
Location: SE Wisconsin
Posts: 546
Thanks: 3
Thanked 165 Times in 96 Posts
|
I picked up the cork flooring this weekend.
When I saw it on Craigslist, it was just a photo of the case, no actual photo of the cork tile. I sent a message for more information, and was told it was 1/4" cork, and that it was at the West Bend, Wisconsin Habitat for Humanity ReStore - just come out during regular business hours to check it out. So, I headed out that way. At the store, there were some open crates of the cork tile. There were some of the smaller bundles out, which were for sale, but at a higher cost than the full cases. Turns out that the tile is 4mm, NOT 1/4 inch. 4mm is just a little thicker than 1/8". On the box, the color of the tile was marked as "cream". I bought 5 cases of 100 square feet. I've never worked with glue-down cork flooring, and don't know if it's exactly the right thing for the garage loft or not, BUT, I figure it was so cheap (25 cents per square foot) that I could always resell it or even just use it as underlayment for some other type of flooring. After getting home, and opening up one of the packages, I realized that there's TWO different sides to the tile. The "finished" side is sort of a cool cream color. It looks anywhere from cream to light gray, depending on the light it's under. That side is also smoother and harder. It feels like it has some sort of a finish on it. It feels about like vinyl tile does. The other side of the tile is just plain cork. I really like the color and feel of it. Which lead me to wonder... "Could I install this tile upside-down?" I purchased the smallest size containers of water-based contact cement and water-based polyurethane clear-coat that I could get, so that I could test glue-down some tiles. I had a piece of 1/2" plywood, about 2 foot by 4 foot as a cut-off from working on the garage. I laid it down, brushed it off, and got ready to lay down some test cork tile. I brushed contact cement on the backs of the tile and on the plywood and let them sit for an hour to fully dry. I even did two of the tiles "upside-down". Once they were dry, I stuck the cork tiles down onto the plywood. The contact cement is instant, so the trick is to do it right the first time! 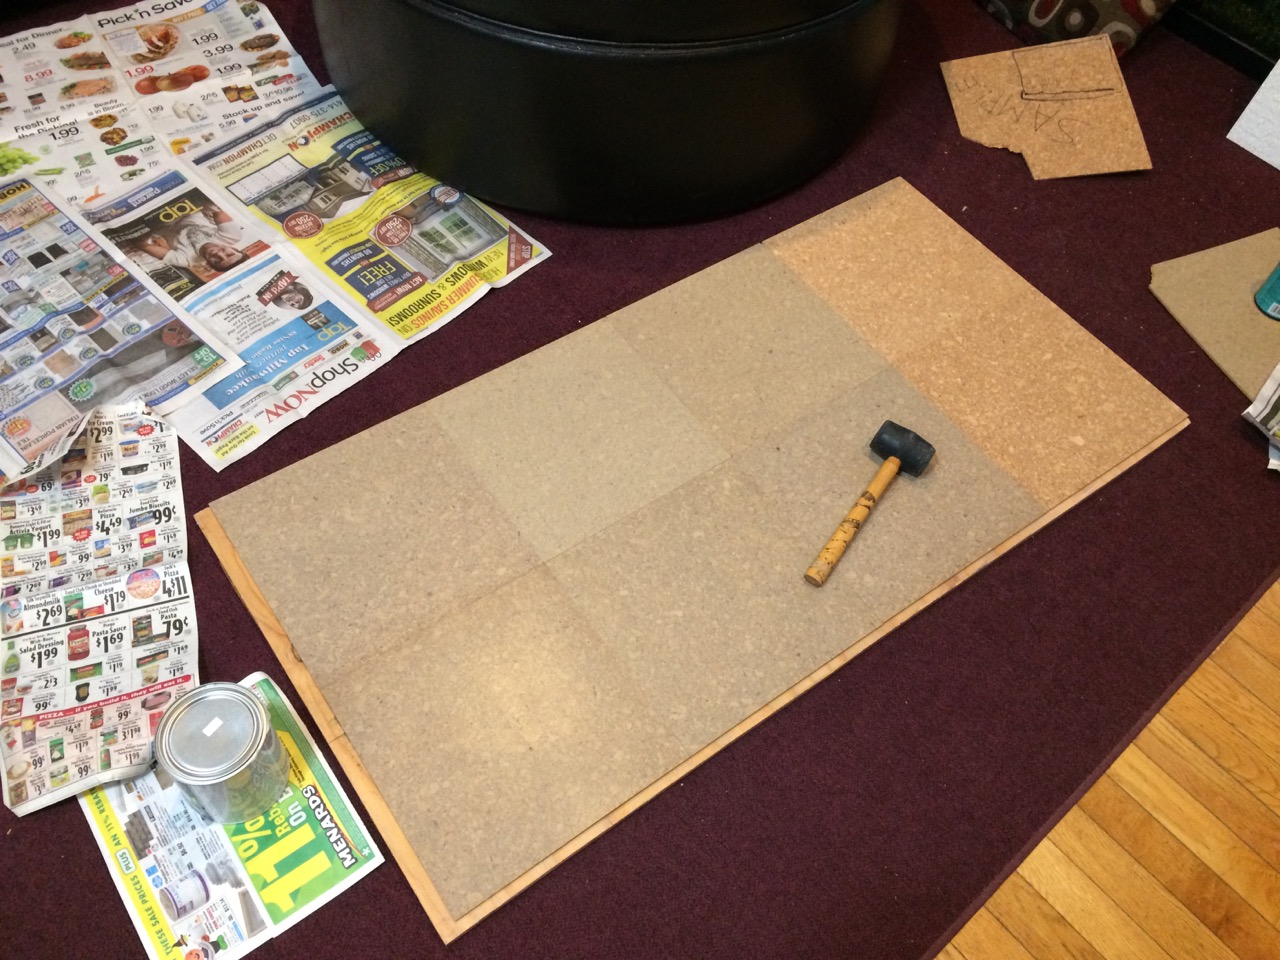 The directions for the contact cement say to apply a certain amount of pressure to the items being stuck together. Normally, this is done with a large heavy roller. I took a look at some YouTube installation videos and saw that just whacking it with a rubber mallet was pretty common for small installations. Next, I brushed on a layer of clear coat. I only did that on a little more than half the cork. I figured it would be interesting to see and compare the coated vs non-coated tiles. I intentionally took the photo with the glare of the lights reflecting in it so that you could see where the clear-coat was. This was a "semi-gloss" urethane. Where you see the glare of the lights is where the clear-coat is. 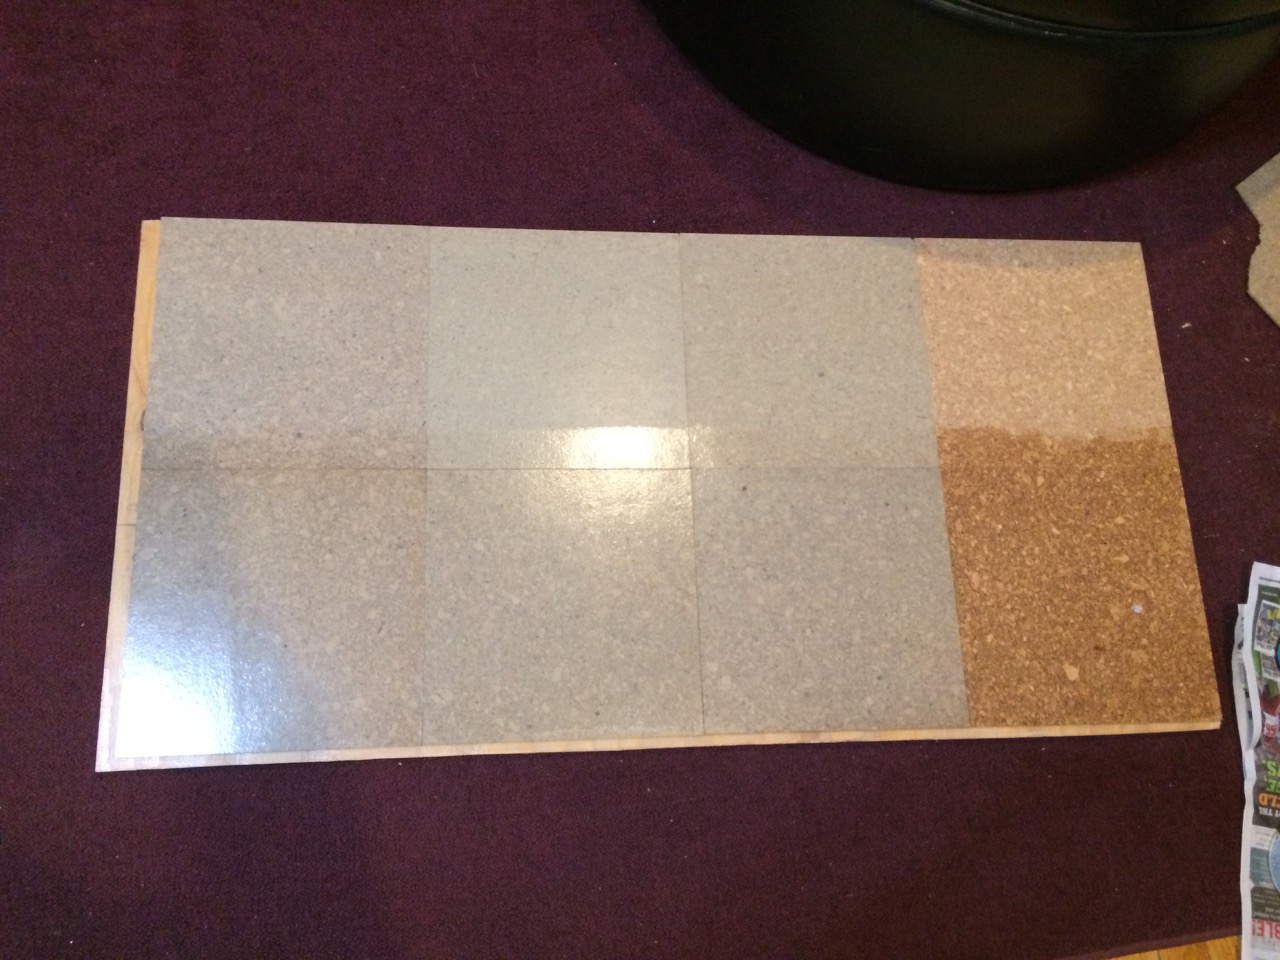 One thing that was really noticeable was the clear-coat on the raw cork backer. The tile in the bottom right really sucked up the urethane. It took longer to dry too. It took on a darker color, which I think looks nice, but it also became stiff and somewhat rough feeling - losing the "soft" and "warm" sense of the plain unfinished cork. Based on that, I don't think I would install these tiles raw side up. As another odd note. One of the tiles looks lighter than the rest. When looking through How-to videos about tiles and flooring in general, a rule of thumb that I heard more than once was to mix up all your materials. That way, if there is any difference in color, at least it's all spread out. Sort of the tile equivalent of mixing together all your buckets of colored paint to make sure it's consistent. I'm not sure if I love this color of cork or not, but the price was right. And as I said, I could even resell it or just use it as underlayment. It's actually WAY too early to think about flooring when I don't have roofing, electrical wiring, or insulation yet! I am also curious about using epoxy paint on the main concrete of the garage. It looks SO NICE! It is expensive though, and could be up to $400 worth of paint! I'm not sure how well it would hold up under my type of abuse. Still, I'd like the place to look nice. Let me know if anyone has experience with that garage epoxy paint, and what you think of it.
__________________
To view links or images in signatures your post count must be 0 or greater. You currently have 0 posts. To view links or images in signatures your post count must be 0 or greater. You currently have 0 posts. |
|
|
|
|
01-13-17, 02:14 PM
|
#80 |
|
Apprentice EcoRenovator
Join Date: Nov 2011
Location: NC
Posts: 117
Thanks: 6
Thanked 27 Times in 25 Posts
|
If you put on another layer of OSB that will really help with the bouncy feel of the floor.
Regarding of the Epoxy paint, it really depends on how you use the garage. If you will be doing welding in there it isn't a great choice. General mechanic work and wood work though it is a great solution, provided you do high quality prep work for it and use a high quality paint. The Folks over at Garagejournal.com can give you some great pointers. Outside of that you just need to be a bit careful on how you use it. For example don't drag heavy, sharp things across it, use some ply wood under your jack stands, etc... Generally Epoxy is fairly resistant to acids and chemicals in general, though I'm not finding anything about its resistance to common lithium battery chemistries, so if a spill of those were to happen it would be best to get it cleaned up quickly. |
|
|
|
 |
| Tags |
| diy, garage, heated slab, pex, solar |
|
|


 Linear Mode

