
|
 05-04-17, 08:51 AM
|
#131 |
|
Home-Wrecker
Join Date: Sep 2008
Location: SE Wisconsin
Posts: 546
Thanks: 3
Thanked 165 Times in 96 Posts
|
BIG UPDATE:
Boy have I been busy lately. I have a back-log of blogging, video, and photography to do. Just been really busy with work, and I'm taking a CNC Machining class on top of that. (Which is very interesting, but the homework takes more time than I thought it would!) INVERTERS: I ended up purchasing Enphase M215 inverters with MC4 connectors on them. While Renvu had the best overall price on inverters, they only had the ones with H4 connections. Supposedly, MC4 and H4 are completely interchangeable. HOWEVER, when I tested the two solar panels that I had purchased (for testing and experimenting before I shelled out the big bucks...) I was able to plug an H4 inverter to an MC4 Solar panel, but was NOT able to UNPLUG it! Seriously, in my garage, I have two solar panels with two micro-inverters (as far as I can tell) PERMANENTLY connected to them. I'm on the verge of getting out my bolt-cutters! OK, maybe not that bad... I may just mount them in the backyard as two additional panels, even though that's not ideal solar location. (Better some power than none.) So, I very intentionally made sure to order Inverters with MC4 connectors. I found an e-Bay seller who had two cases of the inverters I was looking for. Each is a case of 12, and I was looking for 24, so this guy had EXACTLY the make, model, and number of inverters I needed. I asked him a few questions, had him send me a few additional photos to make sure they WERE what I was looking for, and then made the purchase. 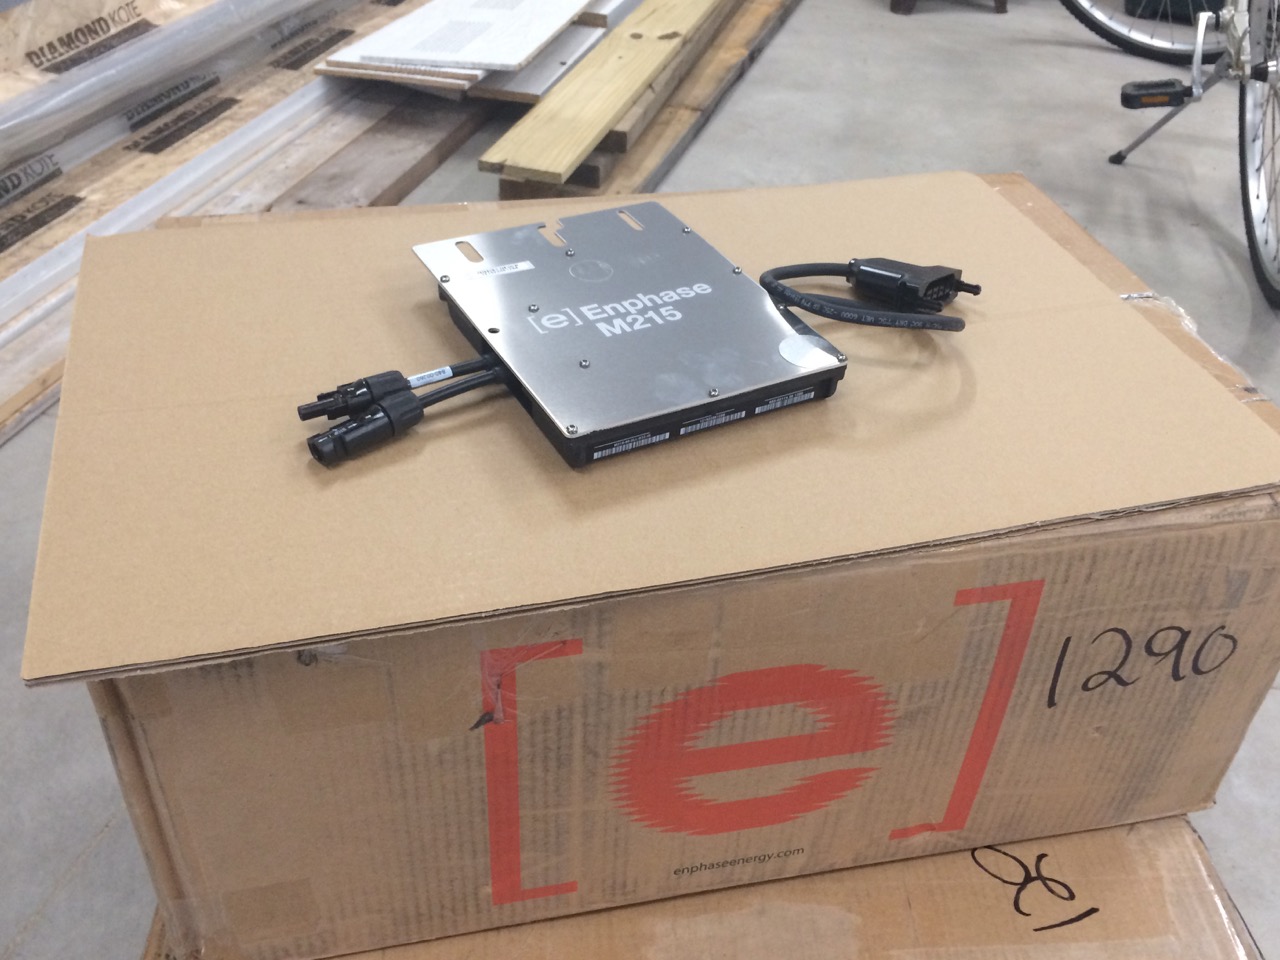 SOLAR PANELS: I was trying to find a time to go get the solar panels, and I was able to, somewhat last-minute this Sunday. I have a beater trailer (which I think was originally a pop-up camper frame) and measured out the spacing for the solar panels. Two stacks would fit on there fine. The wheels of the trailer actually come up through the frame. The trailer originally had 8" rims, and I upgraded them to 12" rims. I spaced up the wood decking so that the wheels couldn't hit the solar panels when the trailer was weighed down and hit a bump. My brother and I drove from Oconomowoc, Wisconsin to Wautoma, WI to go meet Phil Manke, an interesting guy who I met through the Midwest Renewable Energy Association Fair a few years ago. Phil has several stacks of Helios 260W panels. These are still brand-new, and even on the official listing of "approved" panels for my Utility rebate. These panels were manufactured about 30 miles from my house, and I even got to visit the factory when I got my 48V panel I used for the "Solar Swing Set". We stacked 24 of them on the trailer, lashed them down, and headed home. The trip home was uneventful (no solar panels flying off...) and we then just pushed the entire trailer into the garage, rather than unloading and stacking them, only to possibly have to move them again later. We aren't quite done with the garage construction yet. Siding is still the last big thing to get done, and chances are that I'm going to have a huge pile of siding in the garage some time soon! RACKING: I ordered the racking through a local electrical distributor. One advantage of that is that I didn't have to pay for freight, I just picked it up at their location, not too far away. The racking is 14' long, so I would have paid stupid expensive shipping otherwise. I now have a dozen total pieces. I'll splice two together to make a 28' long piece to span the total width of my garage. Then there will be an upper piece and lower piece for each of the three rows of solar panels. Last night, I got done with work early, which was great, but I had also been working since 5AM (after a night class) and was sort of falling on my face, BUT I had a little time AND my S-5! clamps had just shown up in the mail the day before, so I thought I'd try to start laying out my racking! I already sketched out placement of the clamps. Essentially, the clamps HAVE to be spaced every 4 feet, as the roofing has ribs every 16 inches, and no other pattern lays out correctly. (Although there's nothing preventing me from adding MORE clamps if I want to.) 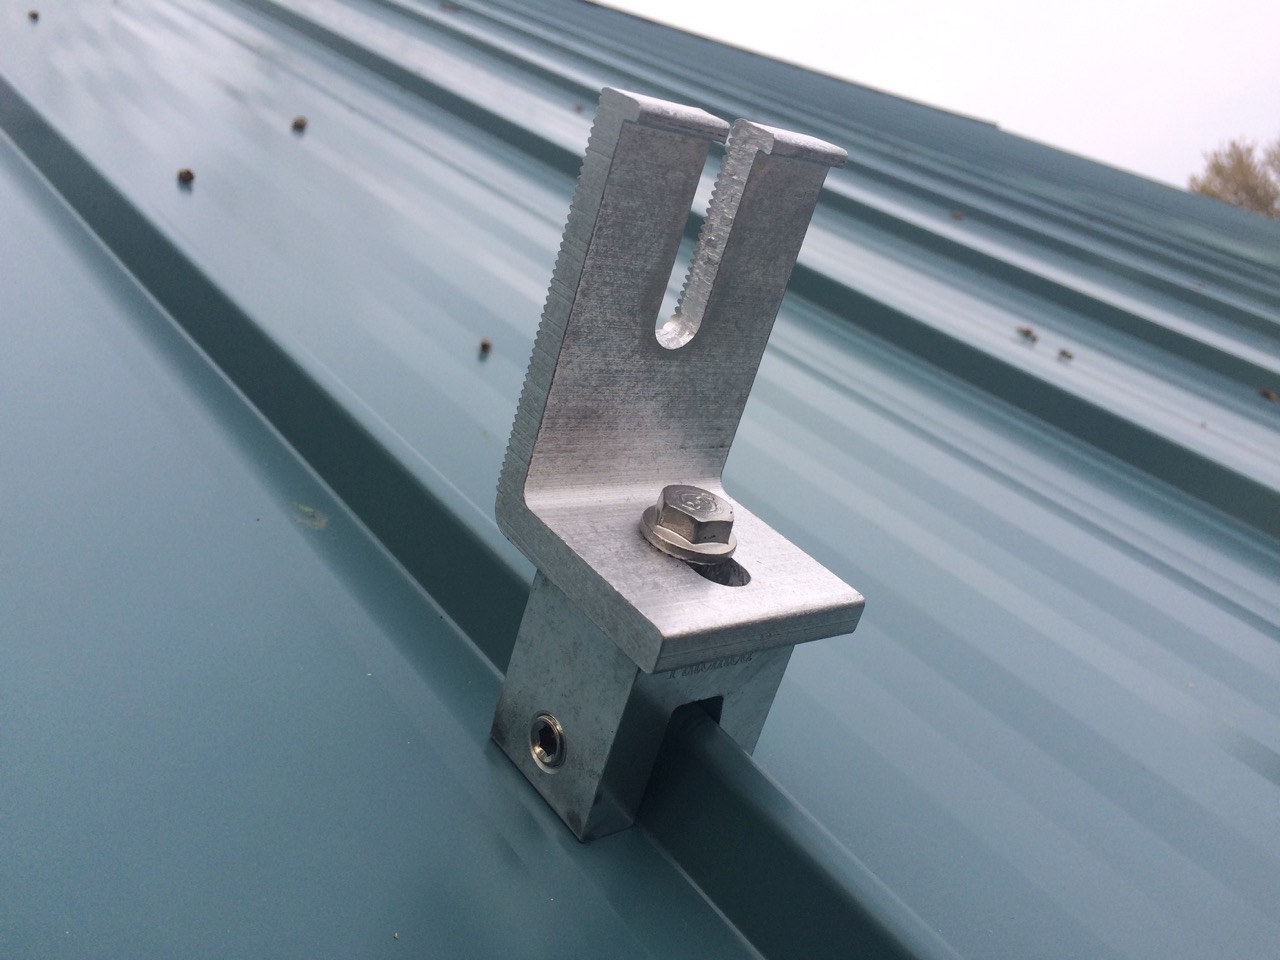 From the top of a step ladder, I installed the S-5! clamps, every 4 feet, and 24 inches from the bottom of the roof. This gives me 10" of spacing from the bottom of the roof, plus 14 inches in to the solar panel, locating the racking pretty close to the hole in the frame where the panel would be mounted using a different fastening system. This will be the lowest racking - the bottom rack of the lowest row of panels. Also, it should be a good hand-hold and "Don't let Ben slide off the roof" device.  The roof is a little steeper than I would like it to be for walking around on. Once the bottom rack is in place, I should at least be able to get up there and start to figure out what makes the most sense for safety and practicality of installing the rest of the racking and the panels. I was able to get up the first section of racking, all by myself, without falling off a ladder. I do NOT yet have all the fasteners torqued-down (the S-5! clamps are, those are solid) so that I can slide the rack left and right as needed, and make other adjustments. It looks to me that the racking might be a hair high in the middle. Right now, the racking just looks like a really bad snow-catcher! 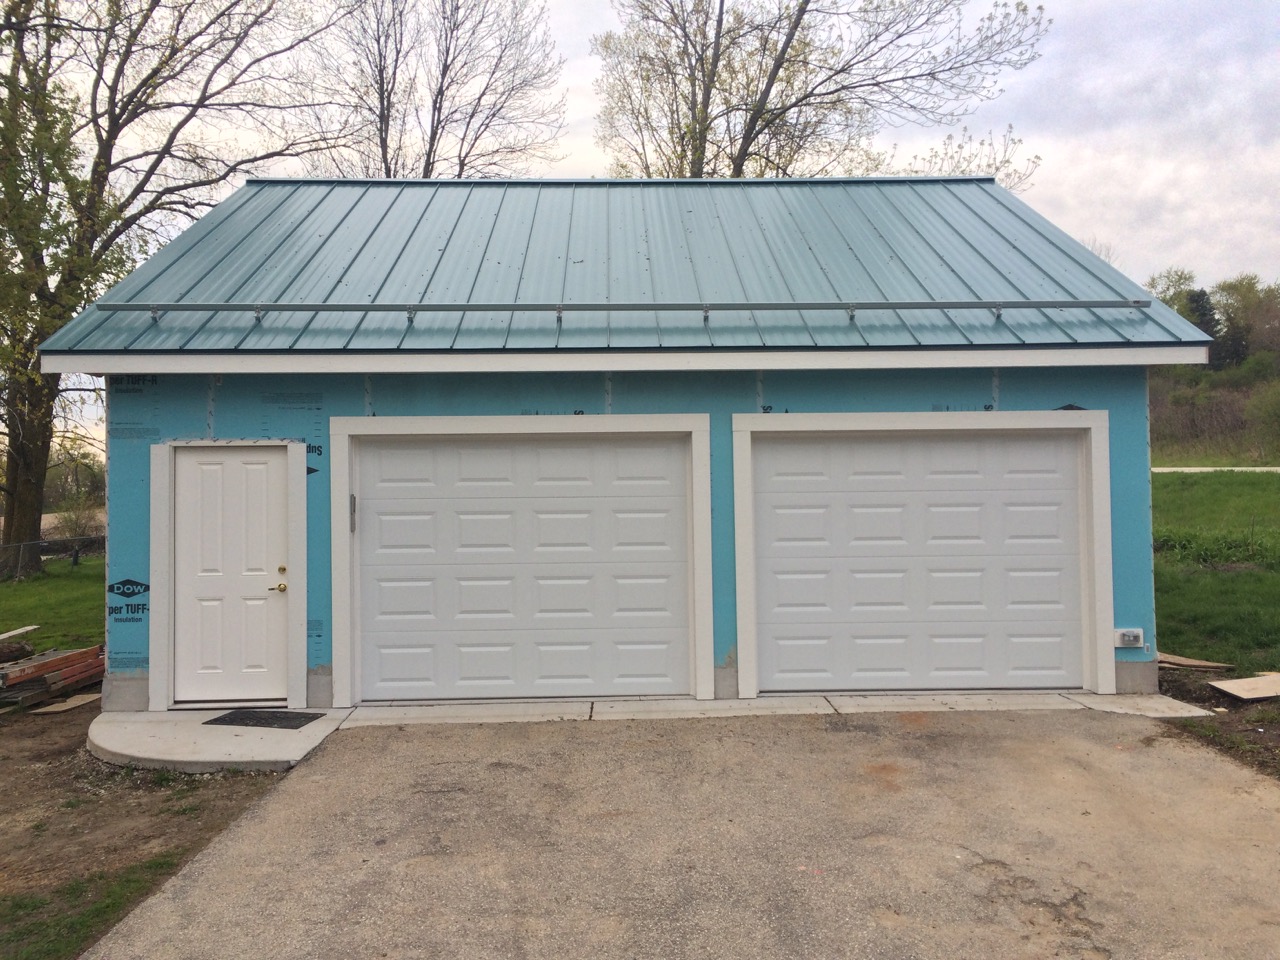 Whew! So that's it for now. I can't do any work this weekend on the project, as I'm off to a workshop style Wind Turbine Class on Friday through Sunday...
__________________
To view links or images in signatures your post count must be 0 or greater. You currently have 0 posts. To view links or images in signatures your post count must be 0 or greater. You currently have 0 posts. |

|

|
| The Following User Says Thank You to bennelson For This Useful Post: | Daox  (05-09-17) (05-09-17) |
|
05-04-17, 03:27 PM
|
#132 |
|
Super Moderator

Join Date: Jun 2013
Location: SC
Posts: 2,923
Thanks: 172
Thanked 564 Times in 463 Posts
|
Good progress. This was the point I wanted I wanted mine installed. All the money was spent but the benefits were not coming back.
Are you going to share the cost with us? It could help others thinking about installing solar. Cost keep coming down as least for now.
__________________
Current project Aquaponics system , Passive Solar Greenhouse build To view links or images in signatures your post count must be 0 or greater. You currently have 0 posts. Solar Install 12.5 Kwh- To view links or images in signatures your post count must be 0 or greater. You currently have 0 posts. Mini Split installs - To view links or images in signatures your post count must be 0 or greater. You currently have 0 posts. EV Chevy Volt - To view links or images in signatures your post count must be 0 or greater. You currently have 0 posts. |
|
|
|
|
05-04-17, 04:34 PM
|
#133 |
|
Home-Wrecker
Join Date: Sep 2008
Location: SE Wisconsin
Posts: 546
Thanks: 3
Thanked 165 Times in 96 Posts
|
Panels themselves were $150 each
Inverters were $95 Each Beyond that is racking, nuts and bolts, etc. etc. I''l have to add it all up sometime, but something in the ballpark of $8,000ish. Out of pocket costs after rebates and incentives is expected to be around $5,500. Faceplate value of panels is 6,240 watts. System power based on inverters is 5,160. So, somewhere in the neighborhood of $1 per watt installed, post rebates. There ARE ways to do it cheaper than this as well. If a person wants to do a REALLY cheap system, it IS totally possible.
__________________
To view links or images in signatures your post count must be 0 or greater. You currently have 0 posts. To view links or images in signatures your post count must be 0 or greater. You currently have 0 posts. |
|
|
|
| The Following 4 Users Say Thank You to bennelson For This Useful Post: |
|
05-08-17, 09:28 AM
|
#134 |
|
Home-Wrecker
Join Date: Sep 2008
Location: SE Wisconsin
Posts: 546
Thanks: 3
Thanked 165 Times in 96 Posts
|
I got two more pieces of racking up.
I was also able to borrow an auto-retractor fall protection device. I'll be using that for the rest of the install - the metal roof is FAR more slippery than an asphalt shingle roof. 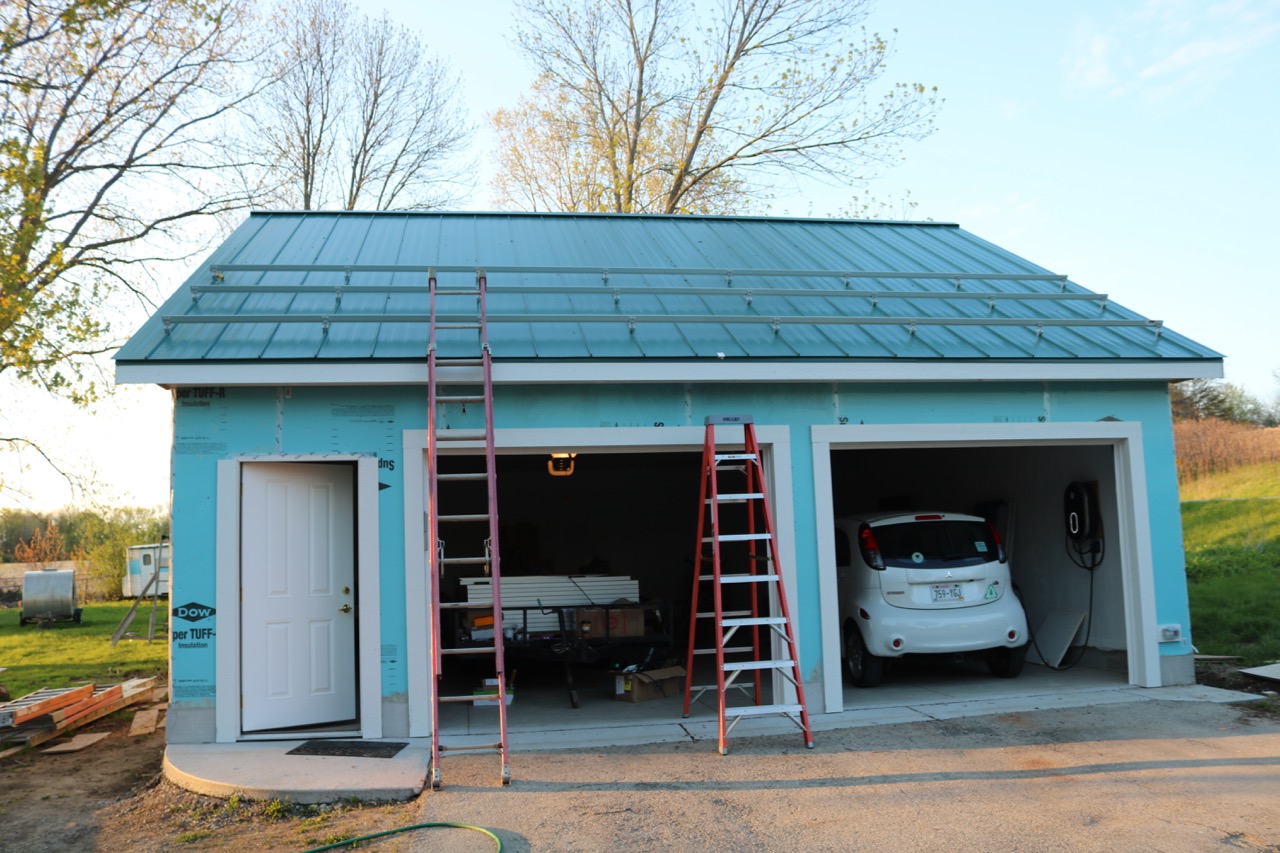 My little girl decided that she needed to test the fall protection.  Full blog post at 300MPG.org Solar Racking Begins!
__________________
To view links or images in signatures your post count must be 0 or greater. You currently have 0 posts. To view links or images in signatures your post count must be 0 or greater. You currently have 0 posts. |
|
|
|
| The Following 3 Users Say Thank You to bennelson For This Useful Post: |
|
05-23-17, 06:43 PM
|
#135 |
|
Home-Wrecker
Join Date: Sep 2008
Location: SE Wisconsin
Posts: 546
Thanks: 3
Thanked 165 Times in 96 Posts
|
I'm trying to figure out exactly how to do the junction boxes.
Those are one of the types of things that somehow seem to never get covered in instruction manuals or are otherwise skipped in How-To videos. A few people in this thread mentioned one way to do them. Here's a little video of how I'm thinking of doing it. Your input appreciated.
__________________
To view links or images in signatures your post count must be 0 or greater. You currently have 0 posts. To view links or images in signatures your post count must be 0 or greater. You currently have 0 posts. |
|
|
|
|
05-24-17, 07:48 AM
|
#136 |
|
Steve Hull
Join Date: Dec 2012
Location: hilly, tree covered Arcadia, OK USA
Posts: 826
Thanks: 241
Thanked 165 Times in 123 Posts
|
Ben,
I use the brass lug nuts to connect the wires togtether. I also put on anticorission paste before i put wires in. Then I wrap with 3-M tape and do 30-40 wraps. A big ball that I want to last 50 years. Then I use silicone paste (not the stuff that hardens) on the gasket to seal the top. Some put in a small weep hole (1/16 inch) on the bottom. Oh, I also use the silicone to seal with waterproof conduit inlets. Have not figured on the use of weep holes. If it is sealed up tight, then why the need? Maybe a 20 year type protection . . . . Looks great. A wonderful thread! Steve
__________________
consulting on geothermal heating/cooling & rational energy use since 1990 Last edited by stevehull; 05-24-17 at 12:50 PM.. |
|
|
|
| The Following User Says Thank You to stevehull For This Useful Post: | roflwaffle (05-26-17) |
|
05-24-17, 09:17 AM
|
#137 |
|
Super Moderator
Join Date: Jun 2013
Location: SC
Posts: 2,923
Thanks: 172
Thanked 564 Times in 463 Posts
|
If you want to use lugs Splicer/reducers this is the cheapest place I found.
https://lugsdirect.com/splicer-wire-lugs.htm Use NO-OX-ID Sanchem Inc NO-OX-ID A Special Rust Preventive 1oz Jar NIB tape up as Steve stated.
__________________
Current project Aquaponics system , Passive Solar Greenhouse build To view links or images in signatures your post count must be 0 or greater. You currently have 0 posts. Solar Install 12.5 Kwh- To view links or images in signatures your post count must be 0 or greater. You currently have 0 posts. Mini Split installs - To view links or images in signatures your post count must be 0 or greater. You currently have 0 posts. EV Chevy Volt - To view links or images in signatures your post count must be 0 or greater. You currently have 0 posts. |
|
|
|
| The Following 2 Users Say Thank You to pinballlooking For This Useful Post: | roflwaffle (05-26-17), stevehull (05-24-17) |
|
05-28-17, 08:17 PM
|
#138 |
|
Home-Wrecker
Join Date: Sep 2008
Location: SE Wisconsin
Posts: 546
Thanks: 3
Thanked 165 Times in 96 Posts
|
I worked on some electrical boxes today.
Electric Boxes for Solar Roof (Blog Post Link) I tried more or less following the suggestions of some of the folks in this thread. Also, at the end of this last week, I was able to attend some solar training sponsored by Iron Ridge and Enphase. That was PERFECT, as those were the two main products I am using for my project! I asked the Enphase guy about the bracket I've seen in the Enphase materials for mounting the junction box. His response was that they used to make those, but stopped, because everyone always just screwed junction boxes right to the racking. So, looks like that's what I'll be doing too. I need the electrician to come out and make sure that everything is to code and finish the final electrical. This will be an inspected system and required the master electrician's number on the electrical permit. So, of course the electrician will want to make sure it's done right, as do I. I'm also hoping to get the roofer out soon. He knows all about mounting things to the metal roofing and has a nice lift for us to use to get the panels to the roof. The roof is just too steep and slippery to simply walk around on carrying panels. I'm still not quite sure of the best way to get the conduit around the edge of the roof and have it look nice. I'm hoping the electrician can give me a hand with that. 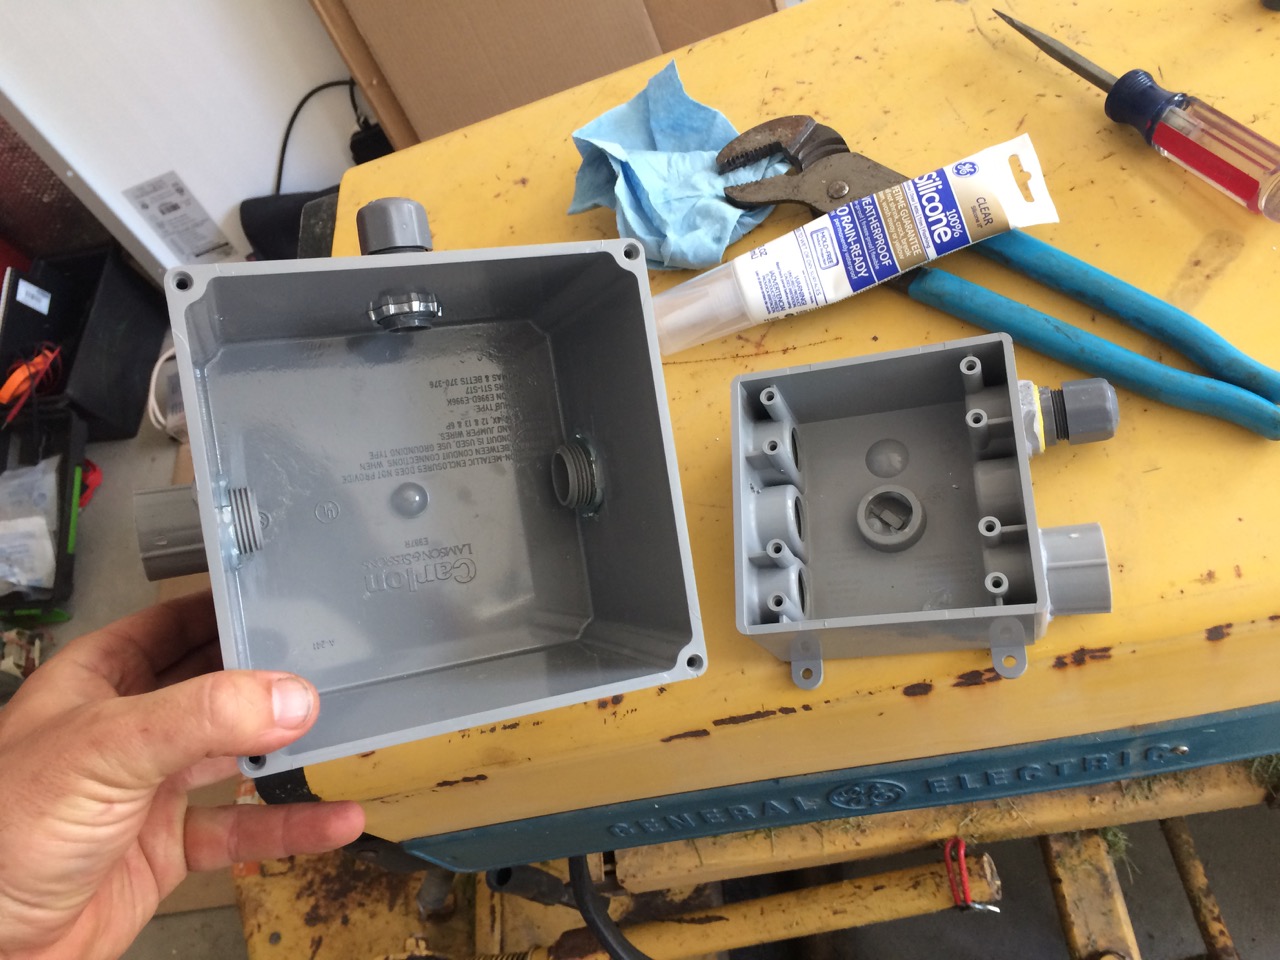 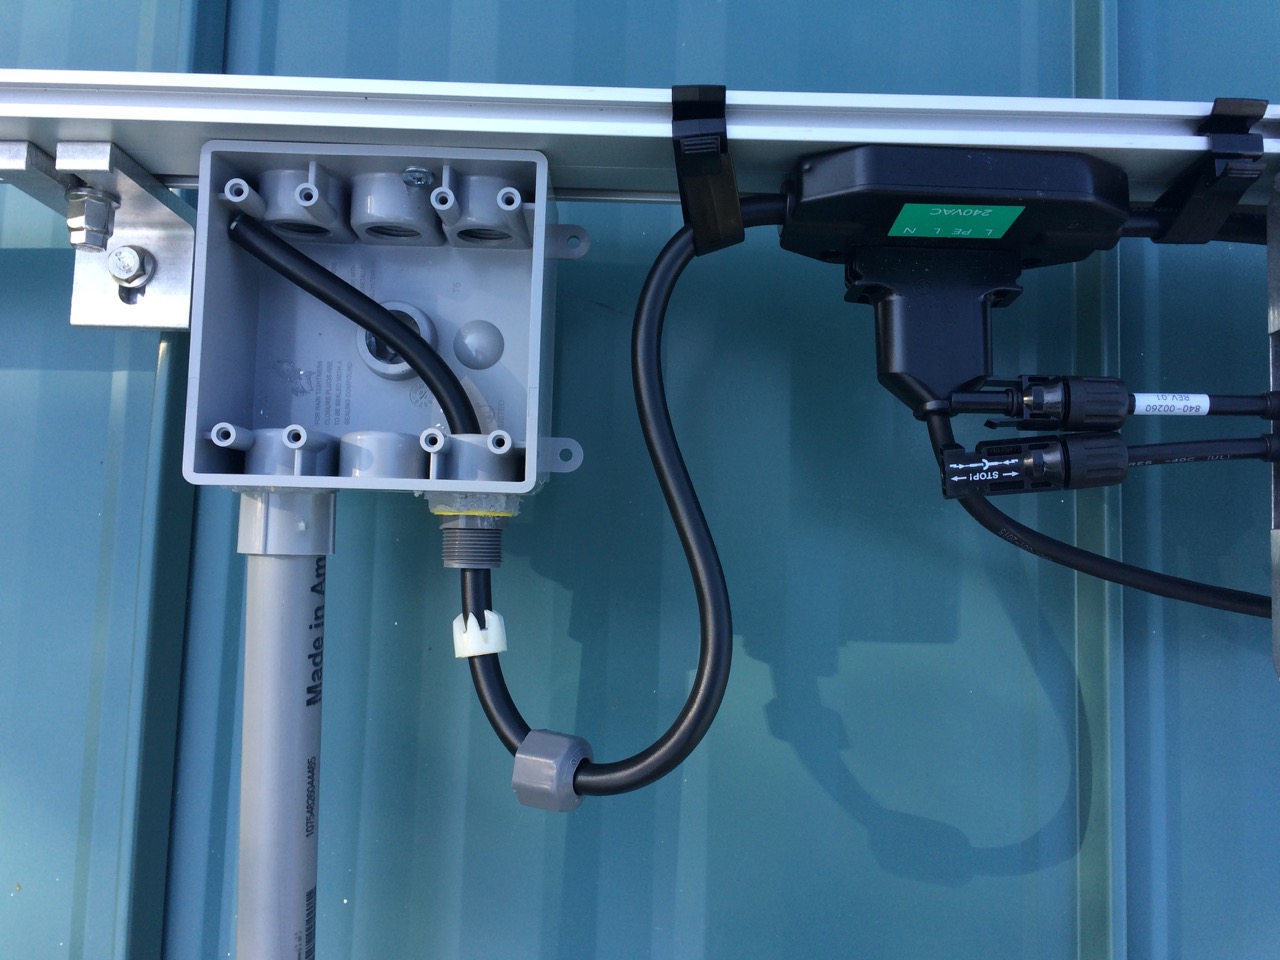
__________________
To view links or images in signatures your post count must be 0 or greater. You currently have 0 posts. To view links or images in signatures your post count must be 0 or greater. You currently have 0 posts. |
|
|
|
|
06-03-17, 09:00 PM
|
#139 |
|
Home-Wrecker
Join Date: Sep 2008
Location: SE Wisconsin
Posts: 546
Thanks: 3
Thanked 165 Times in 96 Posts
|
__________________
To view links or images in signatures your post count must be 0 or greater. You currently have 0 posts. To view links or images in signatures your post count must be 0 or greater. You currently have 0 posts. Last edited by bennelson; 06-04-17 at 09:04 AM.. Reason: added blog link. |
|
|
|
| The Following User Says Thank You to bennelson For This Useful Post: | celblazer (06-04-17) |
|
06-05-17, 04:42 PM
|
#140 |
|
Home-Wrecker
Join Date: Sep 2008
Location: SE Wisconsin
Posts: 546
Thanks: 3
Thanked 165 Times in 96 Posts
|
Solar is installed!
More to come... 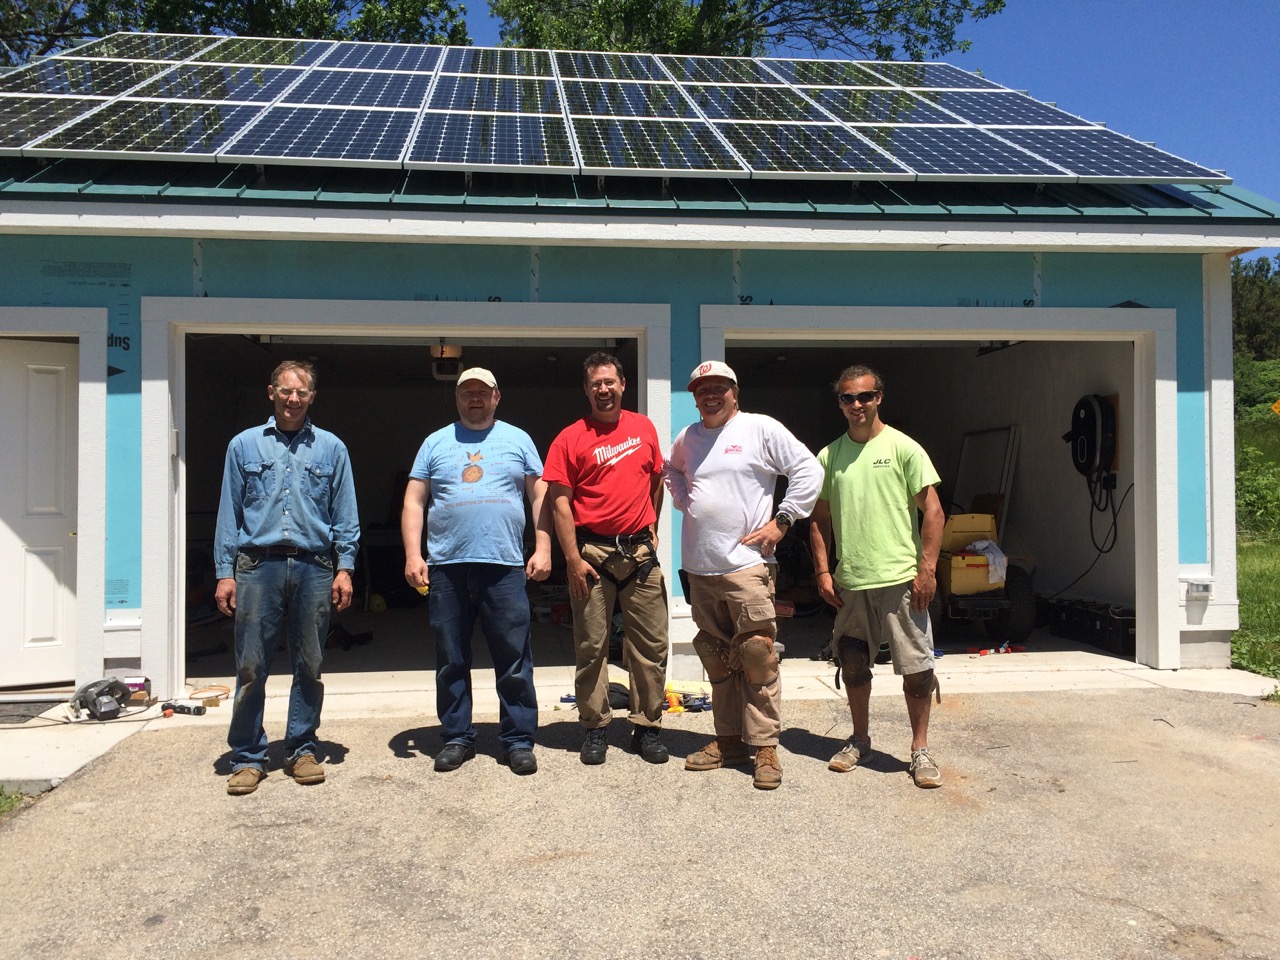
__________________
To view links or images in signatures your post count must be 0 or greater. You currently have 0 posts. To view links or images in signatures your post count must be 0 or greater. You currently have 0 posts. |
|
|
|
 |
| Tags |
| diy, garage, heated slab, pex, solar |
|
|


 Linear Mode

