
|
 10-20-09, 02:26 PM
|
#51 |
|
Lex Parsimoniae

Join Date: Feb 2009
Location: Woburn, MA
Posts: 4,918
Thanks: 114
Thanked 250 Times in 230 Posts
|
I see what you mean.. Well, it was a good try anyways.
The 800 number didn't work, since they don't have any stock right now and I think they use crescent wrenches anyways! ") Do you have any calipers? That service port cap might tell the tale if it's exactly 14 mm..  I know that I've used a mixed bag of metric and SAE for years, and many times going by 'fit' when I needed to. I'll bet if I ordered both Crowsfeet kits, I would have the right size and very likely could find one that was very close in the other kit. Meaning, I could use two flare wrenches on those upper connection. Maybe! I'll find some cheap stuff, since I'm getting too old to buy tools that are made to last more than 20 years..  Thanks, Rich |

|

|
|
10-20-09, 03:54 PM
|
#52 |
|
Supreme EcoRenovator

Join Date: Mar 2009
Location: Portland, OR
Posts: 4,004
Thanks: 303
Thanked 723 Times in 534 Posts
|
Here's the service cap measurement, done very carefully. Inches on top, mm on bottom.
Regards, -AC_Hacker %%%%%%%%%%%%%%%%%% |
|
|
|
|
10-20-09, 04:47 PM
|
#53 |
|
Lex Parsimoniae
Join Date: Feb 2009
Location: Woburn, MA
Posts: 4,918
Thanks: 114
Thanked 250 Times in 230 Posts
|
I could be wrong, but that looks like it's going to need a 17 mm wrench..
Thanks for taking the time to help out an old man.. Cheers, Rich |
|
|
|
|
10-23-09, 08:58 AM
|
#54 |
|
Lex Parsimoniae
Join Date: Feb 2009
Location: Woburn, MA
Posts: 4,918
Thanks: 114
Thanked 250 Times in 230 Posts
|
At long last! The Sanyo shipped yesterday and should be here on Monday!!
(243 pounds of it)! I'm going to try a micro Bell Jar test today. 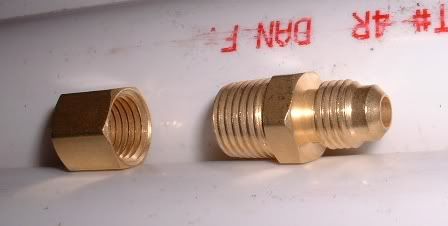 I plan to use these fittings to test the vacuum pump, by placing a drop of water inside the dead-end cap, vacuum it and see if the water turns into vapor (disappears). ~~~~ The 3 quarts of vac pump oil was just delivered! ~~~~ Added some oil to the vac pump and just did the test (twice). I could tell something was going on inside the micro bell jar, because the temperature quickly dropped. I shut off the valve on the pump, turned off the power and let the vacuum coast. After only 15-20 seconds, I could see the pressure coming back up on the compound gauge. I reapplied vacuum about 3 times (pump on for 30-40 seconds), between coasting. In the end, the was no temperature drop felt, and no drop in vac pressure. I shut down, opened the 'bell-jar' and it was bone dry! I think this Pump is working!! ~~~~ Edit: After looking at this, http://www.thermalengineeringcompany...appliances.pdf And reading the fine print.. Water boils at 70 degs when the pressure is down at a mere 20,000 Microns.. So, if I want to be sure that I'm in the target range of my vacuum pump (50 microns), I'm going to need to find a good vacuum meter. Last edited by Xringer; 10-23-09 at 04:19 PM.. Reason: test results |
|
|
|
|
10-23-09, 09:29 AM
|
#55 | |
|
Supreme EcoRenovator

Join Date: Oct 2008
Location: Austin, TX
Posts: 1,154
Thanks: 14
Thanked 257 Times in 241 Posts
|
Quote:
BTW, there is a special tool that can be used to replace valve cores without releasing the pressure. It is also very useful for pulling a vacuum faster.
__________________
To my surprise, shortly after Naomi Wu gave me a bit of fame for making good use of solar power, Allie Moore got really jealous of her... |
|
|
|
|
|
10-25-09, 06:57 PM
|
#56 |
|
Lex Parsimoniae
Join Date: Feb 2009
Location: Woburn, MA
Posts: 4,918
Thanks: 114
Thanked 250 Times in 230 Posts
|
Hello AC_Hacker,
When you picked up your Sanyo, did you lay the outdoor unit on it's side for transport? There's room inside my SUV for it to stand upright, but if it was to fall over!  It would be much easier to just lay it down in the cargo area of my ride. http://i46.photobucket.com/albums/f1...pe/medFord.jpg I should be picking up my 2 tons of Sanyo tomorrow afternoon. Thanks, Rich |
|
|
|
|
10-26-09, 11:34 AM
|
#57 | |
|
Supreme EcoRenovator
Join Date: Mar 2009
Location: Portland, OR
Posts: 4,004
Thanks: 303
Thanked 723 Times in 534 Posts
|
Quote:
I think (guessing here...) that it's advisable to let a couple of hours pass after the unit has been turned to the upright position, before you power it up. I have heard this before... I don't know if this is refrigeration folk lore, or if it is really specified practice. It seems reasonable to me, as I would think that it would allow time for the refrigerant and lubricant to settle into their proper places. For me, the unit was in the upright position for couple of weeks, due to other demands. Best Regards, -AC_Hacker %%%%%%%%%%%% |
|
|
|
|
|
10-26-09, 11:45 AM
|
#58 | |
|
Lex Parsimoniae
Join Date: Feb 2009
Location: Woburn, MA
Posts: 4,918
Thanks: 114
Thanked 250 Times in 230 Posts
|
Quote:
My permit should come in the mail this week sometimes, so I'm not looking to hookup the power for a while.  Besides, it's going to take a few days to get my new FieldPiece SVG2 vacuum gauge.. (US Postal Service - Priority Mail). My mission for today is to get it home without doing much damage to my old back.. Thanks for the info! Edit: I'm going to bring the camera, in cause of shipping damage, so I should have some pics to post this evening. Found a store 2 miles from my house that sells all sorts of HVAC stuff (no Micron vac gauges) and they have SlimDuct stuff in stock.. Airtec Products - Lineset Protection It really looks like nice stuff..  I wonder how well that setup drains with a sideways water hose? Last edited by Xringer; 10-26-09 at 02:14 PM.. Reason: notes: |
|
|
|
|
|
10-26-09, 07:03 PM
|
#59 | |
|
Supreme EcoRenovator
Join Date: Mar 2009
Location: Portland, OR
Posts: 4,004
Thanks: 303
Thanked 723 Times in 534 Posts
|
Quote:
BTW, here's a link to an Australian web site that rates various appliances. Apparently, what we call 'heat pumps' they call air conditioners. It looks like they use the term 'reverse cycle' air conditioner to specify what we call heat pumps. Energy Labelling - Energy Rating Home Page No, they don't have Sanyo in there. It might be marketed in Austrlia under a different name. I wasn't able to find out the name. Good luck with your set up. This discussion should be valuable to others who want to also DIY a mini split install. Regards, -AC_Hacker %%%%%%% |
|
|
|
|
|
10-26-09, 08:36 PM
|
#60 |
|
Lex Parsimoniae
Join Date: Feb 2009
Location: Woburn, MA
Posts: 4,918
Thanks: 114
Thanked 250 Times in 230 Posts
|
I think they must be using the 9,000 BTU pics on their website, because this thing is BIG!
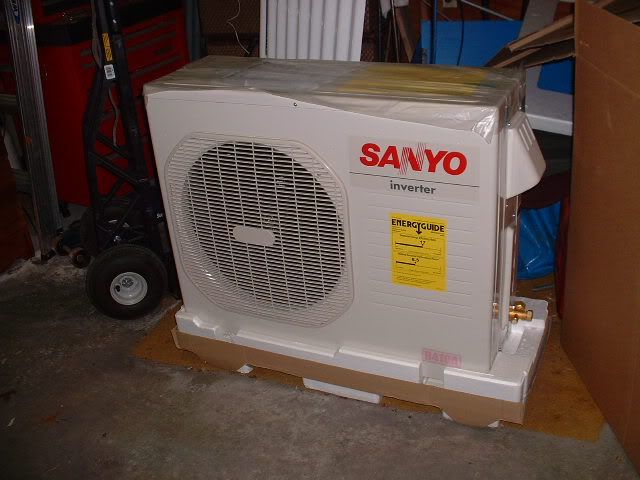 It takes two men and a boy to move this thing! 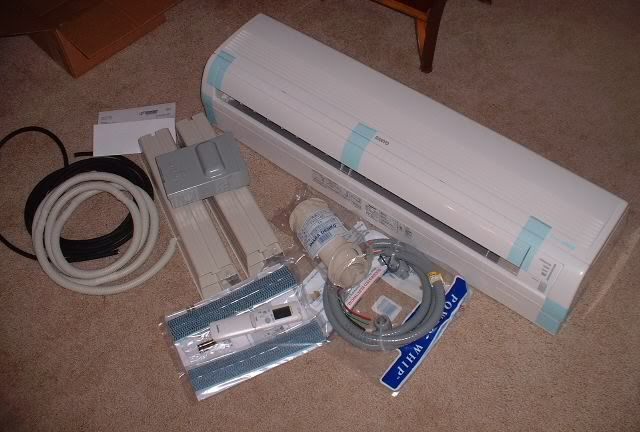 My wife thinks the indoor unit is way too big..  The kit looks pretty good.. The drain hose adapter seems odd. Found it taped inside. 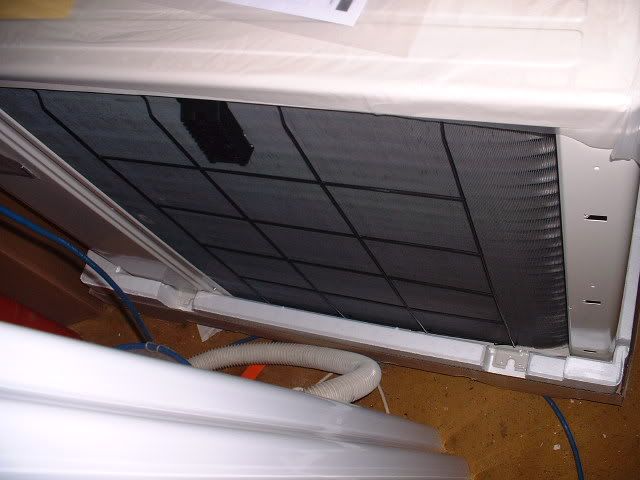 Why isn't there a mesh screen back here to keep the leaves off the coil?? I'm so glad that I didn't buy any wrenches for this thing! The smaller nuts are in the 12 mm range and the larger ones are 17 to 28 mm.. This is starting to look like a crescent wrench job.. Luckily, I have a kit of the larger sized metric crescent wrenches.. |
|
|
|
 |
| Tags |
| air conditioner, diy, heat pump |
|
|


 Linear Mode

