
|
 01-05-12, 03:12 PM
|
#11 | |
|
Apprentice EcoRenovator
Join Date: Mar 2011
Location: SE Wisconin
Posts: 107
Thanks: 3
Thanked 11 Times in 9 Posts
|
Quote:
I expected more output too, and I'm sure it was more because going off the 1* I lost during each 10 minute defrost I'll assume I had the 1* loss every ten min through the whole test which means I put in an additional 1200 btu's over the course of the test. That addition ups my output to 3900 btu/hr, giving me a new COP of 1.43. Which still isn't great but it's better than the other number. Today's project is to get the cracked pipe on the hottub repaired and fill it so I can hopefully begin heating today.  Adam |
|

|

|
|
01-05-12, 03:26 PM
|
#12 | ||||||
|
Apprentice EcoRenovator
Join Date: Mar 2011
Location: SE Wisconin
Posts: 107
Thanks: 3
Thanked 11 Times in 9 Posts
|
Quote:
Quote:
Quote:
Quote:
Quote:
Quote:
Adam |
||||||
|
|
|
|
01-07-12, 03:24 AM
|
#13 |
|
Apprentice EcoRenovator
Join Date: Mar 2011
Location: SE Wisconin
Posts: 107
Thanks: 3
Thanked 11 Times in 9 Posts
|
Today was a successful day! The HP is now installed and operational, and the best part of it is, it actually works.
Yesterday I built a bracket for the coil to hang from, prepped the hottub for filling, and put the unit in place. All that left for today was final checks and the fill. Aside from one loose hose clamp which was easily fixed, I have no leaks! This project has gone way too well for one of my creations, I hope nothing blows up on me. 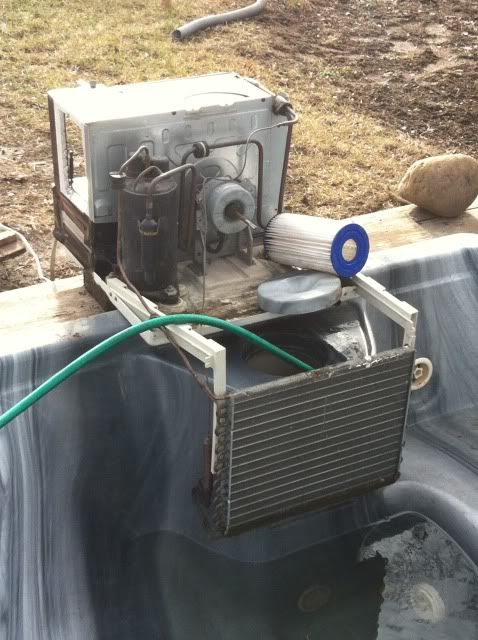 View of the inside while filling. That hole where the hose is going in is where the filter sits and is the main intake for the pump to draw water from. When it runs most of the water is drawn through the coil on its way in. The brackets holding the coil are actually the plastic frame parts from the things that slide to fill the extra space in a window, jsut with one side cut off so they're L's. They seem surprisingly sturdy, only time will tell how well it hold up. 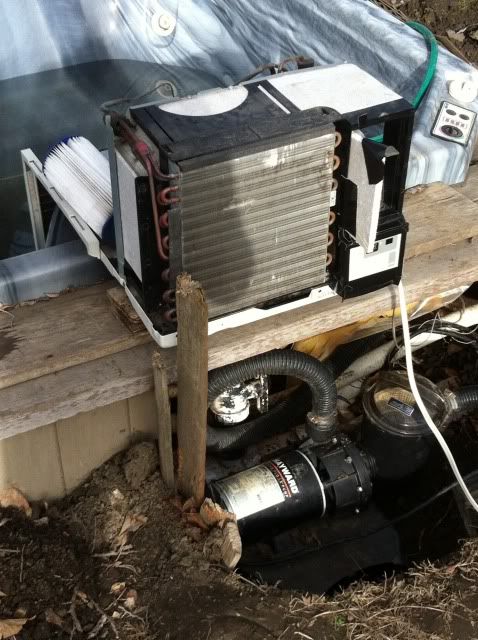 View from the outside showing the evap and the pump, which I placed directly below the unit on purpose for ease of getting it's eat to the HP. 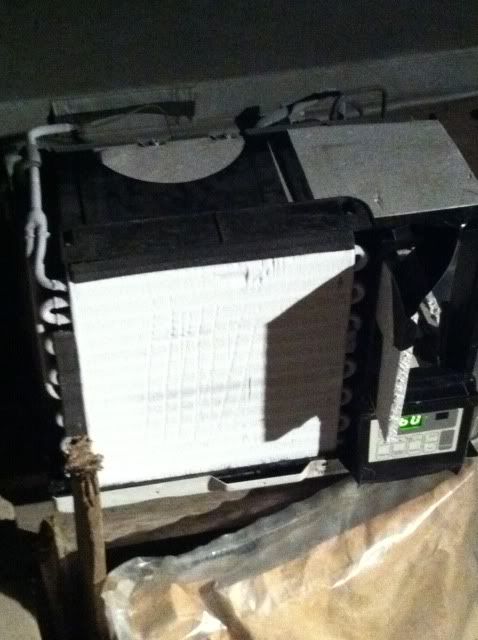 Frost was a definite issue today, as you can see, luckily it was 50* during the day(perfect day to do this) and only dropped down to about 42* when I took that pic at around 11:30pm after a half hour of running. Unfortunately the humidity was 66%, not good for ASHP's. On the upside, I've learned that as long as it's above freezing, simply turning off the compressor and leaving the fan on for about 10 minutes clears all the frost right up. You'll also note that piece of insulation in the bottom of the pic with the space, that's what creates the "chimney" for the heat from the pump to be delivered to the HP. Notes from today... 1. I need to figure out a better way to control the unit. To start it I have to dip the thermistor in warm water at first, then after a few min when the comp discharge line is warm I can keep it against that and it'll stay running. I don't want to have to deal with this anymore. Can I simply cut the wire and connect the ends together or will this kill my digital controls? 2.Defrost, this is clearly a problem that's not going away and since I dont have the dehumidifier control anymore I need to figure out a way to approach this. My simple idea is to run a timer to a small resistor which I'd wrap in against the thermistor. I'd set the timer to keep the resistor warm and depending on conditions, have it click off for 15 min allowing time for defrost. I don't know much about how to go about setting that up though so I'm not sure how well that'd work. My other thought was to see if I can readjust the mechanical temp control from my other a/c to a lower temp and attach it to the line going from the evap back to compressor. This is the place that our self defrosting fridge and dehumidifier both had their sensors, and I noticed this line only gets frosted once the whole coil is frosted over. further testing is needed to see if this is possible. If so I'd set it up just like the other A/C where it just switched the compressor deirectly. 3. I'm not sure how much heat I was producing today due to not having enough time to get a good hour long test in and log some data, but my hottub is approx 350 gal and takes just under 3000 BTU to raise one degree. My goal is to achieve at least 2* an hour rise in moderate, 40* temps, giving me 6000 btu/hr output from n 8000btu/hr rated a/c. Does this seem reasonable or should I be able to get more? given 70* water and 30-40* ambient. Adam |
|
|
|
|
01-07-12, 03:26 AM
|
#14 |
|
Apprentice EcoRenovator
Join Date: Mar 2011
Location: SE Wisconin
Posts: 107
Thanks: 3
Thanked 11 Times in 9 Posts
|
Forgot to add, so far I only have $30 invested in this project, $20 for the A/c, and $10 for some fittings I needed for plumbing. I think I'm doing pretty well so far!
Adam |
|
|
|
|
01-07-12, 08:36 AM
|
#15 | ||
|
Supreme EcoRenovator

Join Date: Mar 2009
Location: Portland, OR
Posts: 4,004
Thanks: 303
Thanked 723 Times in 534 Posts
|
You really don't want to mess around with the A/C when you are in the hot tub. That would be a really pathetic way to die... the headlines would be very embarrassing, especially if your friends were also in the tub with you. I certainly wouldn't want it on my conscience.
Quote:
I don't know if you are into electronics, but if you could get the actual schematic of the controller board, you might be able to re-purpose it. Your controller board still thinks that it's job is to make things cool. Thermistors can have a positive or a negative temperature coefficient, I don't know which yours is. If you could understand the circuit, and get a thermistor with the opposite temperature curve, it could make your controller act like your A/C was a heater, which it actually is now. Another, simpler approach is to get an ohm meter, and see what the resistance is of your thermistor at say, 80F and find a potentiometer that would be close to that value at half-turn. then you could dial the 'pot' so your unit stays on. Quote:
If you dug a 40 foot trench about 6 to 8 feet deep and buried about 200 feet of plastic pipe arranged like a slinky and circulated water, that would really help, or dug a borehole about 100 feet deep and circulated water, or if there was a pond or flowing stream really close and you could throw the evaporator HX into that pond, that would help a lot, too. Lacking these measures, having something that would periodically turn the A/C off for a period of time so the frost melts, and then back on might help. -AC_Hacker
__________________
I'm not an HVAC technician. In fact, I'm barely even a hacker... |
||
|
|
|
|
01-08-12, 01:27 AM
|
#16 | ||||
|
Apprentice EcoRenovator
Join Date: Mar 2011
Location: SE Wisconin
Posts: 107
Thanks: 3
Thanked 11 Times in 9 Posts
|
Quote:
Quote:
Quote:
Quote:
For now, I'll just have to come up with a way to turn the unit on and off to allow for defrost. Adam |
||||
|
|
|
|
01-08-12, 02:51 AM
|
#17 |
|
Apprentice EcoRenovator
Join Date: Mar 2011
Location: SE Wisconin
Posts: 107
Thanks: 3
Thanked 11 Times in 9 Posts
|
One other thing, how do I handle defrosting in below freezing weather? Real heatpumps have reversing valves. I don't have that luxury.
Adam |
|
|
|
|
01-08-12, 09:29 AM
|
#18 | |||
|
Supreme EcoRenovator
Join Date: Mar 2009
Location: Portland, OR
Posts: 4,004
Thanks: 303
Thanked 723 Times in 534 Posts
|
Quote:
 Here are some HXs I got for cheap. If you get soft copper tube for inside & outside, straighten them out, insert the smaller inside the larger, then coil them up together... then get some copper Tees and braze the ends on... it's not so hard to do. I was lucky in that I found these HXs for cheaper than the copper to build them. You might also haunt ebay for brazed plate HXs. Good chance that you can find a complete unit for less than you'd spend on copper to DIY. Look for brazable connectors (AKA: sweat connectors) on the refrigerant side, NPT or barb on the water side. Quote:
But a properly sized bore hole will out perform a trench by virtue of it's depth... and more constant temperatures at greater depth. Quote:
I had a very small de-humidifier, and I noticed that it would just stop the compressor, and that apparently the refrigerant would just drain down into the evaporator coil, and that would cause the frost to melt pretty quickly... then the compressor would start again, etc. Worked pretty well. When you get setup with tools, you'll probably start collecting various vapor-compression machines, and you'll have available parts. Like for instance, I have a 1 Ton portable ASHP with a reversing valve for the purpose of changing from heating to cooling. I also have a 65 pint/day de-humidifier with a reversing valve for the purpose of frost removal. It's pretty amazing actually, that it is so easy and cheap to acquire this kind of hardware for experimenting. If you had asked me 5 years ago, what I thought was the chance that I would become an HVAC hobbyist? I would have thought you were out of your mind. Now I am one. -AC_Hacker
__________________
I'm not an HVAC technician. In fact, I'm barely even a hacker... |
|||
|
|
|
|
01-08-12, 11:08 PM
|
#19 | ||
|
Apprentice EcoRenovator
Join Date: Mar 2011
Location: SE Wisconin
Posts: 107
Thanks: 3
Thanked 11 Times in 9 Posts
|
So after running for 5.5 hours which was probably closer to 4.5 - 5 hours when defrost time is subtracted in, I calculated an Average COP of 2.6 to 3.1 which I'm not exactly sure of because I'm not exactly sure if my heat loss over the time period was 4* or 6*. How does that COP sound with an avg 42* outdoor temp?
Quote:
Since I’ll have the circuit open, I’m improving my evaporator coil too. I’m just going to use what I’ll have, so my choices are 8000 btu evap coil, 8000 btu condensing coil, 5000 btu evap coil, and a 5000 btu condensing coil. I’d Like to only use two coils because the way the pipes are set up I could use two coils easily(the evap right now has 2 circuits). I’m thinking the 5000 and 8000 btu condensing coils because they’re both thinner, allowing air to flow easier and size wise, they’re just larger. Quote:
Adam Last edited by launboy; 01-08-12 at 11:13 PM.. Reason: Forgot link |
||
|
|
|
|
01-08-12, 11:11 PM
|
#20 |
|
Apprentice EcoRenovator
Join Date: Mar 2011
Location: SE Wisconin
Posts: 107
Thanks: 3
Thanked 11 Times in 9 Posts
|
Maybe I'll be lucky enough to acquire a reversing valve, it seems like those complicate the system quite a bit though. How does that work with the cap tube?
Adam |
|
|
|
 |
| Thread Tools | |
| Display Modes | |
|
|


 Linear Mode

