
|
 11-23-15, 09:41 PM
|
#1 |
|
Supreme EcoRenovator
Join Date: Jan 2010
Location: elizabethtown, ky, USA
Posts: 2,428
Thanks: 431
Thanked 619 Times in 517 Posts
 |
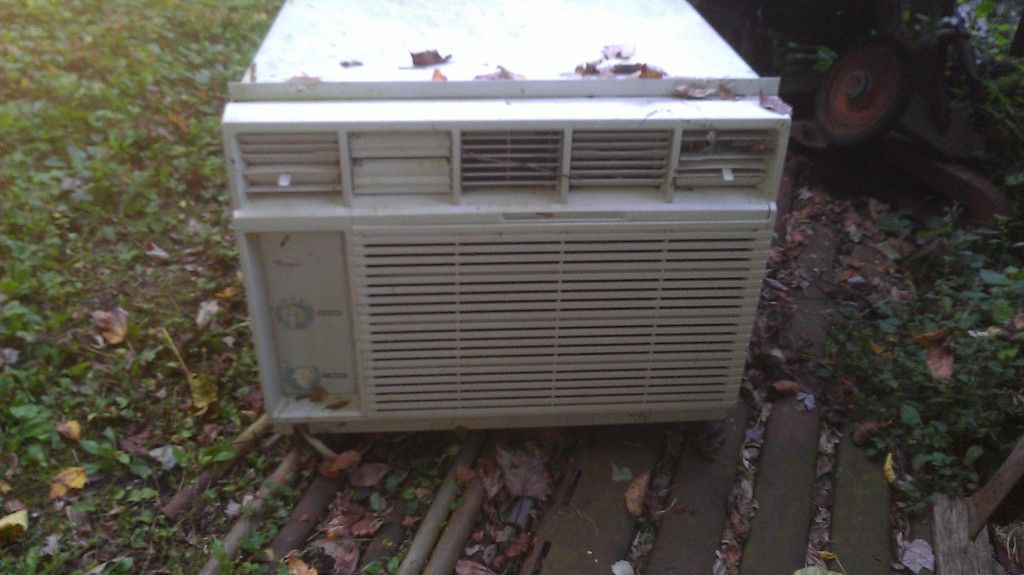
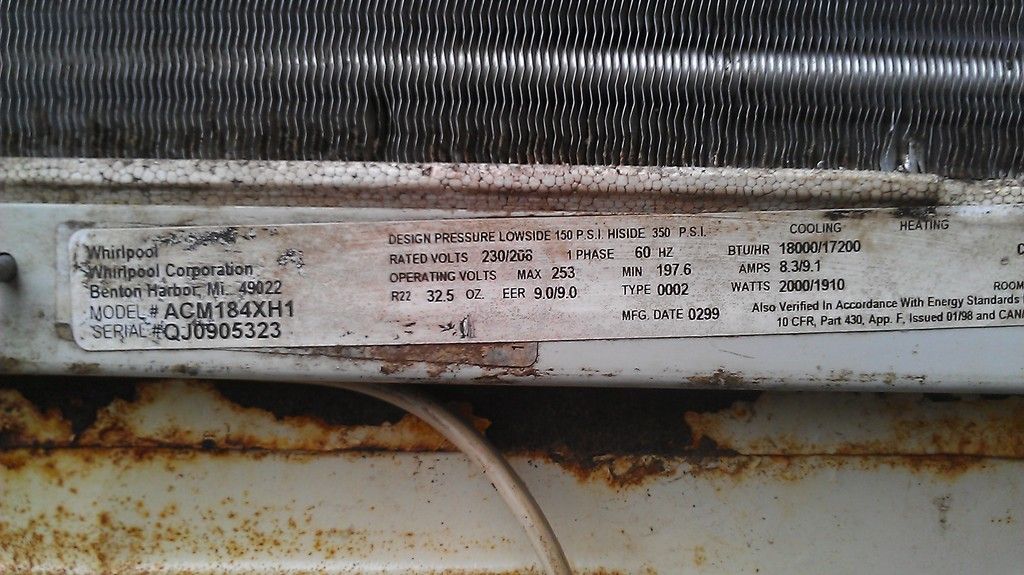
OK, so I was at my buddy's house figuring out how to insulate his garage, and his neighbor needed help patching his leaking porch roof. While surveying the job site, I happened upon this stray unit in his scrap pile:
 It is a Whirlpool 240 volt model rated at 18000 BTU. Looking into the unit, the compressor only says 15000 btu on its nameplate, so I'm only rating this one at 15k for this discussion. Long story short, neighbor guy gave me the unit as partial payment for helping him with his roof. It don't leak no more. Having run my previous window shaker concoction to death, I now have lots of parts I can rob from it if I need them. I brought it over to dude's house and did some work to it while doing his insulating with him. I gutted the control system and the reversing valve from it. The refrigeration loop was whole in the old unit when I retired it, the main failure was the fan motor mount. One of the outdoor fan blades had cracked due to a collision with some ice during defrost; after I fixed the blade it was a little off balance. It ran for a long time before the motor mount got loose. At the end of the winter, it got a new home sitting doing nothing in the barn. I tried using the itty-bitty berns-o-matic torches on the new subject, but gave up after going through two bottles of oxygen.  I basically got a few lines separated from the donor unit and the patient. Not wanting to waste money on gas, I gave up on this toy set. I went next door and borrowed neighbor's oxyacetylene bottles and vintage oxweld torch. Looks just like this victor:  If you are doing more than just a tiny amount of gas brazing or welding, don't bother with a propane blowtorch or the toy set above. Just buy, rent, borrow, or beg a real torch off someone somewhere. I finished the whole rest of the surgery on the patient unit in less time with the real torch than it took me to halfway take apart stuff with the toy one. I learned my lesson this time, the toy set will be used for soldering jewelry and such from now on. Here are pics of what I've done so far: 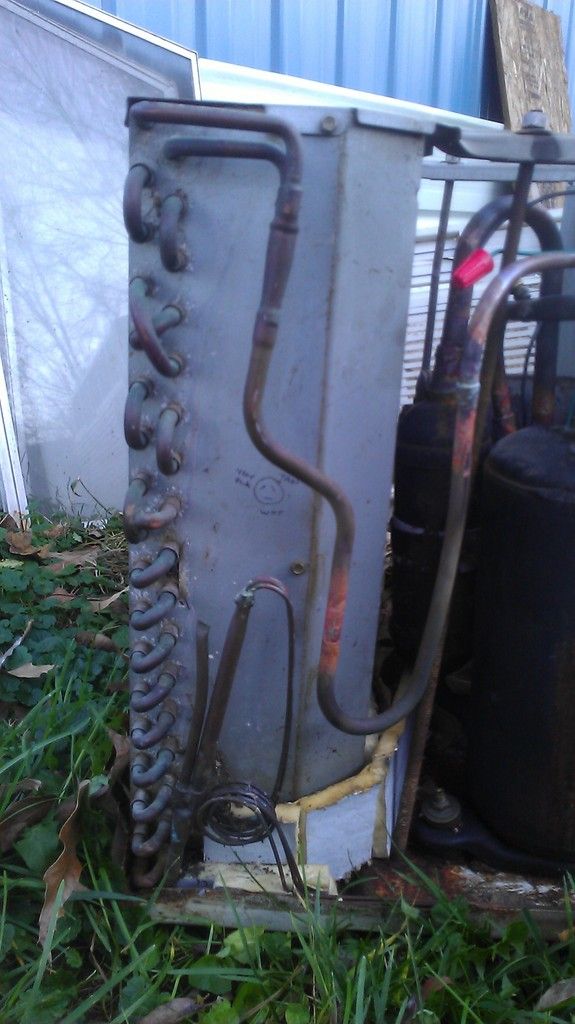 The original compressor discharge line was tapped into with a bullet piercing valve to drain the factory charge of R-22. The shiny spot down low is where I closed up the pierced hole. This line was rerouted to a reversing valve gleaned from the retired unit. The shroud for the outdoor HX (and some of the drain pan) was rusted through, so I stuck some scraps of R-max board in along the bottom to minimize air leaks that would serve to bypass the HX and reduce efficiency. Last edited by jeff5may; 02-17-18 at 07:56 AM.. |

|

|
| The Following User Says Thank You to jeff5may For This Useful Post: | b420ady (11-14-16) |
|
11-23-15, 10:54 PM
|
#2 |
|
Supreme EcoRenovator
Join Date: Jan 2010
Location: elizabethtown, ky, USA
Posts: 2,428
Thanks: 431
Thanked 619 Times in 517 Posts
|
A top view of the compressor and plumbing:
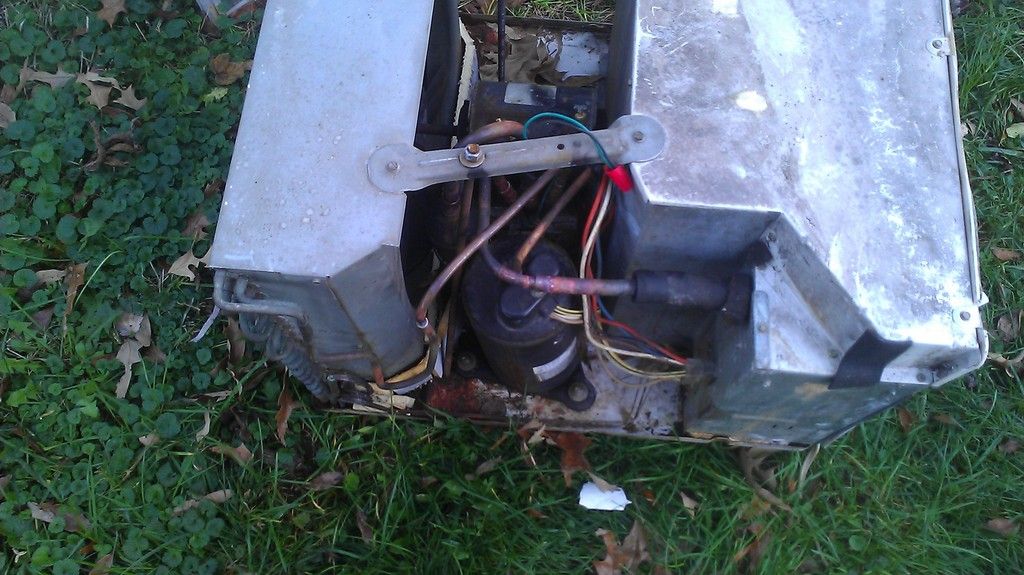 the suction line had another u-bend in it, which I chopped out to use elsewhere. Now the reversing valve is the u-bend. 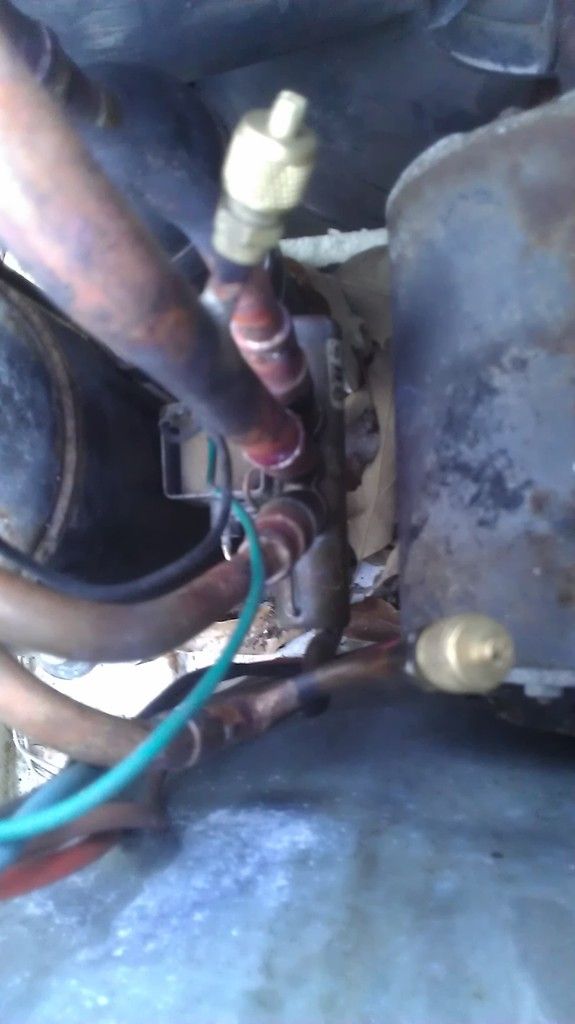 I crammed the reversing valve in between the compressor and fan motor. The original rig was not insulated one bit, anywhere on the outdoor side. I haven't decided whether or not I will insulate any of this plumbing yet. The reversing valve is a Ranco V3, 2 ton size. It is plumbed for heating mode when inactive. The solenoid coil is not connected to anything yet. Since the unit held a charge before I got ahold of it, I was not overly concerned with contamination. I pulled a weak vacuum on the thing while reclaiming and filled it to atmosphere with propane. I chopped it open, fitted all the piping, then took the cores out of the service valves. I cracked open the propane bottle slightly, and lit the gas escaping from them. The flame was about the same size as a cigarette lighter. I then brazed the service valve connections and a few more that were not near the reversing valve. I shut off the propane, let the thing cool, and wrapped the reversing valve with rags. After the whole thing cooled off, I removed the propane source hose from the piercing valve and removed the valve. I connected the propane hose to the service valve in the discharge line, opened up the bottle, and lit the suction line fitting. I brazed up the piercing valve hole with some safety-silv and flux, because the tube was tarnished pretty heavy and sil-fos rod didn't want to stick to it. Most of the rest of the fittings went back together using only sil-fos rod. After everything was nice and cool again, I put the valve cores back in and connected my gauge set to both access valves. I pulled a vacuum for 15-20 minutes with a really old refrigerator compressor. I shut everything down, closed all the valves and let it sit to see if it had a leak. It held vacuum, so I filled it to about 50 PSI with fresh propane, vacuumed it for another 20 minutes, then charged it with what was left in the propane bottle. If I could find my micron gauge, I would have used it. I left the unit half-charged and will return to make sure it still has that charge in it later. The unit just started to make frost on the outdoor coil when I ran out of propane, so the reversing valve seems to have survived. I took more pictures while I was doing work on the unit, but my phone lost a lot of them somehow between when I took them and when I got home. I'll take some more when I go back to check that it holds charge. Last edited by jeff5may; 02-17-18 at 07:48 AM.. Reason: spelling |
|
|
|
|
11-24-15, 09:03 AM
|
#3 |
|
Supreme EcoRenovator
Join Date: Jan 2010
Location: elizabethtown, ky, USA
Posts: 2,428
Thanks: 431
Thanked 619 Times in 517 Posts
|
Stuff used so far:
 RIDGID 101 Tubing Cutter-40617 - The Home Depot around $20 at hardware stores everywhere (knock-offs are less)  HDX Swaging Tool-HDX053 - The Home Depot I got mine for $6.99 at harbor freight tools. This swaging punch is how to adapt smaller tubing (under 3/4") to fit without spending time and cash hunting for adapters and couplings. The first time you don't need to run back to the store for a fitting, it pays for itself. After that, every time it gets used is a bonus. It makes ends look like the ends of the valve below.  Ranco V3 310081 7GD B1227308 3 Way 1 2 Ton Reversing Valve 10283 | eBay under $20  $2.00 each on ebay, more cost less each. $2.00 each on ebay, more cost less each. Airgas - HAR4031 - 1/16" Harris® Safety-Silv® 40 High Silver Brazing Alloy Wire 1 Troy Ounce Pack (Prices are subject to change without notice due to raw materials cost volatility) under $15, used maybe 2 bucks worth. You get about 1.5 meters of wire per troy ounce.  https://weldingsupply.com/cgi-bin/ei...:UNDEF:X:40021 ON SALE NOW: $3.99 for a 1/2 pound tub. I got a 6 oz bottle for around the same at airgas. Airgas - RAD64001758 - .050" X 1/8" Diameter Radnor® by Harris® Stay-Silv® 5 Silver Solder Job Pak (prices are subject to change without notice due to raw materials cost volatility) Local HVAC supply house sells these for $1.50/ stick. Tractor Supply sells Hobart (aka Miller) brand for around $20/box. At the store, it is the only thing that looks like what you might need. Right next to the silicon bronze rod on the wall. Hobart Bare Bronze Brazing Rod, 1/8 in. dia., Pack of 10 - For Life Out Here  Airgas can get small job packs of the 5 and 15 sta-silv sticks and flux-coated safety-silv sticks in whatever flavor you want. The uncoated (5 and 15) rods are self-fluxing on copper. When brazing to anything iron, brass, bronze, or stainless/nickel, don't use the 5 or 15. The phosphorus in the alloy will not wet them. Go straight to the safety-silv and flux. The flux-coated sticks are color coded so you can mix them all up and not lose track of which is what. Depending on how clean your pipe joints are, the flux on the stick may be enough to flow the joint well. The more silver content, the better the stuff sticks between dissimilar metals and the more it costs. The thing is, you have to decide which process to use before you apply heat. I always err on the safe side: anything that is not new (or newly dismembered) gets sanded shiny and fluxed on the male end. If something isn't copper, it gets safety-silv and some extra flux on the outside once fitted. After brazing, the flux must be removed or it will corrode the piping. I wipe the joint with a wet rag (used as a heat shield during brazing) to clean off the remaining flux while the rag and joint is still warm. Don't burn yourself (wear gloves)! Last edited by jeff5may; 10-28-16 at 06:48 AM.. |
|
|
|
|
11-24-15, 12:57 PM
|
#4 | |
|
Helper EcoRenovator
Join Date: Nov 2015
Location: NW Arkansas
Posts: 37
Thanks: 5
Thanked 7 Times in 7 Posts
|
Quote:
Great write up and overview of tools/parts! I'll reiterate what you just said about the wet rag. I do this all the time, and one must be careful as the water on the rag can flash off to steam with your hand holding it. I tend to think "oh, I'll be fine" and slightly drape/squeeze the joint and try to stay out of the steam bath, but it only takes once to make a big impression if you brain fart. Use the gloves. |
|
|
|
|
|
11-25-15, 08:31 AM
|
#5 |
|
Journeyman EcoRenovator
Join Date: Oct 2011
Location: Cincinnati ohio
Posts: 338
Thanks: 40
Thanked 35 Times in 31 Posts
|
I'm excited to see this build
|
|
|
|
|
12-08-15, 08:26 AM
|
#6 |
|
Journeyman EcoRenovator
Join Date: Oct 2011
Location: Cincinnati ohio
Posts: 338
Thanks: 40
Thanked 35 Times in 31 Posts
|
So it looks like this unit has cap tubes. Do those work ok for both heat pump mode and ax mode?
|
|
|
|
|
12-08-15, 10:49 PM
|
#7 |
|
Supreme EcoRenovator
Join Date: Jan 2010
Location: elizabethtown, ky, USA
Posts: 2,428
Thanks: 431
Thanked 619 Times in 517 Posts
|
Up until around the turn of the century, pretty much all of the mini-splits used cap tubes to do their bidding. Some of the multi-zone units used a txv for heating mode. The more modern units are being built with electronic expansion valves and proprietary superheat control.
The vintage units that work very much below 0 degC actually have 2 cap tubes in them. The first cap tube does its job all the time. The second cap tube is plumbed in series with the first, with a parallel check valve that bypasses it during the cooling cycle. The added restriction of the second cap tube raises the temperature split (delta T or dT) between the indoor and outdoor heat exchangers to allow the unit to extract heat at low outdoor temperatures in heating mode. I will start using this unit the way it is rigged right now. Once I figure out how well (or poorly) it performs, I may end up modding the refrigerant loop to make it work better. This particular unit has the cap tubes directly brazed into the evaporator tubes, so it would be difficult to plumb in a txv for heating cycle. I'm not sure what I will do yet. Last edited by jeff5may; 06-24-16 at 08:02 AM.. Reason: clarity |
|
|
|
| The Following User Says Thank You to jeff5may For This Useful Post: | Daox  (12-09-15) (12-09-15) |
|
12-11-15, 09:43 PM
|
#8 |
|
Supreme EcoRenovator
Join Date: Jan 2010
Location: elizabethtown, ky, USA
Posts: 2,428
Thanks: 431
Thanked 619 Times in 517 Posts
|
There is interest growing in the General-purpose controller thread, so I have decided I will be using my manifestation in this unit. It consists of an arduino uno development board, an LCD readout with 5-button keypad, and a control board out of a portable air conditioner. I had it working to control the retired window unit conversion in the past, so I am confident it will do what it should. A store-bought relay shield (with its own power supply) would serve the same purpose.
With the other unit, I started out using a non-heat pump thermostat. When it failed, I rigged the homebrew controller up strangely to make the unit happy. It had wires for the compressor, fan, and reversing valve relays coming from the controller. My existing unit had a working defrost board, so the controller did not do defrost. I had the thing working before, and the defost control I was using had a single thermistor as a defrost thermometer. I may end up doing the same thing with my controller. I haven't had much time to do anything with the unit except prove that the thing actually holds its charge and moves heat. It works in both directions, too. It has been unseasonably warm lately, so I ran it in cooling mode a week or so ago, just to make sure I didn't fry the reversing valve during the re-plumb. My buddy thinks it looks ugly, and doesn't believe it can do a better job than his "infrared" remote control space heater. I already know it does, because it poured out the 95 degree air in his garage, heating it up to around 70 in less than an hour, during a cold spell a couple of weeks ago. I unplugged the beast, and 2 of his toasters could hardly keep up. I will be running through some ideas for a defrost algorithm that will run off either a single or a pair of thermometer sensors. If I can figure out how to use all 1wire sensors, that would be great. If not, I will have to use up more pins on the controller, which are scarce. Last edited by jeff5may; 02-17-18 at 08:03 AM.. Reason: Photobucket recovery and repost |
|
|
|
|
12-23-15, 09:13 PM
|
#9 |
|
Supreme EcoRenovator
Join Date: Jan 2010
Location: elizabethtown, ky, USA
Posts: 2,428
Thanks: 431
Thanked 619 Times in 517 Posts
|
Ok, I finally got a little free time to have a life. Naturally, I used it to play with this unit. Here are some details that didn't stay on my phone last time I took pics.
 I hadn't realized the unit is only rated at 9 EER until today. 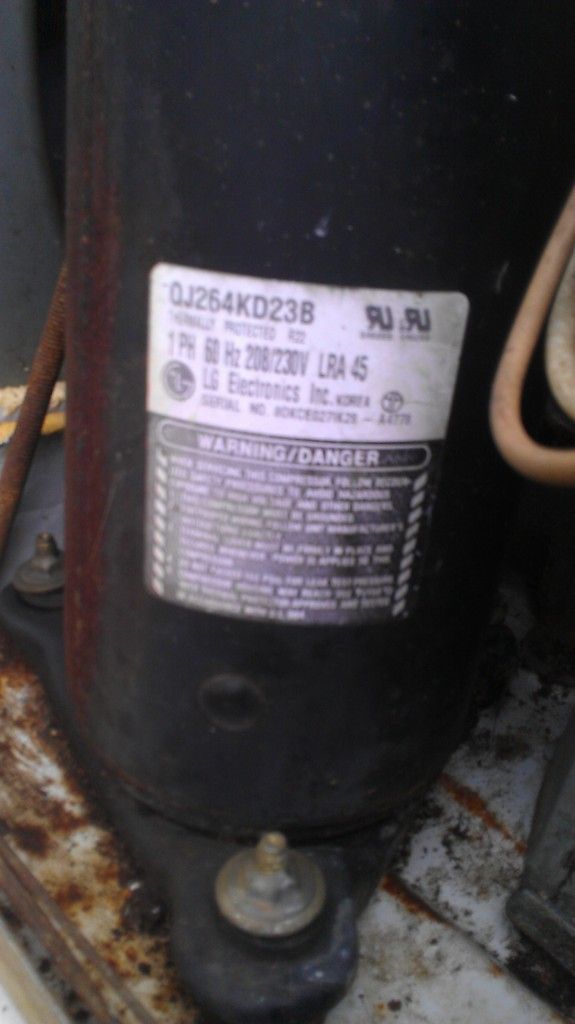 Typical economy compressor. I'll have to make sure to feed it an ample supply of cool gas to keep from burning it up. These babies don't like to be starved for long. Since I re-plumbed the unit with the reversing valve, both my buddy and his neighbor got tired of looking at it in the driveway. Buddy bought a couple of 1500 watt space heaters, which are the best thing ever this year... if you've been christmas shopping, you've probably seen them. Remote control, server tower looking things. I believe he paid 200 dollars or more for them. He has this idea that since the strip heater elements are hidden in the unit, the unit doesn't work on the same principle as the old "toaster" style space heaters. His reasoning for why the rigged window shaker beat the two boxes was "it runs off 240 volts, mine run off 120." Oh well, at least his garage is insulated now. The unit got moved to the barn and now sits atop a small deep-freezer. I rigged up a 220 cord to plug it in where my arc welder usually does. Plugged it in, turned it on, and ran it with the 12 ounce bottle of worthington I put in it weeks ago. After maybe 20 minutes of ramping up, I got these pressure readings: 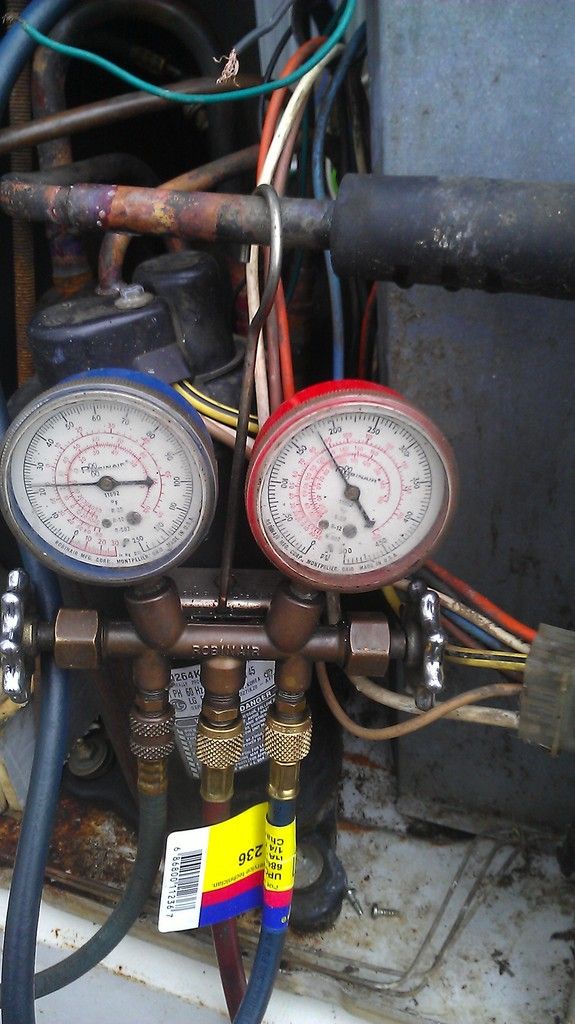 Reading in heating mode looks rather low on charge. The rather low suction pressure is also somewhat disappointing. I was hoping for a little closer split in pressures. We will see how this changes as I add charge. A warm front came through yesterday and remained today, as a result, it was unseasonably warm. Outdoor temperature was almost exactly 60 degF at about 90% relative humidity. This lies right at the border between heating and cooling as far as outdoor temperatures go, so with this window unit, I should be able to get both heat exchangers to not frost up in both modes of operation with the right charge. Over the course of about an hour, I added about 10 more ounces of propane to get the outdoor hx to a point where it did not frost up. IMHO, this unit is seriously overcharged, but I ran the unit this way to see how the cap tubes split the pressure during best-case conditions. I rigged a 24VAC doorbell transformer to the reversing valve solenoid to check pressures and temperatures in both heating and cooling, and to check for frost conditions. Yep, it's a low-seer unit alright. This reading was in heating mode on medium fan setting. I am pretty confident of the manifold gauges and IR thermometer / heat leak finder I am using. So unless the reversing valve is dropping some pressure, something don't add up. A 40-ish psig suction pressure translates to a saturation temperature in the 20's, so I should still have some frost where the propane is still in a liquid state. A discharge pressure of 275 psig translates to a condensing point around 135 degF, so if my gauges are correct, I have 50 degrees F of superheat at the compressor shell! If the BBQ had some butane or methane in it, I would be getting these lower pressure readings in the evaporator also. It would take a decent amount of contamination to do it, more than an ounce or two. I took some temperature readings to get a better idea of what's going on elsewhere in the circuit: 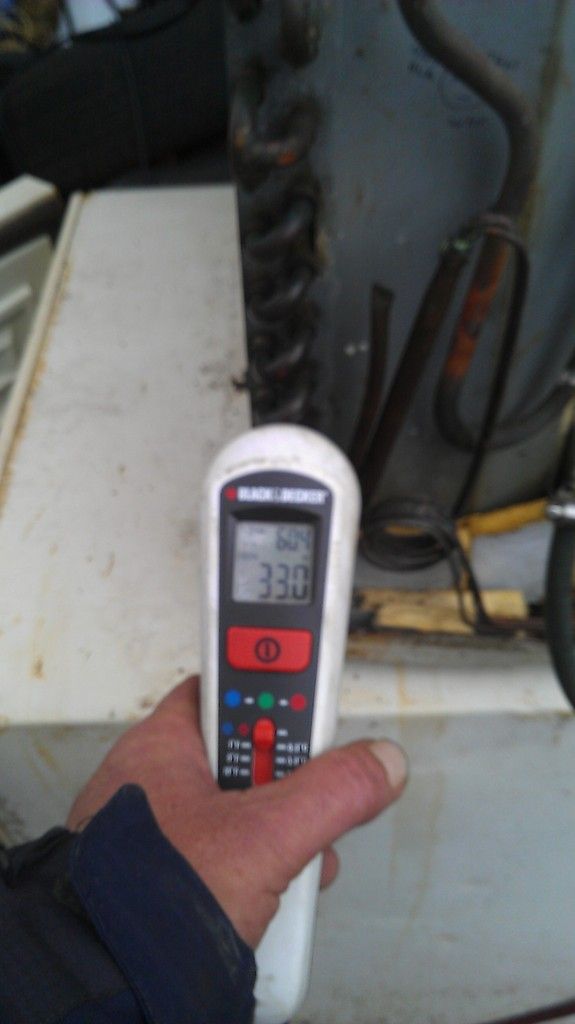 Leaving the cap tubes, the refrigerant is right at freezing. 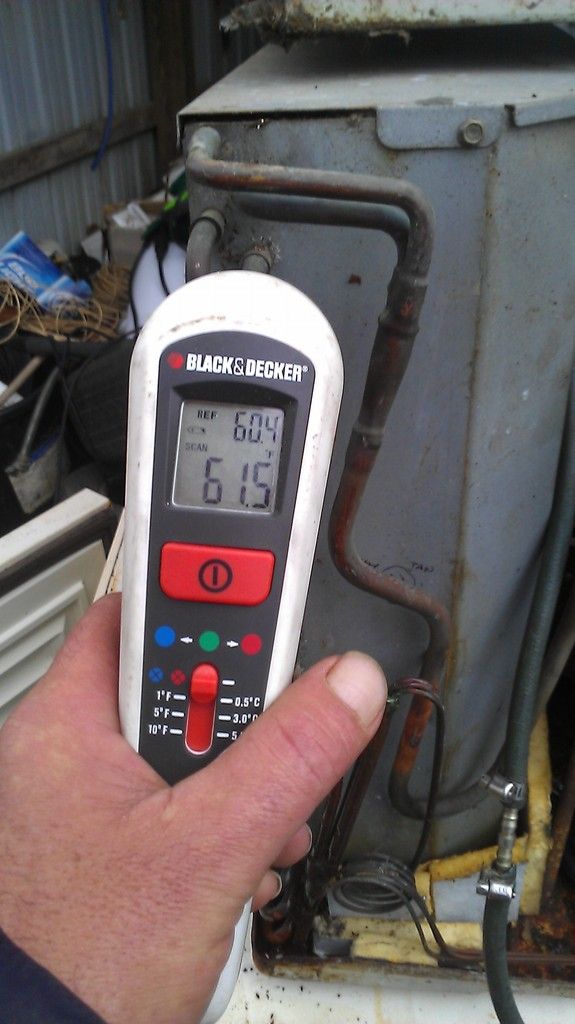 3/4 the way up the evaporator, the heat transfer has stopped. 30 degF of superheat gained... harrumph! Still, not bad for the 9 EER design. 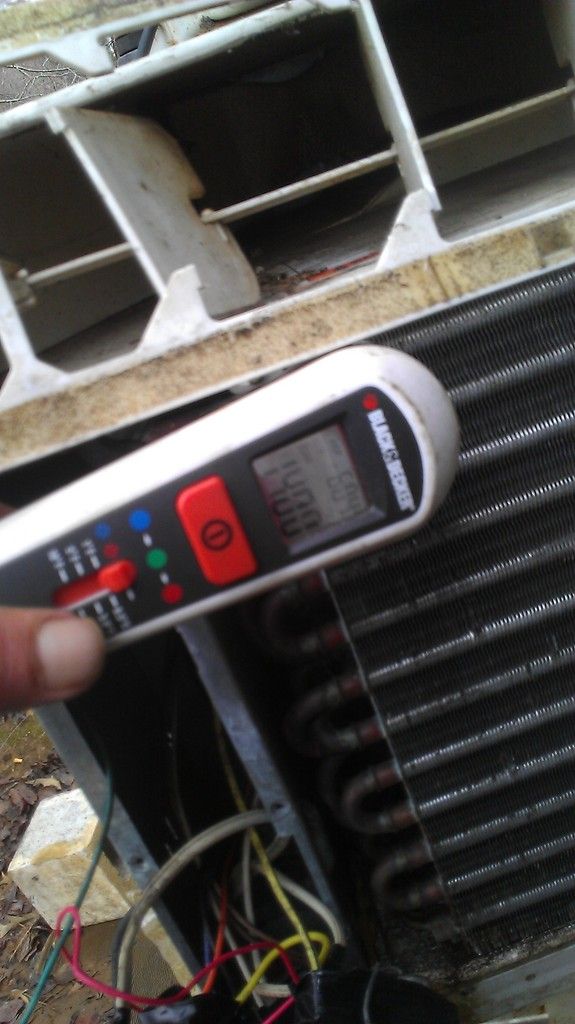 At the entry point, the gas looks to have lost most of its superheat on its way through the reversing valve. Also in this pic, a cap tube can be seen exiting the crimped end of the hx tubing at the bottom. This is going to be an issue if I end up running a txv in this beast to improve performance.  Further down the pipe, we have already entered subcooling territory. Close to the condenser exit point, we have over 50 degrees of subcooling! 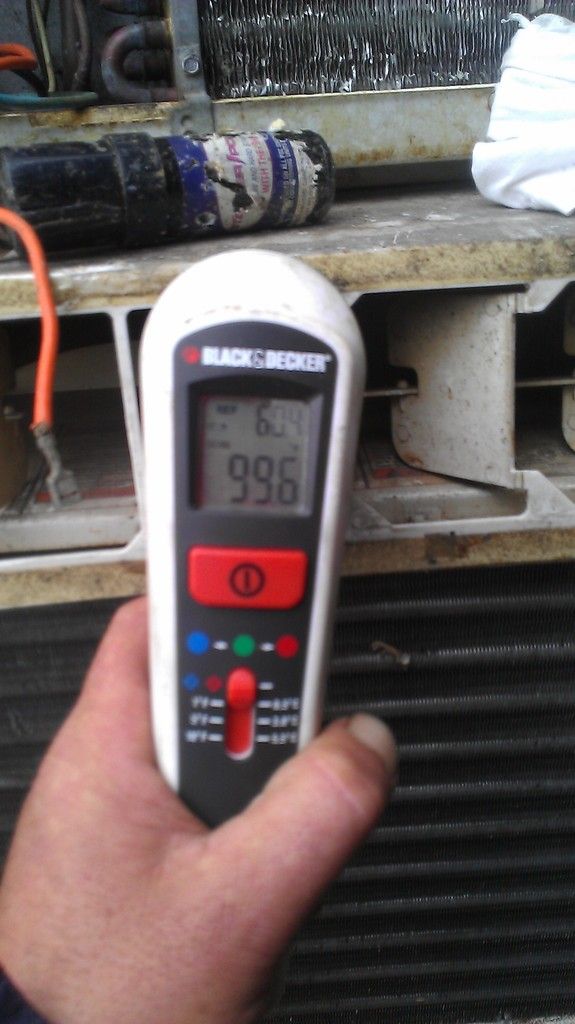 I believe this would qualify as nice hot air coming out of the unit. As the indoor temperature climbs, the outlet temperature follows. As small as the indoor hx is, it needs a high dT across it to move its rated btu's. Like I said, I ran the unit in heating and cooling modes and charged it until neither mode produced frost on the evaporator hx. In cooling mode, this unit was obviously well below its design outdoor conditions, because it produced frost even with this overcharge when left alone. To get it not to freeze up, I had to completely block off the outdoor hx with a piece of drywall and a cinder block, plus run the fan on high speed. Even then, it still tried to frost up until the outdoor hx heated up and built up pressure above 250-260 psig. Whirlpool obviously sized the cap tubes in this unit to handle some serious torture. During normal conditions, indoor and outdoor temperatures would be way above 60 degF, and head pressure would be close to where it was set by overcharge. There would not be such sky-high superheat and subcooling in the circuit, especially when outdoor temperatures were above 90. I am confident that with the proper charge, the thing could endure a hot life in Phoenix, running at head pressures approaching 300 psig. The unit looks to be wired like this diagram:  The only thing missing is the electric strip heater. I won't be adding one. Last edited by jeff5may; 02-18-18 at 10:44 AM.. Reason: Getting rid of photos buckets |
|
|
|
|
05-07-16, 08:52 PM
|
#10 |
|
Supreme EcoRenovator
Join Date: Jan 2010
Location: elizabethtown, ky, USA
Posts: 2,428
Thanks: 431
Thanked 619 Times in 517 Posts
|
I have been trying to integrate an efficient and effective defrost algorithm into my arduino uno controller all winter. None of the schemes I came up with did the job to my satisfaction. Either the unit went into defrost mode every so often (whether it needed it or not)faithfully, or the thing would not defrost until the outdoor coil was a block of ice. The factory add-on defrost modules work better.
As fate would have it, someone found a family of universal a/c control systems on the internet. I just had to have one. Thanks, Xringer. Quick detour to this thread: http://ecorenovator.org/forum/geothe...it-system.html Before wiring shot: During rigging gut shot: Made by Qunda, the model I picked up is part of a family of 3 dozen models of controllers. It is on the expensive end of the line, yet it shipped to my door for under $50. The model I bought can be used with packaged or split units, and has separate relays to drive indoor and outdoor fans. It also has a relay for auxiliary heating. I would have had the thing wired super easily in one afternoon, but the reversing valve output of the board is active in heating mode instead of cooling mode. Instead of re-plumbing my reversing valve, I modded the board, intercepting and inverting the control signal to the reversing valve relay with two resistors and one transistor. Last edited by jeff5may; 05-08-16 at 12:04 AM.. |
|
|
|
 |
|
|


 Linear Mode

