
|
 10-27-11, 12:24 PM
|
#41 |
|
Home-Wrecker
Join Date: Sep 2008
Location: SE Wisconsin
Posts: 546
Thanks: 3
Thanked 165 Times in 96 Posts
|
I do have a couple of pretty wet spots in my yard, including a spring in the front yard. I HAVE considered some sort of ground heat pump in my long-term master plan.
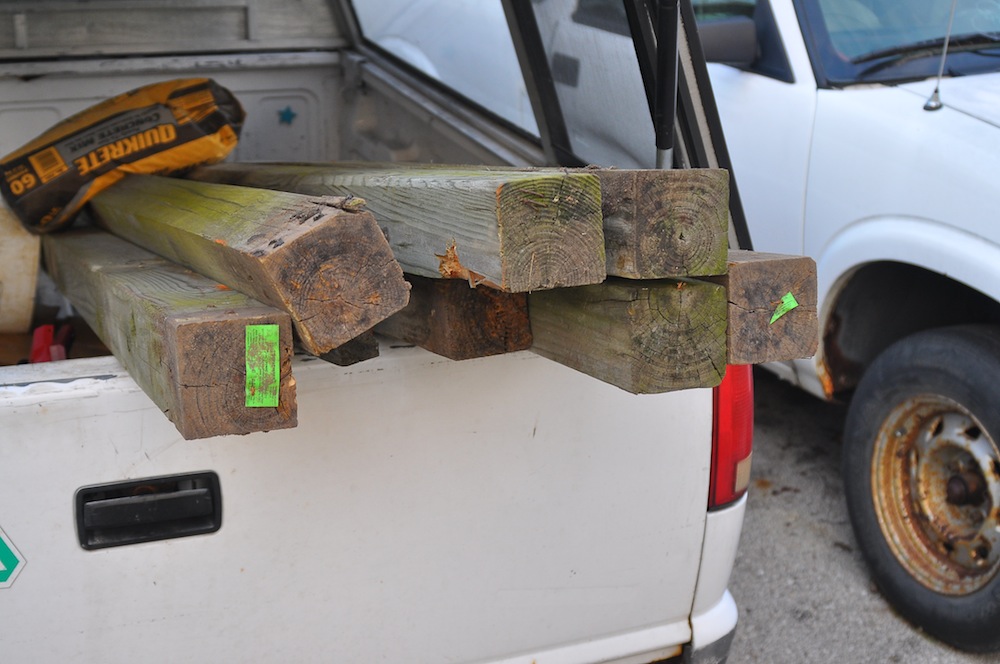
I could do a concrete pad. It's just that it gets more expensive. More time, more work. I'd like to make this as simple as I can, and more importantly, NOT need a jackhammer for when I screw up! I did get some more work done today. To start with, I checked the holes for water. It's been rainy/wet/cold for the last few days. most of the holes were about 28" from ground level to water line. My foot is in the photo for scale.  I remembered that I had some gravel in a couple of 5-gal buckets in the backyard, so I dumped that down the holes until it was 27" from ground to the gravel fill. That was still underwater, as the water simply went UP as I added gravel. I'll check later and see how it drains. It's pretty much all clay right there, so I'm not sure how long it will take. I'm hoping that if we don't get any more rain, the water level in the holes will drop and expose the gravel. If so, I think everything is fine, and I can set posts right down to gravel level. I kept chipping away at the hole through the foundation. My idea is to have a pipe go right through the cinder block wall, and then get cemented in place. Then I will have a nice tube to slide the solar plumbing through, along with any other wires, etc. If I ever need to add or remove anything in the future, I already have a smooth tube to feed through. If I even need to decommission the system, I can just put a pipe cap on either end.  I originally hoped to punch through the hollow spot on one side of the cinder block. Turns out the hollow is less than 3" wide, once you figure in the curve of the cement and all. I figured I would either need to go with a much smaller pipe, but that wouldn't fit all I wanted through it. Maybe TWO smaller pipes? But that didn't leave much room for flexibility or expansion. So, I kept chipping away to make the hole big enough for a 4" pipe. Once I dug away enough dirt to get the hammer drill deep enough from the outside, it went pretty well. I also found out that it's not worth trying to make round holes in cinder blocks. Everything about them is rectangular. Just make a rectangular hole. Some hand-hammering with chisels and a long steel rod got me the hole big enough for the pipe.  That's WAY too much pipe sticking out there, but the store sells it in 10' sections, so that's what I got.  I also thought I should slope the pipe slightly downhill, away from the house, so if there ever is a leak or rainwater getting in there, it doesn't run straight into my crawlspace. On the other hand, where would it drain to? I'll still need to put an angled pipe adapter on the end of this to angle up, out of the ground to the solar panel. I thought maybe something going up, then curving to back down to keep water out? I could have a pipe cap on the end of the 4" pipe with two holes drilled in it for the to and from solar and then caulk them in there real good. Also, the fancy pipe insulation was on sale right now (but only for another day or two) for 25% off, so I bought 60' of it.  I think my next step here is to figure out how long I want the 4" PVC, cut it to that length, and then cement it in to the foundation. I'll also want to fill the exposed cavities in the concrete block. Anyone think I should maybe fill it with Great Stuff, or otherwise insulate it? I really haven't done any cement work before. I just want to fill in around the pipe, so there is no gap around it. I want that pipe to be in there nice and solid, and it to look like a wall again! It doesn't have to be perfect. The part inside the crawlspace, nobody is ever going to see. The part outside should mostly be covered with dirt when I'm all done. Still I want to do a good job. Any advice on working to patch with cement is welcome!
__________________
To view links or images in signatures your post count must be 0 or greater. You currently have 0 posts. To view links or images in signatures your post count must be 0 or greater. You currently have 0 posts. |

|

|
|
10-27-11, 12:36 PM
|
#42 |
|
Lex Parsimoniae

Join Date: Feb 2009
Location: Woburn, MA
Posts: 4,918
Thanks: 114
Thanked 250 Times in 230 Posts
|
Looking good!!
If you wanted to put off the cement work for a while. (years maybe). Just in case you need to change something later, or it's too cold etc.  Just push some rags into the gaps from the inside and use spray foam on the outside to seal it up. $3.42  Really, it's Great Stuff...  |
|
|
|
|
10-27-11, 12:43 PM
|
#43 |
|
Administrator

Join Date: Aug 2008
Location: Germantown, WI
Posts: 5,525
Thanks: 1,162
Thanked 374 Times in 305 Posts
|
Woo, nice to see more progress.
You should be able to get away with a small bag of mortar mix to fix the pipe in the wall. Be careful when you mix water in to not get it too wet. Add the water slowly and mix it very good. Great stuff around it would probably be fine too. I would fill the pipe with great stuff though to seal it off on both ends once you get things situated.
__________________
Current project - To view links or images in signatures your post count must be 0 or greater. You currently have 0 posts. To view links or images in signatures your post count must be 0 or greater. You currently have 0 posts. & To view links or images in signatures your post count must be 0 or greater. You currently have 0 posts. |
|
|
|
|
10-27-11, 12:44 PM
|
#44 |
|
Home-Wrecker
Join Date: Sep 2008
Location: SE Wisconsin
Posts: 546
Thanks: 3
Thanked 165 Times in 96 Posts
|
Great Stuff really is great. The only thing is that it DOES need is to be protected from sunlight.
If dirt covers everything, maybe that's all I need? 
__________________
To view links or images in signatures your post count must be 0 or greater. You currently have 0 posts. To view links or images in signatures your post count must be 0 or greater. You currently have 0 posts. Last edited by bennelson; 10-27-11 at 12:44 PM.. Reason: just horrible grammer |
|
|
|
|
10-27-11, 12:52 PM
|
#45 |
|
Administrator
Join Date: Aug 2008
Location: Germantown, WI
Posts: 5,525
Thanks: 1,162
Thanked 374 Times in 305 Posts
|
Thats all I'll be doing with my hole in the wall. Just fill it up with great stuff.
__________________
Current project - To view links or images in signatures your post count must be 0 or greater. You currently have 0 posts. To view links or images in signatures your post count must be 0 or greater. You currently have 0 posts. & To view links or images in signatures your post count must be 0 or greater. You currently have 0 posts. |
|
|
|
|
11-02-11, 09:50 AM
|
#46 |
|
Journeyman EcoRenovator

Join Date: Jun 2011
Location: a field somewhere
Posts: 304
Thanks: 64
Thanked 44 Times in 31 Posts
|
Looks good. Nice looking house btw.
How deep are your foundation footings? I'm building a "pool house" on the back acre next spring and have similar soil to what you described. I was thinking pier foundation posts... |
|
|
|
|
11-06-11, 06:49 PM
|
#47 |
|
Home-Wrecker
Join Date: Sep 2008
Location: SE Wisconsin
Posts: 546
Thanks: 3
Thanked 165 Times in 96 Posts
|
Ack! I just spent the last twenty minutes writing a really nice blog entry, and then the computer ate it! So, you are just getting all the photos instead!
__________________
To view links or images in signatures your post count must be 0 or greater. You currently have 0 posts. To view links or images in signatures your post count must be 0 or greater. You currently have 0 posts. |
|
|
|
|
11-06-11, 06:52 PM
|
#48 |
|
Home-Wrecker
Join Date: Sep 2008
Location: SE Wisconsin
Posts: 546
Thanks: 3
Thanked 165 Times in 96 Posts
|
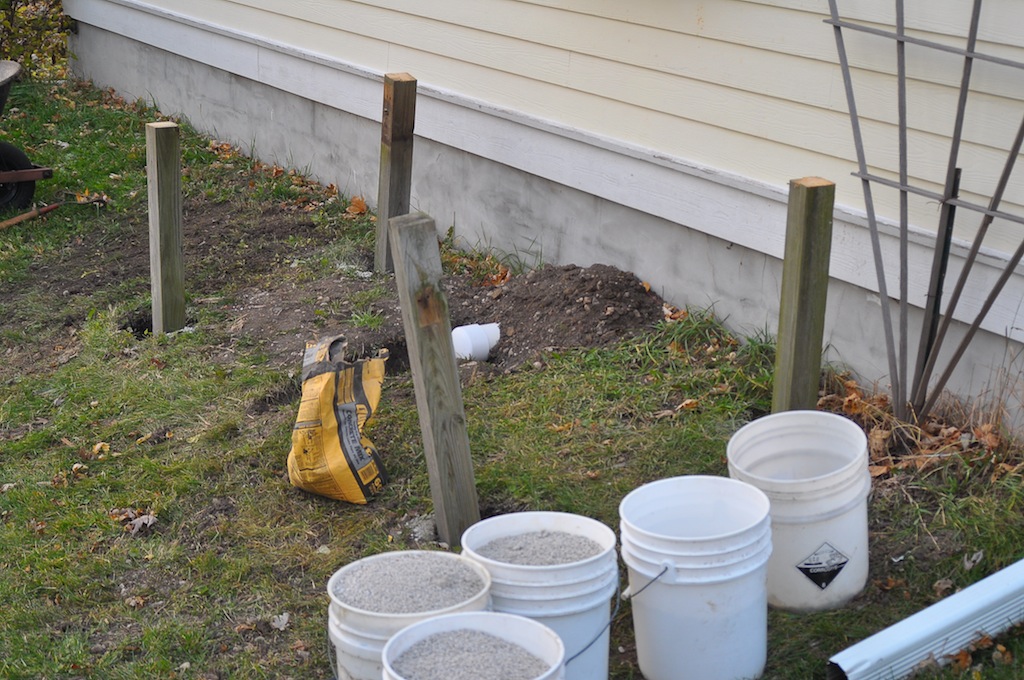
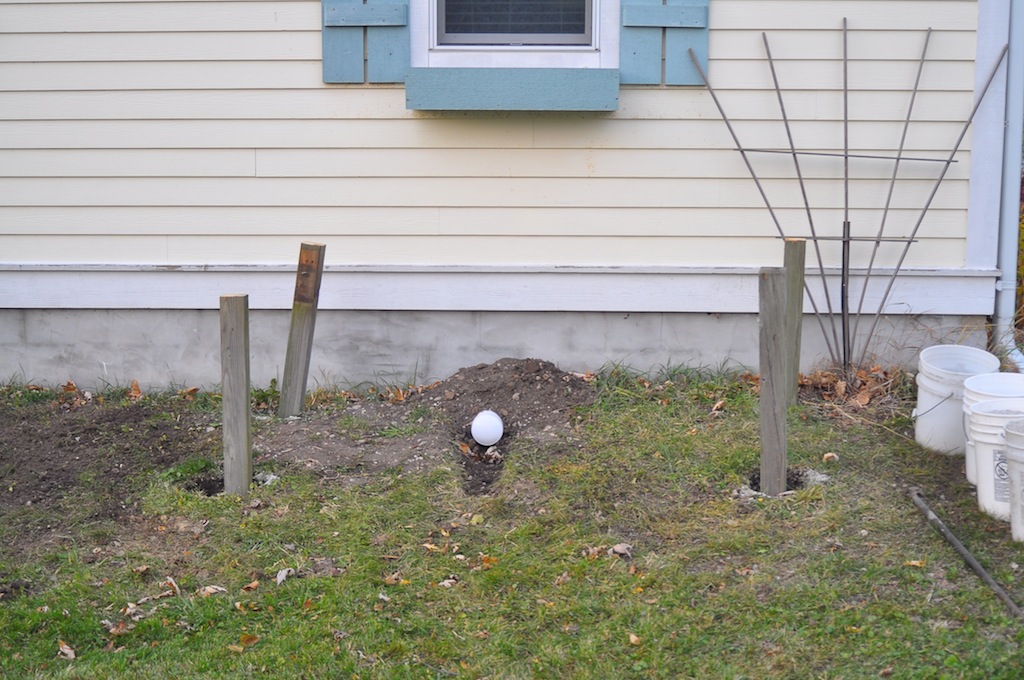
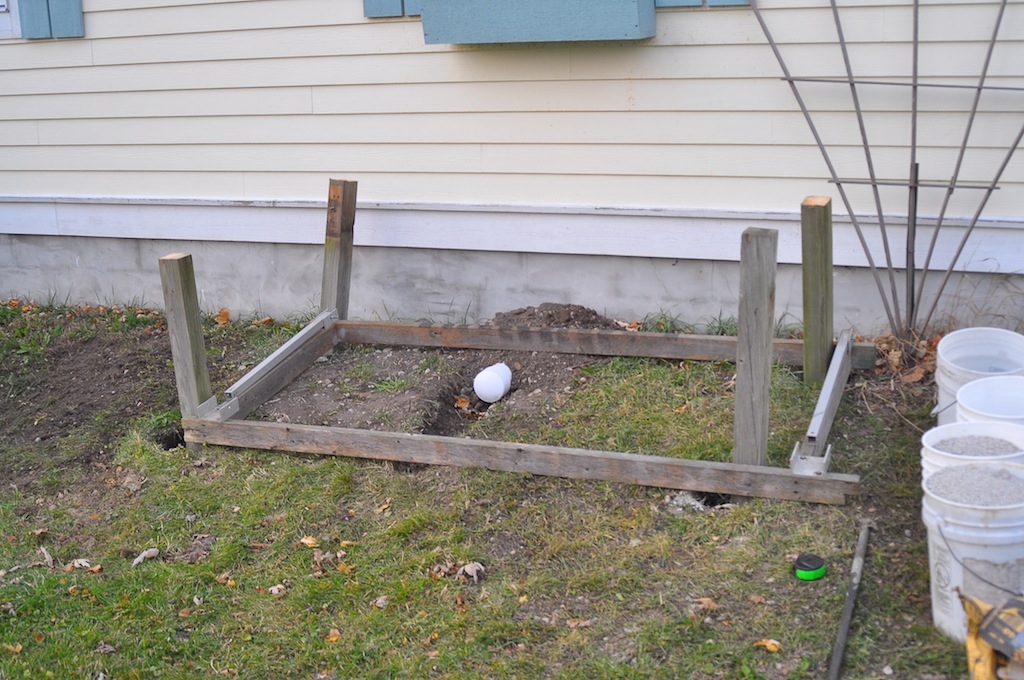
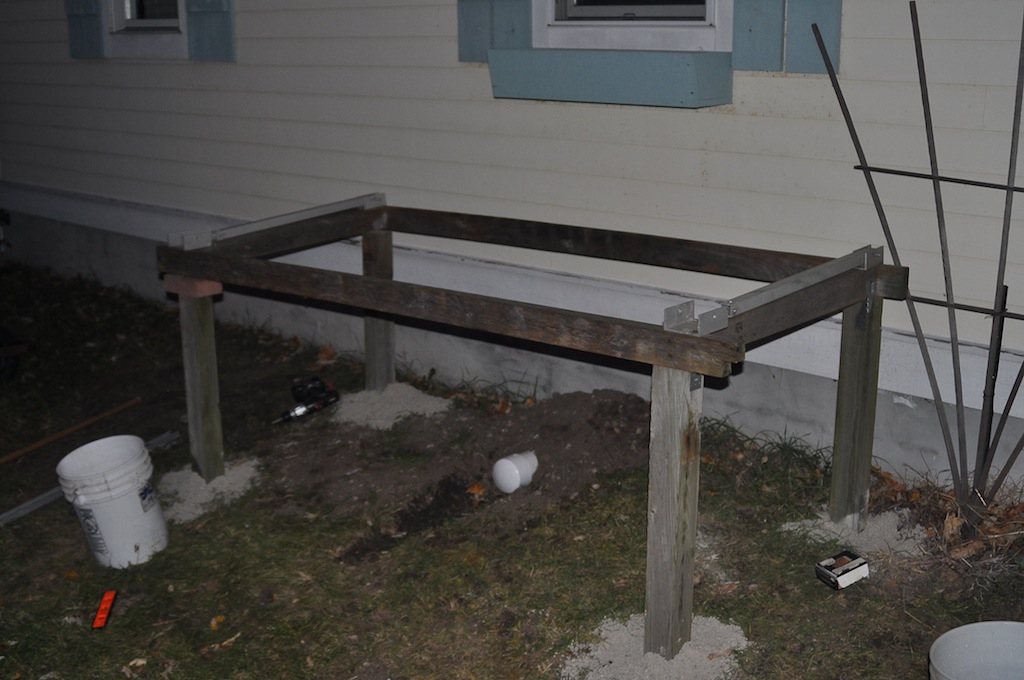
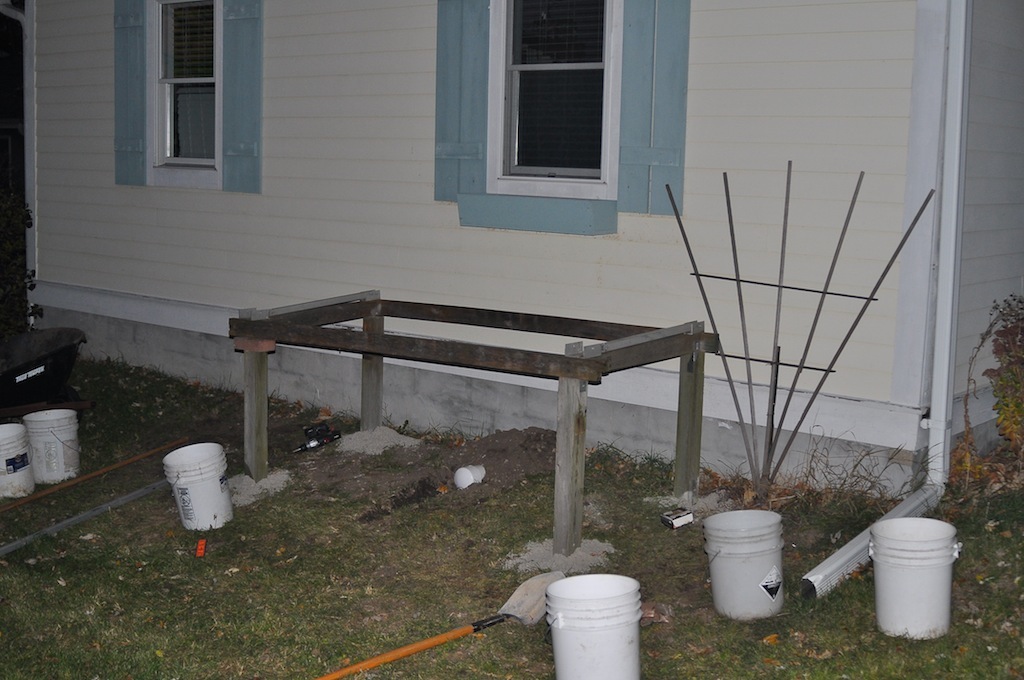
The whole thing it too high right now.
I left the posts long, so that I could cut them down to a matching, level height. That will be about 18" - 24" above the ground so that the solar collector stays out of the snow all winter. Any taller than that, and the collector would start to block that window above it.
__________________
To view links or images in signatures your post count must be 0 or greater. You currently have 0 posts. To view links or images in signatures your post count must be 0 or greater. You currently have 0 posts. |
|
|
|
|
11-06-11, 07:02 PM
|
#49 |
|
Helper EcoRenovator
Join Date: Nov 2010
Location: WI
Posts: 42
Thanks: 2
Thanked 2 Times in 2 Posts
|
Looking good. Btw, what kind of pex tubing are you using?
|
|
|
|
|
11-06-11, 07:13 PM
|
#50 | |
|
Lex Parsimoniae
Join Date: Feb 2009
Location: Woburn, MA
Posts: 4,918
Thanks: 114
Thanked 250 Times in 230 Posts
|
Quote:
I used to think that way too. Until last winter!  Looks like you put in a lot of hard work on those posts. You should end up with very solid mounting system. Those metal brackets on top, look like you are planing on being able to change the elevation. I don't remember what your collector(s) look like, but if the array is tall, it's going to be near upright in mid winter. So, 18" might be the better height. You can do what I did. Shovel away the snow.  I actually dug pits in the snow, so that snow sliding off my panels would have some place to go..
__________________
My hobby is installing & trying to repair mini-splits EPA 608 Type 1 Technician Certification ~ 5 lbs or less.. |
|
|
|
|
 |
| Tags |
| diy, domestic, heat exchanger, hot water, solar |
|
|


 Linear Mode

