
|
 11-22-14, 08:23 AM
|
#81 |
|
Apprentice EcoRenovator
Join Date: Oct 2014
Location: SE MI
Posts: 105
Thanks: 3
Thanked 12 Times in 9 Posts
|
First, THANK YOU for taking us along for the ride !
And Thank You again, your summary (although I did just re-read the whole thread). I'm sure overtime, I will reference this build many times and have many questions, but I will start at the beginning. How did you calculate the ground loop size and why did you choose to do a horizontal loop instead of a vertical loop (one or more wells) ? Just how big is your "pit" ? |

|

|
|
11-22-14, 08:43 AM
|
#82 |
|
Uber EcoRenovator
Join Date: Apr 2011
Location: Strathroy Ontario Canada
Posts: 657
Thanks: 9
Thanked 191 Times in 129 Posts
|
I though I would provide a overview of what went on to get me the DIY GSHP to a fully functional heating cooling system.
For our area of the planet South Western Ontario Canada the common rule of thumb is 600' of tubing placed 6' deep Horizontal for each ton required. Local installer rely on this for their installations. I fortunately have the room for a horizontal loop. It is far less expensive than drilling wells. The field is L shaped and the largest pit is approx. 200 x 60. Randen |
|
|
|
|
11-22-14, 09:24 AM
|
#83 | |
|
Apprentice EcoRenovator
Join Date: Oct 2014
Location: SE MI
Posts: 105
Thanks: 3
Thanked 12 Times in 9 Posts
|
Quote:
I suspect that rule does not apply to vertical wells. (4 ton would be 2400'  ) ) |
|
|
|
|
|
11-22-14, 09:51 AM
|
#84 |
|
Uber EcoRenovator
Join Date: Apr 2011
Location: Strathroy Ontario Canada
Posts: 657
Thanks: 9
Thanked 191 Times in 129 Posts
|
I would like to thank AC Hacker for his thread on Heat pumps. He pulled back the curtain of the magic in the vapor compression machine. It inspired me to try my hand at a DIY Ground source Heat Pump. "The Homemade Heat Pump Manifesto."A heart-felt thanks for all your work involved with your thread.
 In the true recycle reuse mantra of a DIYer my first version of heat-pump was made from items from a scrap heap. The compressor was from an old air-conditioner outside unit. The compressor was a replacement under warranty so it didn't have many hrs. on it. The copper used in fabricating the shell and tube HX was the 3/8 line that carried the furnace oil to the old condemned furnace with a length of 7/8 You can clearly see in the photos the coil around the compressor. This makes up the condenser. The evaporator was made in the same fashion only with two copper tubes inside a plastic hose. The hose is commonly used for hot tubs. Most all components were recycled very few purchased. This way if it failed miserably I was out very little. But if it worked out well I would be very much ahead. The reversing valve was a bit of work as I have access to machine tools it made this possible however the same can be done with a group of ball valves. I had thought of this route but the stainless widget won out. The reversing valve allows that the coolant is always running counter-current to refrigerant flow. Hopefully to capture a little more efficiency. The first version had the capillary tube for the metering device. The refrigerant of choice is BBQ propane. It seems to work well. As seen in the photo I tested the unit with water in garbage pails. It offered a good COP by calculating the heat gained and electrical energy used. The new GSHP was placed in service but this 2 ton was un-able to meet the heating demands of the shop. In retrospect I believe the DIY HXs caused the lack of performance. If anyone is to follow: GET Brazed Plate Heat exchangers. In weather that was -5 Deg. C. the little thing done quite well by keeping the shop at about 18 C, but when the Canadian winter wind of -20 C showed up the toolmaker practically froze in the shop. Running flat out 24-7 we could only make 12-14 Deg.C Although a lot of days were uncomfortable many were just fine The 2 Ton DIY GSHP proved a point. It can be done. and the cost for heating the shop was extremely small. The oil man used to hit me with a $2800.00 bill for the season and with the GSHP maybe $500.00In the first year the savings paid for the excavating and HDPE tube. If anyone is familiar with Tim Allens Comedic work. "what do we need to do with the heat-pump??" "MORE POWER" The idea now was to go to a larger 5 Ton unit. A surplus 3 phase compressor had show-up very reasonably priced. However, This next endeavor was plagued with a mountain of problems. We will explore this in the next postings. Randen Last edited by Daox; 11-22-14 at 01:26 PM.. |
|
|
|
|
11-22-14, 11:34 AM
|
#85 | |
|
Apprentice EcoRenovator
Join Date: Oct 2014
Location: SE MI
Posts: 105
Thanks: 3
Thanked 12 Times in 9 Posts
|
Quote:
I will admit, the brazed plate design looks like packages well ! |
|
|
|
|
|
11-22-14, 12:06 PM
|
#86 |
|
Supreme EcoRenovator
Join Date: Jan 2010
Location: elizabethtown, ky, USA
Posts: 2,428
Thanks: 431
Thanked 619 Times in 517 Posts
 |
The first heat exchanger you made is referred to as a "coaxial coil" or tube-in-tube heat exchanger, which is much different than a shell and tube hx. The shell and tube as well as the brazed plate modules are best to purchase rather than fabricate due to the complexity factor.
Brazed plate modules are generally more compact and transfer the most heat per unit volume compared to the other two designs. However, they tend to foul up with scale and contaminants faster. With your closed loop system, this is not much of a problem. But for pump and dump or any systems that don't recirculate the same fluid repeatedly, major maintenance issues exist. A coaxial coil can rival the performance of the other two designs if the right materials are used, namely convoluted or rifled tubing for the center tube. This is known as a "high density" (or some trademarked brand name) heat exchanger. Note how close the OD of the inner tube is compared to the ID of the outer tube. 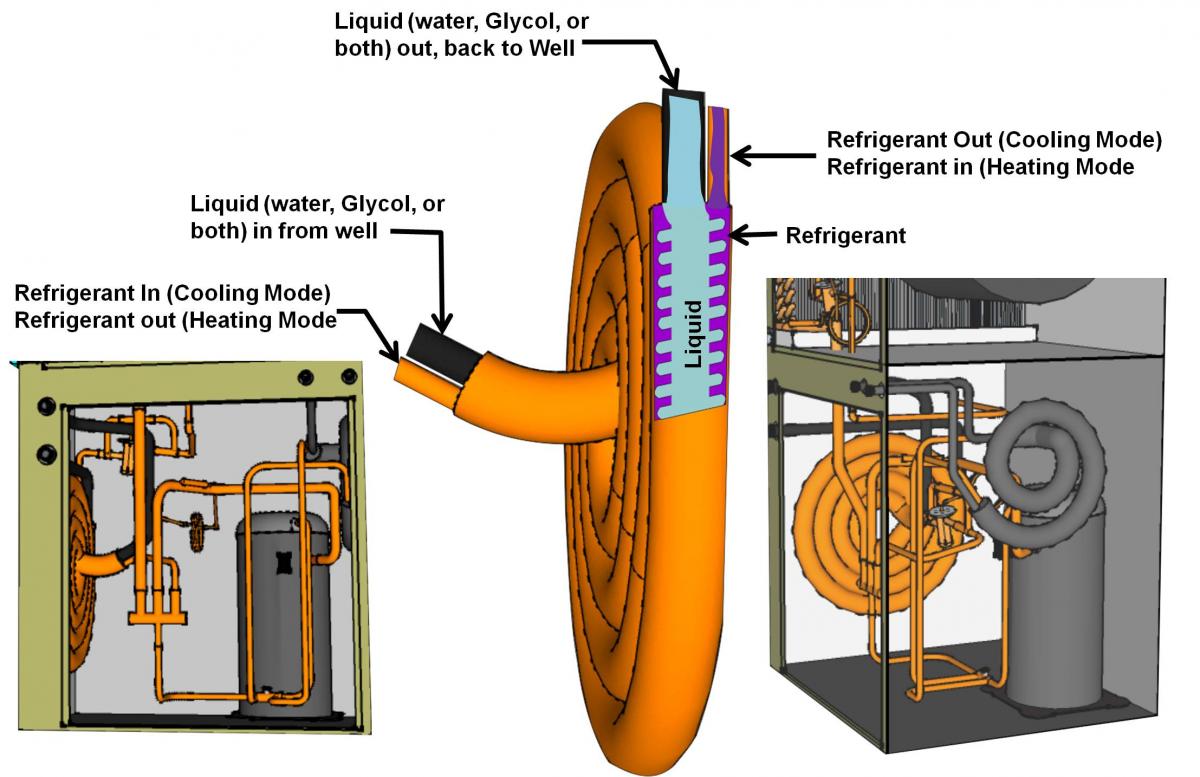 If common smooth tubing is employed, the overall length of the coax coil must be much longer for the same heat transfer capacity. This is known as a "low density" hx. Performace of a low density hx can be somewhat improved by running the refrigerant through a smooth center tube and the water through a convoluted tube on the outside. Randy, what size and schedule of pe pipe did you use for your ground loop? Is it run in series, or do you have any parallel loops? Congrats on the success of the system. I hope it serves you well for a long, long time. Last edited by jeff5may; 11-22-14 at 08:33 PM.. |
|
|
|
|
11-22-14, 08:11 PM
|
#87 | |
|
Supreme EcoRenovator

Join Date: Mar 2009
Location: Portland, OR
Posts: 4,004
Thanks: 303
Thanked 723 Times in 534 Posts
|
Quote:
I totally agree with jeff5may about how particulate matter in an open "pump & dump" type of system would quickly foul a BPHX... because the plates are so tightly spaced. But I'm not so sure about a coaxial being close to the same performance of a BPHX, all other things being equal. In my opinion, BPHX are a stroke of genius when you have a closed system. So, from the point of view of engineering, and assembly, and possibly even cost, Randen's final choice of Brazed Plate was seasoned by prudence and experience. BTW, if you are running R290, the pressures are lower than they are for R22, R134a, R410a, etc. Therefore, lower cost, lower pressure BPHXs may fit your design criterion and budget. -AC
__________________
I'm not an HVAC technician. In fact, I'm barely even a hacker... |
|
|
|
|
|
01-06-15, 06:53 PM
|
#88 |
|
Uber EcoRenovator
Join Date: Apr 2011
Location: Strathroy Ontario Canada
Posts: 657
Thanks: 9
Thanked 191 Times in 129 Posts
|
Its been a couple months and I apologize I needed to wrap up on the final disclosure on the build of the 5 ton for those who wish. A bit of life got in the way.
However the 5 ton is humming away nicely. There are a couple of details that need to be addressed. The safety controls for preventing a frozen evaporator and high and low pressures. The loop coolant is now protected to -12 Deg. C. It needs a further infusion of more propylene glycol however at this concentration a temp of -18 produces a slush which won't expand and split things. I had 2 pesky weepy leaks one of which I took care of while I had added more propylene glycol. The second one is in a place that I'll need to remove the unit and disassemble to get at. I had pressure tested the system but somehow it had eluded me. Like I have been saying this thing is fighting me all the way.! This last weepy leak is so small it evaporates on the heated floor. Oh well this spring I get that little bugger!! The night temps here have been dropping to -12 to -16 with strong winds and to-nite is -18 forecasted. The DIY 5 Ton is keeping the shop comfortable at 18 Deg.C and running at about 70-80% duty cycle. The variable frequency drive is delivering full 5 Ton at these cold O/S temps. I had it dialed back to about 3 ton and it ran non stop to maintain the shop temp. The loop temps are now 7 Deg.C in and 3.6 Deg.C out to the loop. The air handler is receiving 42 Deg.C. warming the shop. In the photos you will see the small pressure switches that will protect the system with pressure extremes and a cold control that will protect the evaporator from a complete freeze-up. Oh yes the photo of the weepy leak. I think the DIY GSHP is just marking its territory. Randen Last edited by Daox; 01-06-15 at 09:37 PM.. |
|
|
|
| The Following User Says Thank You to randen For This Useful Post: | buffalobillpatrick  (01-07-15) (01-07-15) |
|
01-09-15, 03:00 PM
|
#89 |
|
Supreme EcoRenovator
Join Date: Jan 2010
Location: elizabethtown, ky, USA
Posts: 2,428
Thanks: 431
Thanked 619 Times in 517 Posts
|
Randy,
Congrats on another awesome creation! It looks marvellous. I wish I could carve out enough time and space to build something similar. Every time I start working on something, another higher-priority task takes me away from it. I have a question. What kinds of sensors are you using for your high and low pressure limiters? Are they linear or just pressure actuated switches? Other members have been asking where they come from. |
|
|
|
|
01-11-15, 07:33 AM
|
#90 |
|
Uber EcoRenovator
Join Date: Apr 2011
Location: Strathroy Ontario Canada
Posts: 657
Thanks: 9
Thanked 191 Times in 129 Posts
|
Jeff5may
Thanks for the compliment. I believe most DIYers suffer from the same. Too many other projects and its tough to stay focused. My next project I want to get working is my electric truck. It a Chevy S-10EV of the EV-1 fame. But there's house, work & domestic tasks. The switches are readily avalible on E-bay from many suppliers. They are just switches nothing linear about them. Randen |
|
|
|
 |
| Thread Tools | |
| Display Modes | |
|
|


 Linear Mode

