
|
|
Advanced Search | |||||||
 |
|
|
Thread Tools | Display Modes |
|
|
 08-08-11, 08:47 AM
|
#1 |
|
Administrator

Join Date: Aug 2008
Location: Germantown, WI
Posts: 5,525
Thanks: 1,162
Thanked 374 Times in 305 Posts
|
This weekend we took our first step toward remodeling our office. We've been talking about doing this since we bought the house. All of the 1st floor rooms have been remodeled except this one. It has some pretty beat up and stained carpet that is falling apart in places. The ceiling is also pealing due to some water damage that was done years ago from the previous owners. The problem has been fixed long ago thankfully. Also, I don't think that the exterior wall is insulated at all besides the thin piece of foam under the siding outside.
Anyway, the first step was picking up the new flooring. I'll be adding hydronic heat to the floor and will be putting bamboo over it. We picked up the bamboo this weekend. Its semi-thin (around 1/2" I'd guess) tongue and groove pieces. I'll get pics of all this stuff up later.
__________________
Current project - To view links or images in signatures your post count must be 0 or greater. You currently have 0 posts. To view links or images in signatures your post count must be 0 or greater. You currently have 0 posts. & To view links or images in signatures your post count must be 0 or greater. You currently have 0 posts. |

|

|
|
08-08-11, 10:14 AM
|
#2 | |
|
Supreme EcoRenovator

Join Date: Mar 2009
Location: Portland, OR
Posts: 4,004
Thanks: 303
Thanked 723 Times in 534 Posts
|
Quote:
As I recall, you already have fossil -fueled hydronic heating in part of your house. And your solar panel rack and heat storage tank, both seem aimed at solar space heating... and may likely have lower temperature heat available to you. I have experimented with Watts Radiant RadiantWorks and have found it very interesting and useful, especially when doing some 'what-if' trial runs. It has helped me understand how varying certain parameters can affect the system performance. As for myself, I am beginning to favor the use of 3/8" PEX, spaced much closer than usual (3" or 4"), using a multi-tube spiral arrangement, as illustrated below. 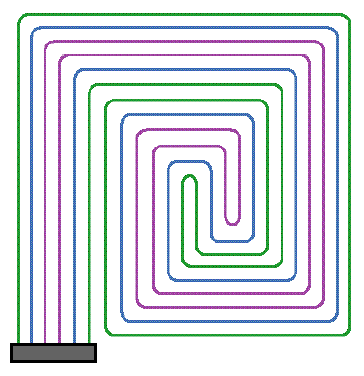 ...I am also favoring aluminum spreader plates like Gary's floor, topping the plates with 1/4" Hardibacker and finishing the floor with Marmoleum, which has very low R-value. Best of luck with your project. -AC_Hacker
__________________
I'm not an HVAC technician. In fact, I'm barely even a hacker... Last edited by AC_Hacker; 08-08-11 at 10:18 AM.. |
|
|
|
|
| The Following User Says Thank You to AC_Hacker For This Useful Post: | FortyTwo (12-31-12) |
|
08-12-11, 09:11 AM
|
#3 | |
|
Administrator
Join Date: Aug 2008
Location: Germantown, WI
Posts: 5,525
Thanks: 1,162
Thanked 374 Times in 305 Posts
|
Quote:
__________________
Current project - To view links or images in signatures your post count must be 0 or greater. You currently have 0 posts. To view links or images in signatures your post count must be 0 or greater. You currently have 0 posts. & To view links or images in signatures your post count must be 0 or greater. You currently have 0 posts. |
|
|
|
|
|
08-12-11, 11:28 AM
|
#4 | |
|
Supreme EcoRenovator
Join Date: Mar 2009
Location: Portland, OR
Posts: 4,004
Thanks: 303
Thanked 723 Times in 534 Posts
|
Quote:
I came across a study by Siegenthaler (the guy who wrote the book) and he was comparing the effects of using several different PEX diameters... 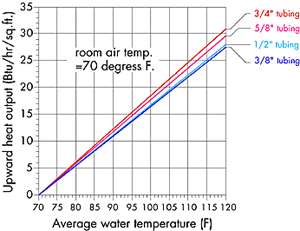 As I recall, the bigger the diameter, the better the heat transfer, tube spacings being equal. However, the difference between 1/2" and 3/8" was very small... as I recall it was around 3% difference... pretty small, all things considered. I've also seen studies, and learned from working with computer models (this is where RadiantWorks was so helpful) that the increase in heat transfer that results from decreasing tube spacing is large. And the bending radius of 3/8" is favorably smaller, too. When I first came across the concept of Low Exergy Heating (AKA: low temperature heating), I spent a couple of weeks on a massive google-blitz from which I learned that there was not much work that had done on Low-Ex heating in the US, and that the really important work had been done in Europe a decade+ ago. So that lead me to all kinds of installations and products that had been developed for this purpose. And there, over and over again, I found very closely-spaced tubing configurations... like around 3 to 4 inch spacing (or closer). One of the most interesting studies I found was Chinese (they are graduating 400,000 engineers per year as opposed to our 80,000) where they experimented with an extruded plastic floor with small heated water channels, side-by-side. The material tests were very, very favorable. Nowhere during my pursuit of Low-Ex heating information did I come across spacings of 9" and 12"... This is American fossil-fueled foolishness. Back to wet system (poured concrete), one of the big determiners of spacing is a desire for even heating. The radiant-heating trade even has a term for cold spaces that result from tubes being spaced too wide. they call it 'striping'. Striping results in parts of the floor that feel cold to the feet, so it is to be avoided. So tubes are spaced more closely to avoid striping. Thick slabs are less likely to stripe than thin slabs... Minimum thin slab thickness is about 1.5" before striping occurs... But in all these considerations, tube spacing was in the 8 inch range. And again, if you look at Gary's thermal photos of aluminum plate spreaders, the heat falls off as you move away from the tube... closer tubes, less heat fall off. So the heat that comes off a floor is the average heat of the surface of the floor. Floors that have a large variance in temperatures will need a higher feed temperature than floors that have a lower variance, to achieve a given heat output. If you are using cheap fossil fuel (remember that stuff?) a difference of a few degrees is hardly worth concern. If you are going solar, it means more days that you can use 100% solar, if you are using a heat pump, the energy savings are very large. I can certainly see that if you are a tradesman, installing radiant floors, you would want to get in, get the job done, and move on to the next paying job, and not fiddle around with a swarm of closely-spaced tiny tubes. But then there's DIY... Regards, -AC_Hacker PS: I think spending a couple of hours with RadiantWorks is much more educational than spending that time reading a book... and it's free. * * *
__________________
I'm not an HVAC technician. In fact, I'm barely even a hacker... Last edited by AC_Hacker; 08-12-11 at 12:10 PM.. |
|
|
|
|
|
08-08-11, 11:09 AM
|
#5 |
|
Administrator
Join Date: Aug 2008
Location: Germantown, WI
Posts: 5,525
Thanks: 1,162
Thanked 374 Times in 305 Posts
|
Right now I have electric/hydronic heat since my gas tank water heater died. The only form of hot water I have right now is my on demand electric unit that is just enough for a shower. I do not plan on using it to heat the house this winter. I do plan on having the solar setup done before winter rolls around though and it will run off of that and the natural gas forced air.
But, I am unsure how I am going to do the floor. I am definitely leaning toward not pouring the floor in concrete and using the aluminum spreaders like Gary. I have not played around with tubing sizes though. I'll have to do some more reading through the DIY hydronic floors thread to catch up on whats being done. However, I do know I want close spacing so I can fully utilize the solar hot water for heating purposes. I'll definitely have to check out that link. Any suggestions are welcome.
__________________
Current project - To view links or images in signatures your post count must be 0 or greater. You currently have 0 posts. To view links or images in signatures your post count must be 0 or greater. You currently have 0 posts. & To view links or images in signatures your post count must be 0 or greater. You currently have 0 posts. Last edited by Daox; 08-08-11 at 11:13 AM.. |
|
|
|
|
08-08-11, 12:45 PM
|
#6 |
|
Journeyman EcoRenovator
Join Date: Feb 2010
Location: Arab, AL
Posts: 491
Thanks: 109
Thanked 49 Times in 43 Posts
|
I've usually kept this type of comment to myself on topics where people are remodelling, but I'm going to throw it out there anyway and will shut up if it's not appreciated.
FWIW: I'd strip the drywall off of the outside walls, inspect for wood damage and check out the wiring and then I'd have spray foam insulation sprayed to fill the cavity. Instant vapor barrier and best available insulation. Add new drywall, finish it, paint it and feel good about my work. I can't help but believe it would be more than worth it over the long term, unless I were planning to move really soon. Even then, with some photos of the open walls, it might be a great selling point to someone who was afraid of how much it would cost to heat and cool. |
|
|
|
|
08-08-11, 01:02 PM
|
#7 |
|
Administrator
Join Date: Aug 2008
Location: Germantown, WI
Posts: 5,525
Thanks: 1,162
Thanked 374 Times in 305 Posts
|
Definitely don't keep it to yourself!
 I'm actually planning on doing a bit more than that. This one room will help me determine what I'll be doing to my upstairs which also needs hydronic flooring and wall insulation. The current plan is to do something to further insulate the wall beyond just normal fiberglass batts. Spray foam is a great start for sealing purposes. Perhaps I'll try one of those DIY kits. However, beyond that, I'll also be thickening the wall. I'd like to end up with an R40 wall once everything is said and done, but I think that may be a bit much to ask for. I might have to settle with around R30. Since a traditional wall 2x4 wall is only ~R11 once you take into consideration the thermal bridging, that is quite a step up. I'm thinking of something similar to the mooney wall. I don't know how deep I'm going to make the wall yet though.
__________________
Current project - To view links or images in signatures your post count must be 0 or greater. You currently have 0 posts. To view links or images in signatures your post count must be 0 or greater. You currently have 0 posts. & To view links or images in signatures your post count must be 0 or greater. You currently have 0 posts. Last edited by Daox; 08-08-11 at 01:07 PM.. |
|
|
|
|
08-08-11, 01:23 PM
|
#8 |
|
Journeyman EcoRenovator
Join Date: Feb 2010
Location: Arab, AL
Posts: 491
Thanks: 109
Thanked 49 Times in 43 Posts
|
OK, let's go one step farther then. After the wall is spray foamed, before you drywall it, you add a layer of extruded polyeurethane in your choice of thickness. I know it comes in 1/2" up to 2" in my area. This takes care of that thermal bridging problem at the cost of a very minimal amount of lost room dimension. While the sprayed insulation + sheet foam insulation may not bring your number quite up to R40, I'd bet it would be quite nice and cozy.
OTOH, to meet passive house standards, mooney walls are probably the best choice. It's hard to beat a 14" or thicker wall with blown in insulation. In my area at least, homes as old as yours typically have large enough rooms that would accept a mooney wall setup without feeling cramped, with the likely exception of the bathroom. I'll be following along on whichever choice you make. |
|
|
|
|
08-09-11, 07:39 AM
|
#9 |
|
You Ain't Me

Join Date: Nov 2009
Location: Northampton MA
Posts: 662
Thanks: 6
Thanked 71 Times in 58 Posts
|
I suggest you get some recycled polyiso, cut it to fit the cavities and spray foam it in place. That will give you a good air seal and an immediate R 16. Then I'd Larsen truss to the inside with plywood gussets and 2x3's and dense pack. You could easily get R 40 that way and it would be a lot cheaper/healthier than a full load of spay foam with a much higher R value.
|
|
|
|
|
08-09-11, 07:57 AM
|
#10 | |
|
Journeyman EcoRenovator
Join Date: Feb 2010
Location: Arab, AL
Posts: 491
Thanks: 109
Thanked 49 Times in 43 Posts
|
S-F said
Quote:
|
|
|
|
|
|
| Tags |
| bamboo, diy, flooring, hydronic, remodel, superinsulate |
| Thread Tools | |
| Display Modes | |
|
|


 Hybrid Mode
