
|
 10-18-16, 07:31 AM
|
#11 |
|
Supreme EcoRenovator
Join Date: Jan 2010
Location: elizabethtown, ky, USA
Posts: 2,428
Thanks: 431
Thanked 619 Times in 517 Posts
 |
Here's an externally equalised valve with a MOP charge in the sensing bulb. The MOP stands for Max Operating Pressure and limits the evaporator pressure to stay below a certain limit. Also known as heat pump charge, it keeps the evaporator in dehumidifying territory allways. For r-22, this is about 85 psig. Half ton capacity, adjustable superheat, sweat fittings. A whopping 16 bucks! Original list price on this line of valves was around $200.
https://surpluscityliquidators.com/p...equalizer.html  I like internally equalized valves myself on these smaller units. The only time an external equalizer is useful is when there is a decent amount of pressure drop across the evaporator (more than 5 psi). This only happens if the evaporator is physically huge and long, or if there is an integrated restrictive component (like a distributor) in the evaporator circuit. Here's an Emerson/Alco catalog with model number decoding info and way more stuff than you will ever want to find: http://www.carlyleccrp.com/site/catalog07/alco/alco.pdf Last edited by jeff5may; 10-18-16 at 10:45 AM.. |

|

|
| The Following User Says Thank You to jeff5may For This Useful Post: | stevehull (10-18-16) |
|
10-18-16, 03:19 PM
|
#12 |
|
Helper EcoRenovator

Join Date: May 2016
Location: SE Wisconsin
Posts: 55
Thanks: 3
Thanked 14 Times in 10 Posts
|
This will be my first experience with a TXV so thanks for the great advise. Before I read your post this morning I ordered the external equalized one from amazon(surplus city).
Today, I ran a bench test using thermometers and I will post info on that later. I believe it to be repeatable data that I can use to compare to coming tests. |
|
|
|
|
10-18-16, 05:14 PM
|
#13 |
|
Helper EcoRenovator
Join Date: May 2016
Location: SE Wisconsin
Posts: 55
Thanks: 3
Thanked 14 Times in 10 Posts
|
Here is my bench test setup. The thermometers measure temps out of evap, out of cond, into cond, and water in tank.
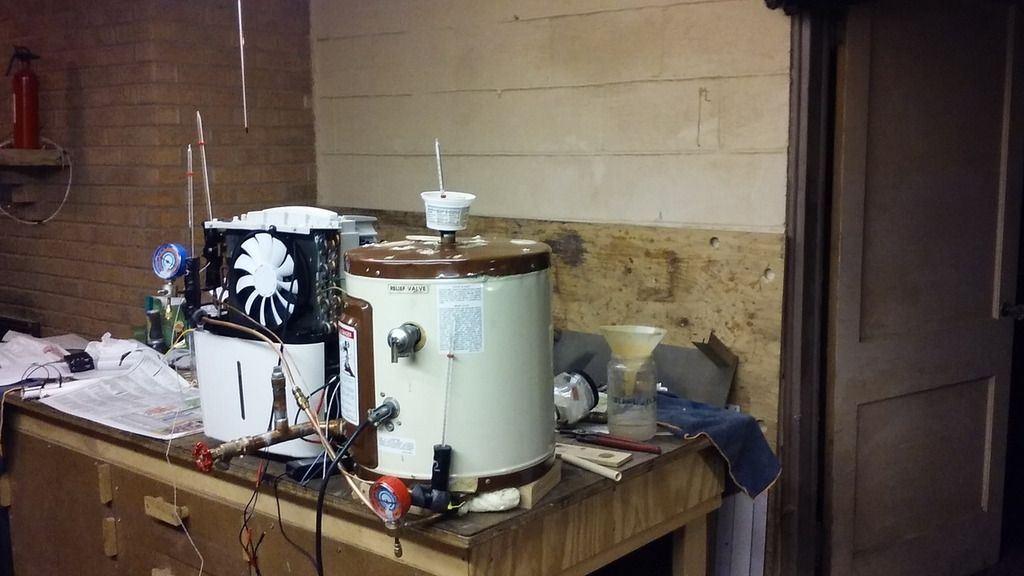 I use watt meter to measure time as well as watts and cumulative watt hours. The test is started after the system has been idle over night. The test stops when the thermostat shuts it down. The final water temp is taken a few minutes after shut down since that temp continues to rise for few minutes. 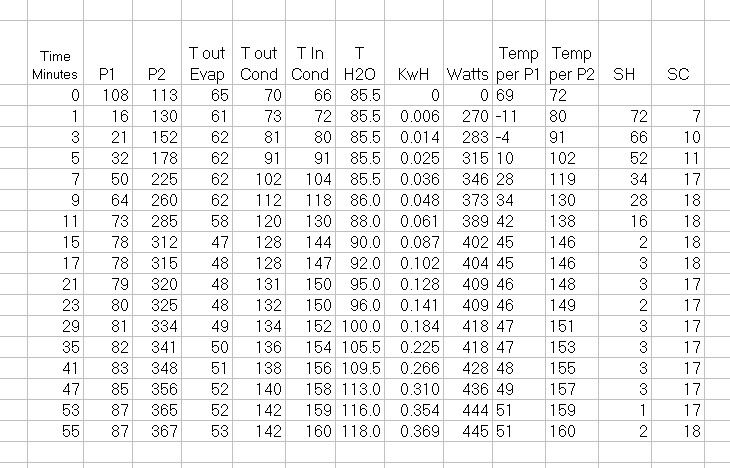 From start up it takes about 10 minutes for the SH to drop down to where the evap is able to pull heat out of the 66F ambient air. I am hoping that a TXV will shorten this time. I used the data from my own PT test to calculate SH, if I had used published data the SH would be around -3 which I don't think is right. 6 gal of water weighs 50 lb. it started at 85.5F and ended at 118.5F which calculates to 0.484 KwH. Per the watt meter the test took 0.445 KwH which doesn't seem so good, heating the steel tank also took some energy. I will be repeating this test with the resistance heater to see how it compares. |
|
|
|
|
10-19-16, 11:44 AM
|
#14 |
|
Supreme EcoRenovator
Join Date: Jan 2010
Location: elizabethtown, ky, USA
Posts: 2,428
Thanks: 431
Thanked 619 Times in 517 Posts
|
From your chart, it looks like your rig is SUPER OVERCHARGED! The rig acted like it should for the first 5 minutes. After that, the condenser began to back up with excess liquid, giving you the heavenly subcooling. At about 7 minutes in, the condenser found equilibrium with the compressor and the cap tube, minimizing its efficiency. At this point, your delta T was around 35 DegF, and the majority of the heat transfer happened in this minimum space where there was room for gas to condense.
After that point, all the rig really did was increase in mass flow and pressure everywhere. This led to your lack of superheat (lots of liquid not evaporating in the evaporator due to high suction pressure) and low efficiency figures. Let out lots of charge and try again. A digital scale that reads to at least grams is super useful to keep track of charge. Looks to me like your compressor should never be drawing any more than 400 watts. If your chart is accurate, it looks like you should be shooting for a superheat value of around 30DegF. The oversized evaporator can only do its job if you keep the suction pressure low. |
|
|
|
|
10-19-16, 06:37 PM
|
#15 |
|
Helper EcoRenovator
Join Date: May 2016
Location: SE Wisconsin
Posts: 55
Thanks: 3
Thanked 14 Times in 10 Posts
|
Thanks again for that explanation. I do have a small scale, but forgot to use it. After I get the txv, I will be sure to do a better job of recording charge. Today I slowly let out some gas from low side valve while running. I watched the watts and pressures and let out enough so watts were below 400. I will let it sit overnight before running a test so all temps will be stabilized. Tomorrow I will repeat the test and let you all know what happens. I believe I have a repeatable test procedure and should get meaningful results.
Today, I also ran a test using the resistance heater with good results: Initial water Temp----91 Final water temp----118 KwH used--------------.406 Calculated KwH based on 50 lbs of water---.396 97% efficiency based on above 2 numbers No surprises, I needed to do this to confirm my test methods and calculations. |
|
|
|
|
10-20-16, 03:24 PM
|
#16 |
|
Helper EcoRenovator
Join Date: May 2016
Location: SE Wisconsin
Posts: 55
Thanks: 3
Thanked 14 Times in 10 Posts
|
So I let out some refrigerant yesterday and retested today. I let everything sit over night so there should be no temp gradients in the water or tank. It is a rare coincidence that the starting temp was 85.5 the same as last test. I let it run until the thermostat shuts it down. So this test was close to identical to the last one with almost equal energy use although at a lower rate. This test took .368 KwH Vs .369 for the last test.
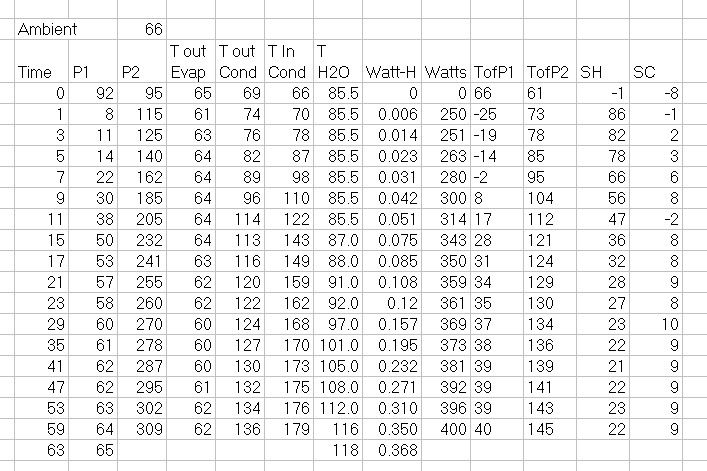 I just noticed I must have made an entry mistake for T out cond at 11 minutes, probably should be 104 instead of 114 which would give 8 deg sub cool. I expect to get the TXV tomorrow and install it over the weekend. The I will start with a small charge and report back. |
|
|
|
|
10-25-16, 03:10 PM
|
#17 |
|
Helper EcoRenovator
Join Date: May 2016
Location: SE Wisconsin
Posts: 55
Thanks: 3
Thanked 14 Times in 10 Posts
|
The TXV valve arrived a few days ago, so here is where I am at now.
First here's a photo of the evap assem I have been using up to now. The gas entered the bottom of the original condenser then exited the top and flowed into the bottom of the original evaporator. The other side has the ugly piping which connects them. The evaporator is the single row HX. 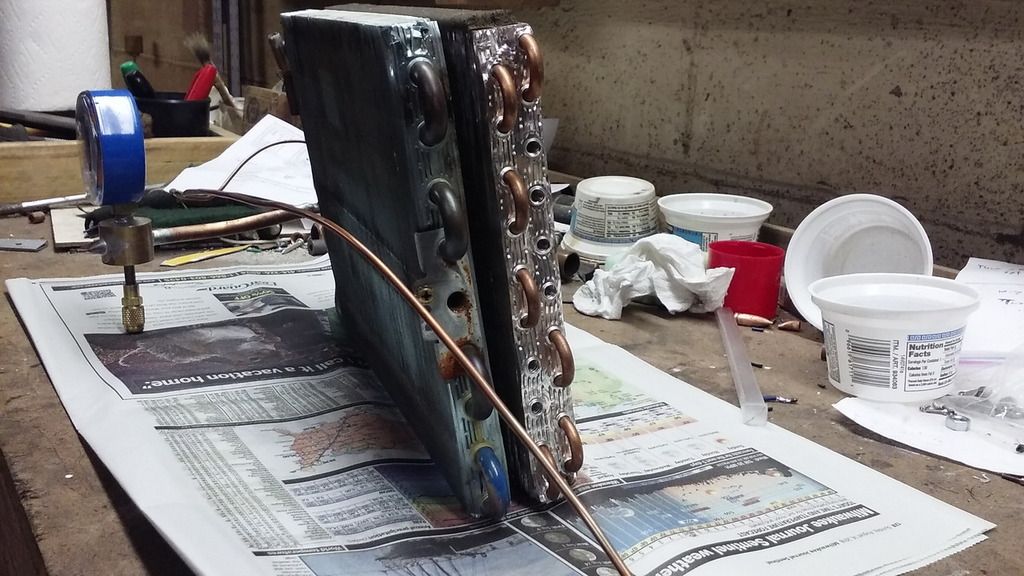 I have just changed it to only use the original evaporator for two reasons. First, it has gotten really crowded and I was having a hard time finding a good place to mount and plumb the TXV valve with both HX's. Second, the compressor gets over 210F and I thought that was too high. I expect this to send colder gas to the compressor to keep it under 200F at the expense of efficiency. 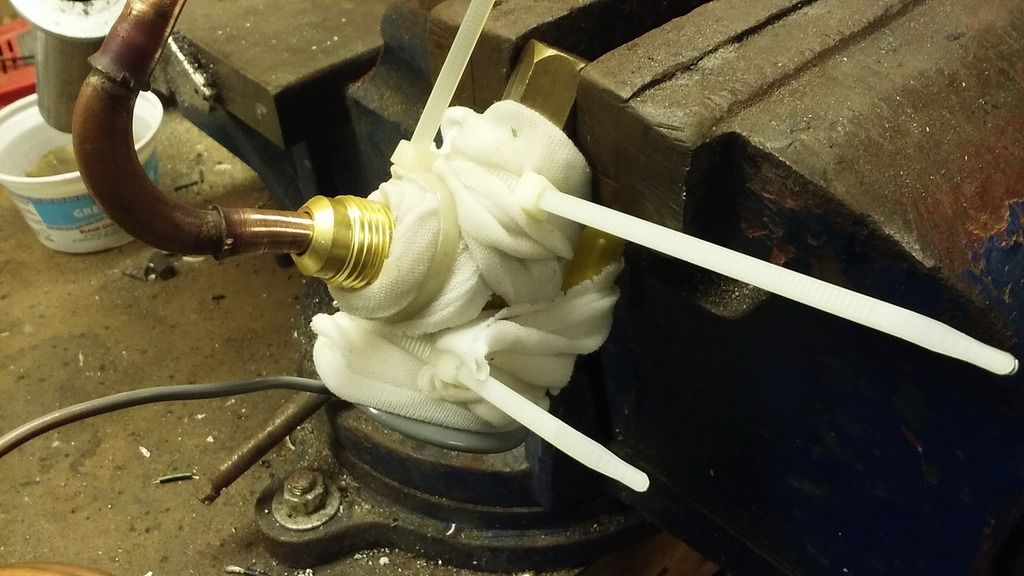 I soldered lines to the TXV because I didn't have 1/2 tube & flare nuts, 1/2 tubing is too big for this system, and I thought it should work since some TXV's are made for soldering. Here's a photo of the valve with wet rags zip tied for heat control. It seemed to work OK. 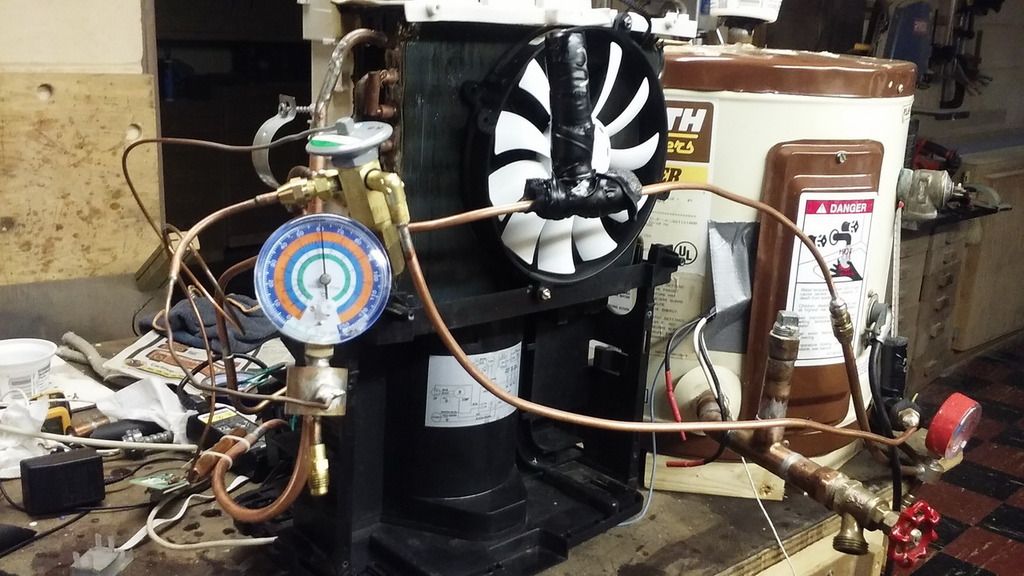 Here it is back together with 60 psi of C25 welding gas. If it holds pressure I will charge it up and test. 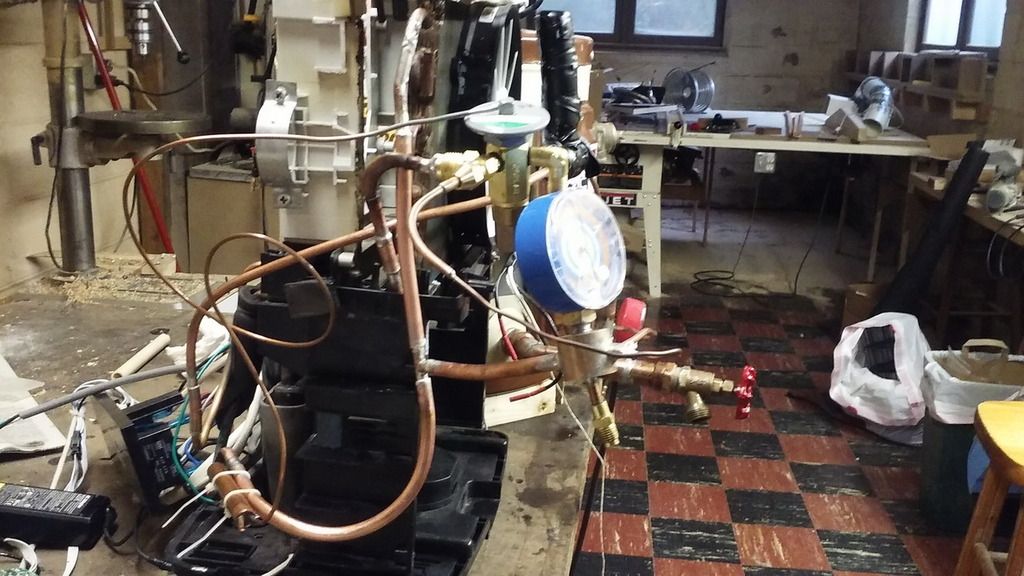 And even with removing the original condenser it still is a mess of tubes and splices. |
|
|
|
|
10-25-16, 11:30 PM
|
#18 |
|
Supreme EcoRenovator
Join Date: Jan 2010
Location: elizabethtown, ky, USA
Posts: 2,428
Thanks: 431
Thanked 619 Times in 517 Posts
|
Looks like a test rig to me. The only thing I'd like to know is what kind of solder did you use? The plumbing solder will vibrate itself apart after awhile and leak. Running pressures into the 20+ atmosphere range has a way of destroying weak links pretty quick. With as many joints as you have, there are many possible points of failure. Should work as proof of concept or for learning purposes, though.
Hiding devices to fit where they didn't originally belong and routing tubing/piping is a craft all in itself. Plumbers and pipe fitters develop this skill over a period of years before they are fully qualified. Don't be too hard on yourself in his area; as long as the rig is sealed, it will function. Those guys make big bucks building rigs that look sanitary because it is super difficult. Haven't seen anything specific about the compressor you are using, nor the model of dehumidifier it lived in. From your two trials, it looks as if you could have gotten better efficiency out of the second run by slowing down the fan. Running refrigerant through the evaporator as fast as it can go is not usually the best mode of operation. That situation will worsen with a TXV metering the refrigerant through a smaller evaporator. Last edited by jeff5may; 10-26-16 at 07:59 AM.. Reason: words |
|
|
|
|
10-26-16, 09:00 AM
|
#19 |
|
Helper EcoRenovator
Join Date: May 2016
Location: SE Wisconsin
Posts: 55
Thanks: 3
Thanked 14 Times in 10 Posts
|
This morning it is still holding pressure at 60 psi, but I won't have time to work on it today.
I expected to be called out for using solder, it's just so much easier than brazing. I used Oatey Safe Flo solder which contains tin-copper-bismuth-silver. It has a melting range of 420-460F which is higher than tin-lead which starts to melt at 361F and it's also higher than any temp it will see. I don't worry about it because a full charge will be less than 4 oz of propane. The way it's going this may never be more than a test rig, but if I do decide to use it I will add brackets to control vibration and insulation. I did try running the fan slower but didn't take good data, I used a 9v power brick in place of the 18v one used in the data I reported here. I can easily change these around. I will look for info on the dehumidifier and compressor for my next post. |
|
|
|
|
10-29-16, 10:45 AM
|
#20 |
|
Helper EcoRenovator
Join Date: May 2016
Location: SE Wisconsin
Posts: 55
Thanks: 3
Thanked 14 Times in 10 Posts
|
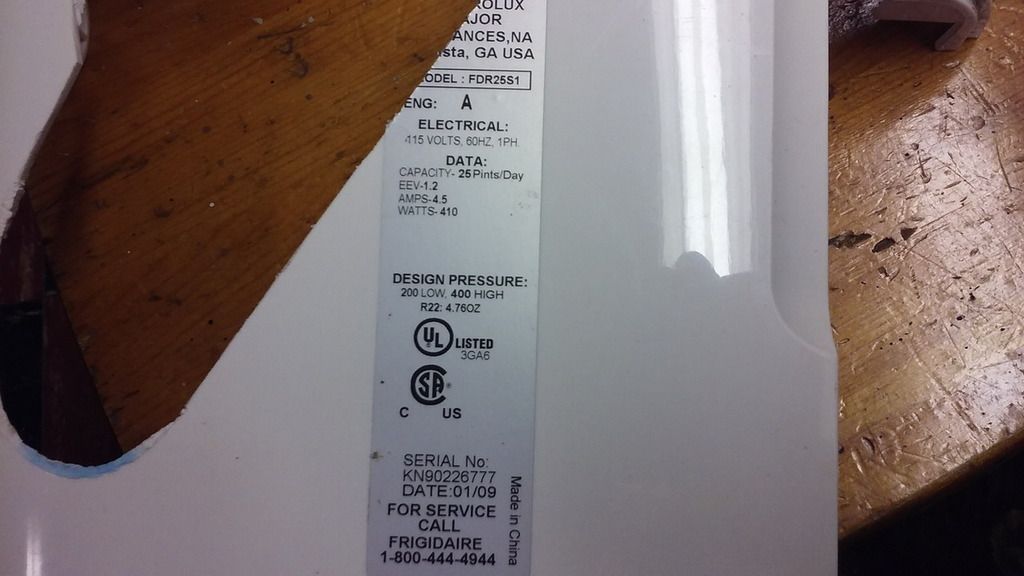
Here's the specs on the dehumidifier label.
 And here's a photo of the backside with 12" scale. It's 7" tall from base to top of cylindrical portion of housing. 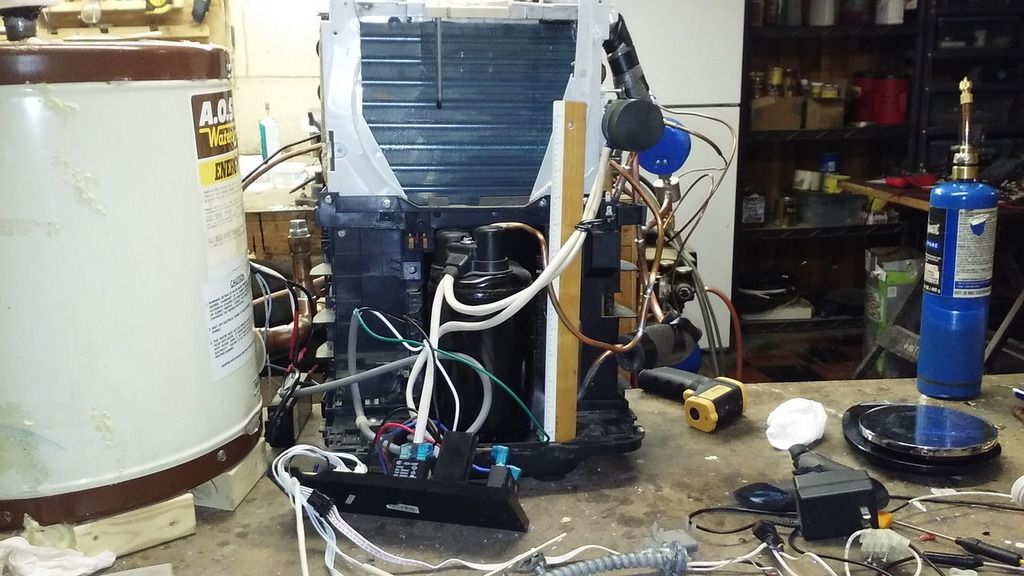 I am starting to think there is something wrong with this compressor. The hot gas out of the compressor and into the condenser is way hotter than the liquid out of the condenser. The first one I built has the gas into the condenser only a few degrees higher than coming out. It seems like the compressor is heating up the gas more than it should. My first unit has an old style compressor that looks like a volley ball, I think it's a piston pump. This second one is a small vane pump, perhaps these are not as efficient in the small size. Anyway I am starting to take data and will post more in a few days. |
|
|
|
 |
| Thread Tools | |
| Display Modes | |
|
|


 Linear Mode

