
|
 12-22-13, 11:24 PM
|
#21 |
|
Lurking Renovator
Join Date: Dec 2013
Location: lynchburg, va
Posts: 14
Thanks: 10
Thanked 0 Times in 0 Posts
|
wow, thank you both. I'll have my A.C. buddy come do the pressure checks etc. Probably won't happen until after Christmas.
What do you recommend i try for the refrigerant? or where could i look to find it? (i tried googling...got nothing). |

|

|
|
12-22-13, 11:48 PM
|
#22 |
|
Supreme EcoRenovator

Join Date: Oct 2008
Location: Austin, TX
Posts: 1,154
Thanks: 14
Thanked 257 Times in 241 Posts
|
The compressor should be labelled with the type.
__________________
To my surprise, shortly after Naomi Wu gave me a bit of fame for making good use of solar power, Allie Moore got really jealous of her... |
|
|
|
| The Following User Says Thank You to NiHaoMike For This Useful Post: | adeyo (12-23-13) |
|
12-24-13, 01:55 PM
|
#23 |
|
Lurking Renovator
Join Date: Dec 2013
Location: lynchburg, va
Posts: 14
Thanks: 10
Thanked 0 Times in 0 Posts
|
Heres a pic. assuming the refrigerant is R134a ...is that typical? it looks like something i can pick up at AutoZone. This might make it easier to service in the future. pro's/con's to this?
|
|
|
|
|
12-24-13, 03:02 PM
|
#24 |
|
Supreme EcoRenovator
Join Date: Oct 2008
Location: Austin, TX
Posts: 1,154
Thanks: 14
Thanked 257 Times in 241 Posts
|
It does use R134a. Be sure to get plain R134a and not the kind with leak stop or anything else in it. Get two cans and you'll determine the exact amount using subcooling or superheat. Another option is to get some air dusters (R152a) and a side can tap, which is said to actually work better for higher temperatures. Also get about 10oz of ester oil.
The fact that it's 240V complicates testing. One way to test is with two power cords. Connect the hots of each to the compressor terminals (remove the terminal cover and take a picture to ask which ones), then plug them into two opposite phases (a multimeter would help a lot). Just beware that the other plug would become energized so do not touch it unless both plugs are not connected. Only power it on long enough (a few seconds or less) to check if it works.
__________________
To my surprise, shortly after Naomi Wu gave me a bit of fame for making good use of solar power, Allie Moore got really jealous of her... |
|
|
|
|
12-24-13, 06:12 PM
|
#25 | |
|
Supreme EcoRenovator
Join Date: Jan 2010
Location: elizabethtown, ky, USA
Posts: 2,428
Thanks: 431
Thanked 619 Times in 517 Posts
 |
Quote:
I imagine the fan and compressor will both start up on 110VAC. If you don't have a proper dryer/range/welder cord to use for testing, I would just use a 110VAC plug. Remember to solidly connect wires to each other and insulate them before testing. This ain't speakers and ipods here! Once you get your test rig wired to a plug, OHM IT OUT BEFORE YOU PLUG IT IN! I don't know how many hackers have ruined their days by not doing this. Just because you think it's wired right doesn't always mean it is. It only takes a second to make sure you aren't going to blow something up. Make sure you have a panic switch in hand, and a dry chemical fire extinguisher within close reach. I use a surge protector strip with a shutoff switch and an overload built into it whenever I mess with my stuff. |
|
|
|
|
|
12-24-13, 07:09 PM
|
#26 |
|
Supreme EcoRenovator
Join Date: Oct 2008
Location: Austin, TX
Posts: 1,154
Thanks: 14
Thanked 257 Times in 241 Posts
|
The fan might start, but the compressor probably wouldn't.
What I described is safe if you know what you're doing. (I have done it before.) You obviously don't want to make it a permanent setup, but it's OK for testing. It's no more dangerous than exposed wiring. (To be extra safe, wear insulating gloves when plugging it in.)
__________________
To my surprise, shortly after Naomi Wu gave me a bit of fame for making good use of solar power, Allie Moore got really jealous of her... |
|
|
|
|
01-17-14, 03:20 PM
|
#27 |
|
Administrator

Join Date: Aug 2008
Location: Germantown, WI
Posts: 5,525
Thanks: 1,162
Thanked 374 Times in 305 Posts
|
Any updates on this adeyo?
__________________
Current project - To view links or images in signatures your post count must be 0 or greater. You currently have 0 posts. To view links or images in signatures your post count must be 0 or greater. You currently have 0 posts. & To view links or images in signatures your post count must be 0 or greater. You currently have 0 posts. |
|
|
|
|
01-17-14, 07:32 PM
|
#28 | |
|
Lurking Renovator
Join Date: Dec 2013
Location: lynchburg, va
Posts: 14
Thanks: 10
Thanked 0 Times in 0 Posts
|
Quote:
Thanks If anyone can help give me step by step instructions on pressure testing the lines I'll attempt it without waiting for my A.C. guy. Or, could someone point me into a great guide? I'm assuming i might need to crimp the brass tubing that appears to be open on this display model? (see pic...in the guide, the pictures show crimped or closed tubes) advice? |
|
|
|
|
|
01-18-14, 01:06 PM
|
#29 | |
|
Supreme EcoRenovator
Join Date: Jan 2010
Location: elizabethtown, ky, USA
Posts: 2,428
Thanks: 431
Thanked 619 Times in 517 Posts
|
Quote:
At the factory, they vacuum, fill, and test the units through these open ends with expensive slip-on, self-sealing, temporary production line tools. After the unit has been run thru its paces, the ends are crimped and brazed. Due to the small size and short warranty of these units, GE has decided these units will never need service. Therefore, no service valves exist in any of these units. So here's what you want to do. Grab some access valves: CBI part: 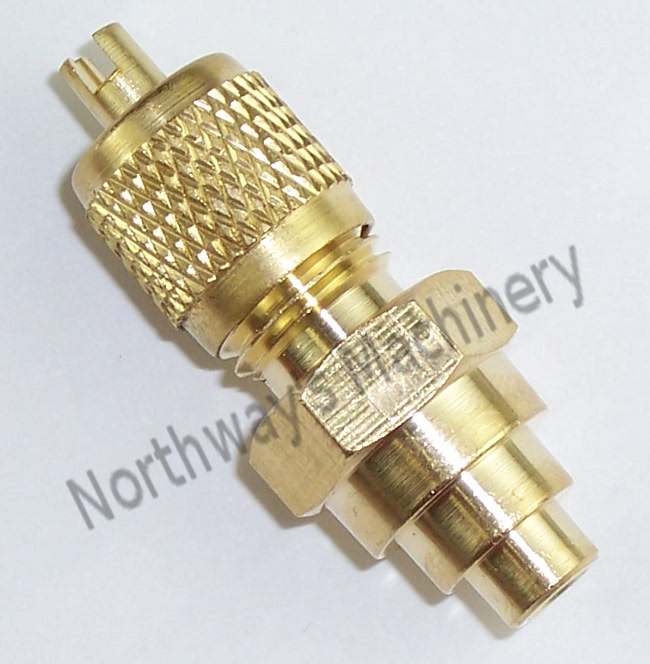 MFR part no. CBI LXB29B or JB A31729 JB part:  These will slip into the ends of your tubing and need to be brazed in with silfos rod. You can get both items at an HVAC supply house in your area. Make sure and take the cores out of the valves before you solder. Otherwise, you will burn the rubber seals and will need new cores. If you can't braze, just order the access valves and wait on your ac pro. He will be able to install them in no time flat. You should be able to score a package of these valves easily. Stores will not want to sell them individually, and it will cost you less for a pack of 3 or 5 or 10 anyway. They are universal, so you can use them on other projects than just a/c units. Last edited by jeff5may; 01-18-14 at 01:41 PM.. Reason: pics |
|
|
|
|
|
01-18-14, 02:49 PM
|
#30 |
|
Supreme EcoRenovator
Join Date: Jan 2010
Location: elizabethtown, ky, USA
Posts: 2,428
Thanks: 431
Thanked 619 Times in 517 Posts
|
If you go to the local auto parts store, the above access fittings are 1/4 inch SAE flare size, or old-school R-12 size. Pretty much all the stuff they have on shelves is new-school R-134a size fittings. So if you want to use the off-the-shelf stuff, you will need to purchase an adapter kit. The cheapest is an Interdynamics "ac pro" part no. VA-LH10 or VA-LH12. With these two, you will only use the low-side adapter fitting, since the high side fitting on most cars has a larger fitting. The systems (old and new) are designed so that a shadetree mechanic can not hook up to the wrong fitting and cause mayhem. This low-side fitting adapter will allow you to use the available DIY R-134a products to vacuum, purge, and fill your unit. The high-side fitting can still be used with a standard R-12 or R-22 gauge set as is.
Last edited by jeff5may; 01-18-14 at 02:51 PM.. Reason: info |
|
|
|
 |
|
|


 Linear Mode

