
|
 08-20-09, 12:30 AM
|
#81 |
|
Supreme EcoRenovator

Join Date: Mar 2009
Location: Portland, OR
Posts: 4,004
Thanks: 303
Thanked 724 Times in 534 Posts
|
dremd,
Start now, the digging part is what takes so much time. Call some local installers and ask what the preferred local configuration is. Is it slinkys in ditches or is it boreholes? How much earth exchanger do you need to take care of your house? You can buy or modify or build the heat pump part during the cold months. Start now & take lots of pictures to share with us. Good luck! Best Regards, -AC_Hacker |

|

|
|
08-20-09, 04:43 PM
|
#82 | |||||
|
Need More Eco

Join Date: Sep 2008
Location: Scott, La
Posts: 172
Thanks: 2
Thanked 6 Times in 6 Posts
 |
Quote:
Quote:
I've got 7 Acres to spread out on; may put a few in the bottom of the pond as well; but over the last 5 years it has been pretty dry (we now get about 1/2 of the rain the we historically have). Quote:
Quote:
Quote:
|
|||||
|
|
|
|
08-21-09, 04:39 PM
|
#83 |
|
Lurking Renovator
Join Date: Jul 2009
Posts: 4
Thanks: 0
Thanked 0 Times in 0 Posts
|
I don't know if you mentioned this before, AC_Hacker, but can you explain why you didn't go for an open-loop system? Bad drainage/soil composition, municipal water only, or a really deep (read: energy intensive) well?
|
|
|
|
|
08-22-09, 12:13 AM
|
#84 |
|
Supreme EcoRenovator
Join Date: Mar 2009
Location: Portland, OR
Posts: 4,004
Thanks: 303
Thanked 724 Times in 534 Posts
|
Green_Masheen,
The short answer is that I live on a 50' x 100' city lot and my options are limited by available space. I'm hitting wet sand at 17 feet but I don't think that there's enough flow to do open loop. I could have rented a small back hoe and dug trenches and put in a slinky configuration. It would have gone faster. The way I'm doing it with boreholes is more work, but I'm half done now with my loop field. The rest of the holes should take me less time, I've learned how to do it better and quicker. I've also built and improved and discovered new tools to make things go easier. More about this later. Hope this helps... Best Regards, -AC_Hacker |
|
|
|
|
08-24-09, 12:13 PM
|
#85 |
|
Lurking Renovator
Join Date: Jun 2009
Posts: 3
Thanks: 0
Thanked 0 Times in 0 Posts
|
This is a great thread. I live a few miles south in the mid Willamette Valley, so I'm wondering if you're calculations (220 ft/ton of capacity) are applicable in my area. We're in the foothills of the coastal range, so there may be more rock, etc. Perhaps I could do a number of short wells too. Is there any minimum well depth required for the total depth to remain the same (ie, could I do 40 five foot wells?).
Thanks |
|
|
|
|
08-26-09, 01:05 PM
|
#86 |
|
Supreme EcoRenovator
Join Date: Mar 2009
Location: Portland, OR
Posts: 4,004
Thanks: 303
Thanked 724 Times in 534 Posts
|
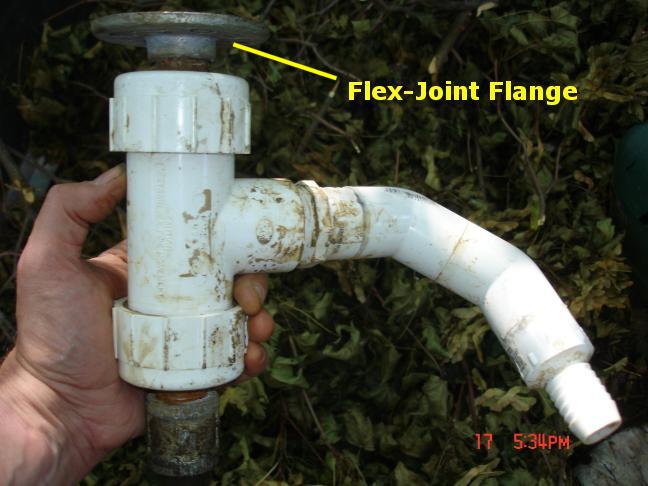
My flexi-joint on the electric auger was not holding up so well to all the punishment I have been putting it to. The shock-mount connectors are working just fine at absorbing jolts and off-axis loading, but I'm watching the fourth set of these suckers fail. So I tried a Ford/GM steering doughnut replacement part, set up the way it was designed and it worked just fine for about three glorious, high-stress minutes before failing. So my solution was to use stainless bolts to bolt straight through the doughnut and add some rubber washers atop the flanges capped with big washers, and adjust the nyloc-nuts to 'barely snug'. Under off-axis loading, this allows the bolts and rubber washers to flex just a bit, but under full torque load, the stainless steel bolts carry the full load. After about five hours of high stress digging, the new system is working perfectly. Problem solved. -AC_Hacker |
|
|
|
|
08-31-09, 11:42 AM
|
#88 |
|
Supreme EcoRenovator
Join Date: Mar 2009
Location: Portland, OR
Posts: 4,004
Thanks: 303
Thanked 724 Times in 534 Posts
|
Daox,
Not to worry, the drill pipe acts as a torsion rod and acts as a buffer against damaging shocks. Regards, -AC_Hacker |
|
|
|
|
08-31-09, 01:32 PM
|
#89 |
|
Supreme EcoRenovator
Join Date: Mar 2009
Location: Portland, OR
Posts: 4,004
Thanks: 303
Thanked 724 Times in 534 Posts
|
Yesterday I finished up hole number 11 of 16.
I thought I'd summarize what I have learned so far about this process. I'd be very surprised if anyone experienced soil conditions exactly like mine. I'd be much more surprised if no one had any of the experiences I have had. So I offer the following information in the hopes that at least some of my experience can be useful to those who might want to try to make their own loop field. Here is a diagram of the soil conditions I have encountered in every hole I have dug: TOP 2 FEET - sand/clay/organic bits The top two feet I initially started with a shovel and a pointed steel rod, to loosen things up. At first, just tossed the dirt on the ground near the hole, not realizing just how much was going to come out of the hole (and also not realizing that it would all have to go back into the hole). On subsequent holes, I used a 55 gallon barrel to hold the dirt while I was digging. This makes is very much easier to get the dirt back in the hole. In my experience, roots are a problem in the top 2 feet but really not much of a problem any deeper. I started using the Shop Vac on the second hole to remove debris, and it really helped in dealing with roots, as once the dirt was vacuumed away from the root, it became very apparent exactly where to cut to remove the root. I tried hacking out the roots with a sharpened cold chisel welded to a section of water pipe, but it didn't work nearly as well as going in with a reciprocating saw. The top two feet were very easy to get through, the soil was sand and clay, but there was so much organic matter mixed in that the soil was 'light' and easily penetrated. 2 FEET TO 6 FEET - clay to clay/sand This was the toughest layer to get through. The clay was pretty dry and hard. Initially I tried just a hand auger. It was slow, exhausting work. Using a pointed iron digging bar to loosen things up a bit, ahead of the hand auger helped, but it was tough work. I tried various diggers and bits on my electric auger, with better results, but only 1/4 horse power, it could only push a three inch bit (see photo above) about a half a foot into the clay, after which I'd have to bash away with the pointed steel bar and vacuum out the debris, and back to the electric auger, etc, etc, etc. On every hole, there was a particular layer of clay at about 4 feet deep which was very tough and it took at least an hour of drilling and bashing and vacuuming to advance six inches. So I got my hands on a 5.5 HP post hole auger and drilled out the remaining holes to the depth of the auger bit, about 36 inches. I also had Howard-the-machinist make me an adapter so I could put on an extension and drill deeper. To my disappointment, the post hole digger didn't exhibit the advantage of power I had expected. I tried putting water in the hole a couple of days before drilling, but when I hit the tough layer of clay, it wasn't just tough but it was tough and slippery. I tried a smaller diameter post hole auger bit and that did help in some cases, but not all. It seemed that the ultimate approach was drilling, bashing with the pointed iron bar and vacuuming, and repeat, and repeat. I did make an improvement to the electric auger which has helped, and that is I added an electric wench to the drill stand. A 120 volt wench would have cost me about $100 + bucks, but I got a 12 volt model on sale for $50. I had a spare 12 volt deep discharge battery laying around and a battery charger, so it was pretty easy. The real reason I added the auger is that the manual wench had open gears and I came very close to getting my fingers in the gears more than once. I have been playing guitar most of my life, and I have grown very fond of my fingers. Also, the last time the finger tips nearly went into the gears, I did a hasty calculation of what it would cost to take a trip to the emergency room, and compared that to the $50 for the wench, an I found myself driving to the store to get the wench. [* Drilling Report Aug 31, 2009 Part Two to come... *] Regards, -AC_Hacker Last edited by AC_Hacker; 09-02-09 at 12:48 AM.. Reason: Add Picture of Finger-Eating Winch Gears |
|
|
|
|
08-31-09, 01:59 PM
|
#90 |
|
Administrator

Join Date: Aug 2008
Location: Germantown, WI
Posts: 5,525
Thanks: 1,162
Thanked 374 Times in 305 Posts
|
 You said you'd go into more detail about this. Would you mind? 
__________________
Current project - To view links or images in signatures your post count must be 0 or greater. You currently have 0 posts. To view links or images in signatures your post count must be 0 or greater. You currently have 0 posts. & To view links or images in signatures your post count must be 0 or greater. You currently have 0 posts. |
|
|
|
 |
| Tags |
| air conditioner, diy, gshp, heat pump, homemade |
|
|


 Linear Mode

