
|
 11-03-09, 02:17 PM
|
#81 |
|
Lex Parsimoniae

Join Date: Feb 2009
Location: Woburn, MA
Posts: 4,918
Thanks: 114
Thanked 250 Times in 230 Posts
|
Made from 1.25" PVC. Some very strong stuff.. Unless you don't glue it..
 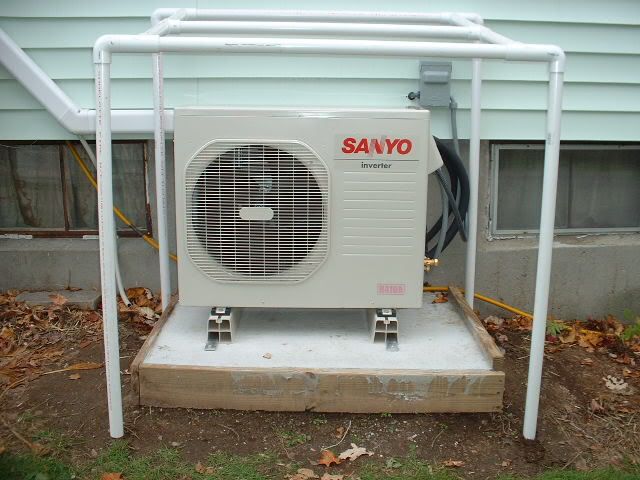  The plan is to cover the top with some white PALRUF PALRUF® - Corrugated PVC Sheet I have one sheet, but need to pick up one more and some of their mounting gizmos. White Sidewalls: I'm considering placing 24"x44" panels of plastic (siding or corplas), down low on each side, to keep the snow drifts from drifting into the sides.. Any suggestions? After I figure out where I want the feet to rest, I'll drive some square steel 'rods' into the ground, and the 'legs' will slip over the steel.. Hopefully, keeping the wind from taking the whole thing out to US-95, where it would be hit by a 16 wheeler!  |

|

|
|
11-03-09, 04:47 PM
|
#82 | |
|
Supreme EcoRenovator

Join Date: Mar 2009
Location: Portland, OR
Posts: 4,004
Thanks: 303
Thanked 724 Times in 534 Posts
|
Quote:
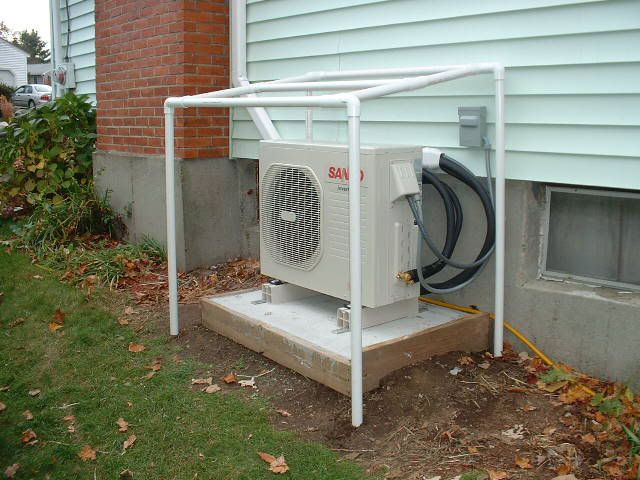
Have you dressed the drip tube so the water will flow away from the slab? In cooling mode, water will come from the drip tube, in heating mode, water will come from the bottom of the outside unit. On my unit, I didn't use the rigid cover for the line set. Didn't know they were available. But I did wrap the line set in two layers of foam tape to prevent heat loss. Your rigid cover probably serves the same purpose. Regards, -AC_Hacker %%%%%%%%%%%%%% |
|
|
|
|
|
11-03-09, 05:56 PM
|
#83 | |
|
Lex Parsimoniae
Join Date: Feb 2009
Location: Woburn, MA
Posts: 4,918
Thanks: 114
Thanked 250 Times in 230 Posts
|
Quote:
The slab is angled down away from the house and towards the right hand corner. I've been thinking about the best way to add some insulation to the lineset, but right now, I would like to just get it working before the snow starts up. Did you have any problems with snow going into the air-intake of your Sanyo last winter? And did you take any precautions during heavy snow storms? I'm thinking of shutting mine off when it's really coming down. |
|
|
|
|
|
11-04-09, 05:24 PM
|
#84 |
|
Lex Parsimoniae
Join Date: Feb 2009
Location: Woburn, MA
Posts: 4,918
Thanks: 114
Thanked 250 Times in 230 Posts
|
A nice sunny day was just about wasted. Then, just before 5PM when it was too cold and dark, to do any outdoor work..
The mailman came slowly up the road and dropped off a crushed package! 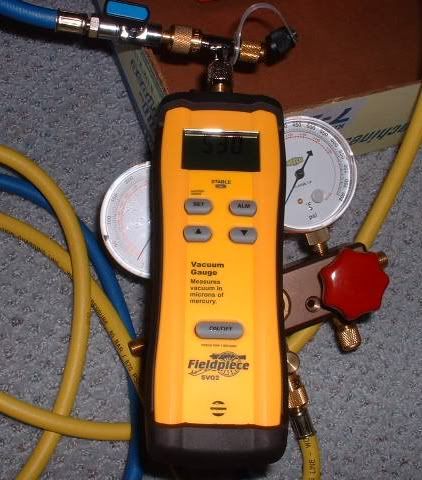 It looks pretty good. I tested it a little and got down to about 250 Microns.. Changed the oil (messy) and now I'm all set to do the vacuuming! My target is to get the lineset (and indoor coil) down to about 100 microns. The manual says the idea pressure is "10 mmHg abs". Isn't that 10,000 microns? Maybe 300-400 microns is a more reasonable goal?  ~~~ Dang! The weather doesn't look so good.. High: 46°F RealFeel®: 33°F Mostly cloudy, breezy and chilly with a passing shower.. Maybe I should wait until Sunday.?. Mostly sunny and pleasant. High: 57 °F |
|
|
|
|
11-04-09, 06:14 PM
|
#85 | |
|
Supreme EcoRenovator
Join Date: Mar 2009
Location: Portland, OR
Posts: 4,004
Thanks: 303
Thanked 724 Times in 534 Posts
|
Quote:
Best Regards, -AC_Hacker |
|
|
|
|
|
11-04-09, 07:57 PM
|
#86 |
|
Lex Parsimoniae
Join Date: Feb 2009
Location: Woburn, MA
Posts: 4,918
Thanks: 114
Thanked 250 Times in 230 Posts
|
Thanks for the tip on the lube. That's got to help.
It came with a 'T', but one side off the top is the wrong sex to fit onto the service port. It should have been male and female. What would be useful is a real short hose, instead of these 6 footers. I did a little experimenting and I think this might work.. Using two hoses with the new gauge in the middle, between the pump and the AC. One cut-off valve at the service port and one at the gauge. Pump>]----------Xg-[<gauge>]-----------Xs-[<Service port Process: Start with cut-offs turned off. 1. Pump on. 2. Open both (g&s)cut-offs. 3. Wait for pressure to get low. (record value). 4. Close both cut-offs. 5. Pump off. 6. Wait a few minutes. Vapor out-gassing.?. 7. Pump on. 8. Open g cut-off. 9. When pressure is back to recorded value in step #3, open s cut-off. 10. Loop back to step #3. I hope to get a little lower pressure on each loop. If the pressure inside the lineset isn't holding low after a bunch of loops, it's going to be very noticeable on step #9. There will be a big change on the gauge. When the pump is at it's limit (no more vacuum to be had) and I'm happy the lineset is holding the vacuum, that might be a good time to call in the allen wrench expert..  Getting it down to 50 or 100 microns would be nice, but I think anything around 500 is going to do the job just fine. The Mr. Slim manual says 1000 microns (1 Torr) is their target. That should be easy to beat.. |
|
|
|
|
11-05-09, 10:25 AM
|
#87 |
|
Lex Parsimoniae
Join Date: Feb 2009
Location: Woburn, MA
Posts: 4,918
Thanks: 114
Thanked 250 Times in 230 Posts
|
Well, that idea didn't work! I found that turning either of the cut-off valves
would let in a little air and drop the vacuum by at least 100 microns. Much of the time it was more. Even just turning one a tenth of a turn would let in some air. Flipping those things off and on was a no-go. So, after taking the nitrogen pressure testing into consideration, we decided it would be best to do just one long run and shoot for the best pressure. That ended up being just under 200 microns. That was the point where the meter stabilized and was only going down about 1 micron every 10 minutes. The red Stable LED was on. This is the setup.. 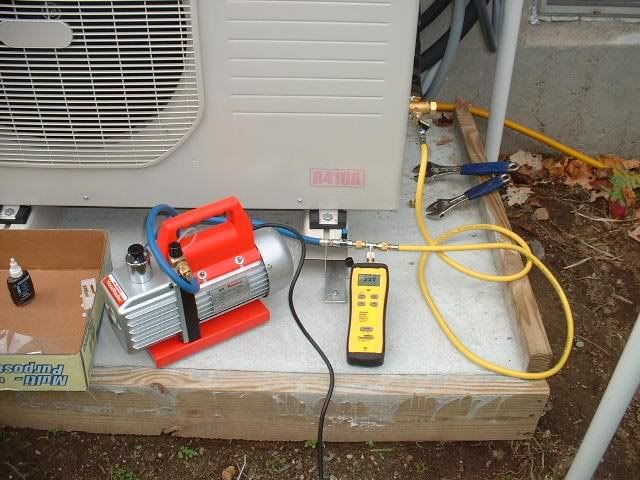 Getting close to 200! 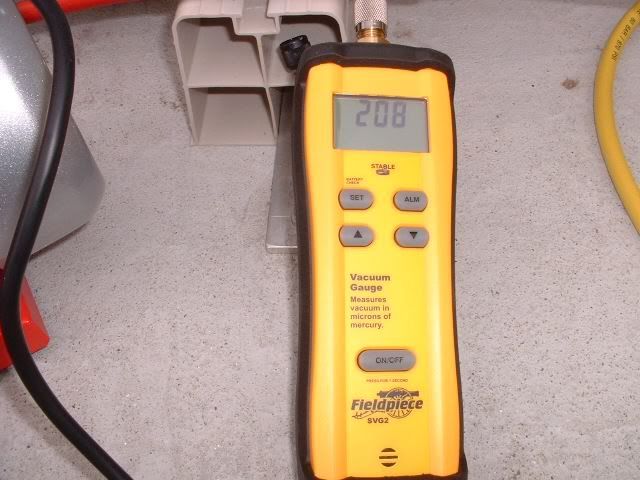 It's 46.3 outdoors and it's 74 in here!  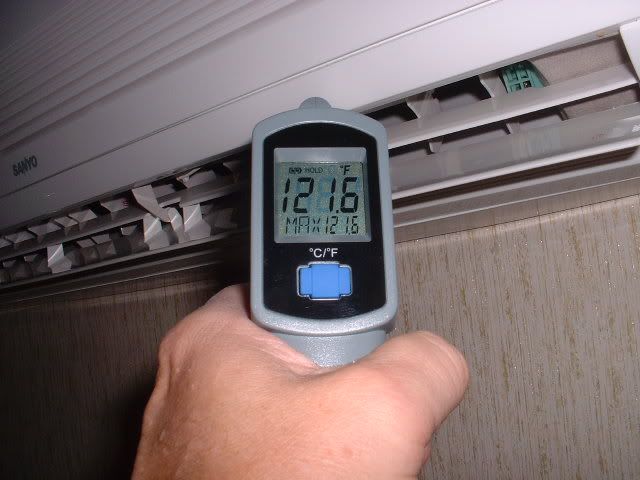 My wife thinks it's great.. |
|
|
|
|
11-05-09, 10:40 AM
|
#88 |
|
Supreme EcoRenovator
Join Date: Mar 2009
Location: Portland, OR
Posts: 4,004
Thanks: 303
Thanked 724 Times in 534 Posts
|
I think it's great too!
Good job of installation, and good job of documenting the process. So now you have pretty much all the tools you need to do some interesting vapor-compression hacking, certainly the most expensive tools. So when the POO wears off (POO = Pride Of Ownership), you might keep your eyes open for an air conditioner or a de-humidifier for some experimentation... Congratulations, -AC_Hacker |
|
|
|
|
11-05-09, 12:24 PM
|
#89 |
|
Lex Parsimoniae
Join Date: Feb 2009
Location: Woburn, MA
Posts: 4,918
Thanks: 114
Thanked 250 Times in 230 Posts
|
Thanks!
I was just outside taking a picture and the fan stopped completely. It's set for 72 and Quite mode. When I came back in, the inside unit fan was running so slowly, I could not hear it! I could barely feel a light air flow from the unit! This has to be the king of bedroom ACs.. Here's the pic: The fan was turning over real slow (and quite) before it went off. The outdoor temperature is actually 46.2 deg F. 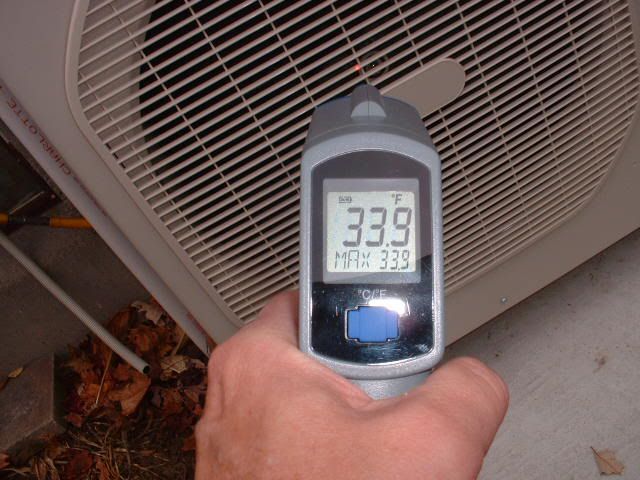 |
|
|
|
|
11-05-09, 02:28 PM
|
#90 |
|
Administrator

Join Date: Aug 2008
Location: Germantown, WI
Posts: 5,525
Thanks: 1,162
Thanked 374 Times in 305 Posts
|
After this heating season it would be very interesting to see an ROI on the unit. Any idea what you spent on this project in total?
__________________
Current project - To view links or images in signatures your post count must be 0 or greater. You currently have 0 posts. To view links or images in signatures your post count must be 0 or greater. You currently have 0 posts. & To view links or images in signatures your post count must be 0 or greater. You currently have 0 posts. |
|
|
|
 |
| Tags |
| air conditioner, diy, heat pump |
|
|


 Linear Mode

