
|
|
Advanced Search | |||||||
 |
|
|
Thread Tools | Display Modes |
 09-02-12, 01:51 PM
|
#41 |
|
Infrequent noob
Join Date: Aug 2008
Location: 1000 Islands region, Ontario, Canada
Posts: 402
Thanks: 37
Thanked 20 Times in 19 Posts
|
Well, since my last report, I haven't technically done any renovations. Did some repairs though: most of the eaves troughs (I'm told some people call these gutters) needed replacing/fixing - the roofing company wrecked them (bank replaced the roof just before I got the place).
Late spring I scored an excellent deal on some surplus concrete bricks, so the summer's big project was excavating and putting in an interlocking driveway, then landscaping the edges. (This 100 year old house has never had a driveway.) So I spent most of July/Aug doing that, a couple of hours each day in the morning and evening before/after it got hot out. Now I'm taking a break! Later this month and in the fall, I'll be back inside the house continuing the de/construction, with a focus on the bedroom. Before driveway... After driveway... Just enough room for two small cars, nose to tail. Too bad about the utility pole & guy wires in the yard, but oh well. After a while, I don't notice them as much. Someone joked that the driveway & landscaping probably doubled the value of the property.  (Not too far from the truth.) All that bedrock on the left side of the drive was just beneath the lawn - some nice Canadian shield. (Not too far from the truth.) All that bedrock on the left side of the drive was just beneath the lawn - some nice Canadian shield.
__________________
.
|

|

|
|
09-02-12, 02:38 PM
|
#42 |
|
Super Moderator

Join Date: May 2009
Location: Warsaw, Poland
Posts: 964
Thanks: 189
Thanked 111 Times in 87 Posts
|
That looks great!
I've been picking away at parts of our driveway, off and on, for the last 3 years, so I know how much time/energy it can consume if you really want it to look half decent. Nothing like scrapping everything and starting over after 2 weeks of work. And the gutterwork - that's getting ready for the rainwater catchment system, right? 
__________________
Ecorenovation - the bottomless piggy bank that tries to tame the energy hog. |
|
|
|
|
09-07-12, 03:29 PM
|
#43 |
|
Infrequent noob
Join Date: Aug 2008
Location: 1000 Islands region, Ontario, Canada
Posts: 402
Thanks: 37
Thanked 20 Times in 19 Posts
|
Probably will put in rain barrels... however there is a little stream at the rear of this property. It didn't dry up even in this summer's terrible drought. So I may not need to store rainwater, just organize a little pump

__________________
.
|
|
|
|
|
10-14-12, 09:51 PM
|
#44 |
|
Helper EcoRenovator
Join Date: Mar 2011
Location: Sarnia, Ontario, Canada
Posts: 91
Thanks: 8
Thanked 2 Times in 2 Posts
|
Nice driveway and gardens!
__________________
TomS |
|
|
|
|
10-15-12, 01:25 PM
|
#45 |
|
Infrequent noob
Join Date: Aug 2008
Location: 1000 Islands region, Ontario, Canada
Posts: 402
Thanks: 37
Thanked 20 Times in 19 Posts
|
Thanks! I'm really happy with how it turned out. Lots of nice comments from the neighbours & local dog walkers.
No further news to report on the house itself. Since my last post, my building tinkering time has been spent working on my shack (garage) on a separate lot. By the end of this month I'll be back inside the mansion though, continuing deconstruction.
__________________
.
|
|
|
|
|
11-08-12, 09:04 PM
|
#46 |
|
Infrequent noob
Join Date: Aug 2008
Location: 1000 Islands region, Ontario, Canada
Posts: 402
Thanks: 37
Thanked 20 Times in 19 Posts
|
I have resumed deconstruction. I've got the wall paneling off & the drywall mostly removed from the bedroom. (Bedroom = the addition beside the top of the driveway in the above pics.)
The walls are 2x4 with no vapor barrier and about 2.5 inches of paper-backed fiberglass between the studs. Same in the ceiling. I'm taking care to save as much material as I can (paneling & insulation, plus most trim) to re-use at my garage. Note to self: orderly deconstruction with the goal of re-use isn't nearly as fun as just swinging a sledgehammer and ripping stuff apart. Plus it takes about fifty times longer. Will take & post some pics on the weekend probably.
__________________
.
|
|
|
|
|
11-09-12, 07:12 AM
|
#47 | |
|
Administrator

Join Date: Aug 2008
Location: Germantown, WI
Posts: 5,525
Thanks: 1,162
Thanked 374 Times in 305 Posts
|
Quote:
__________________
Current project - To view links or images in signatures your post count must be 0 or greater. You currently have 0 posts. To view links or images in signatures your post count must be 0 or greater. You currently have 0 posts. & To view links or images in signatures your post count must be 0 or greater. You currently have 0 posts. |
|
|
|
|
|
12-05-12, 04:21 PM
|
#48 |
|
Infrequent noob
Join Date: Aug 2008
Location: 1000 Islands region, Ontario, Canada
Posts: 402
Thanks: 37
Thanked 20 Times in 19 Posts
|
Yep, I've spent more time carefully pulling nails from wood I want to re-use than just about anything other task so far. (Hardwood flooring, tongue & groove pine from the walls.)
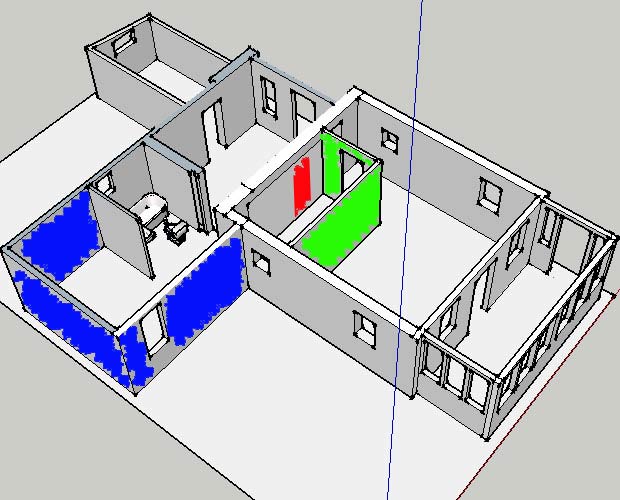
I realize some people will suggest that's not worth my time, but being a semi-self-un/employed slacker, I have lots of time. And a general aversion to generating waste when I don't have to. You can see why this is going to be a 10-year project. Anyway, update! With a few pics! I have pulled down ceiling tiles in the Great Room, and above that is original (I think) tongue & groove pine ceiling. I also removed the second "bedroom" (GREEN walls) from the Great Room, thus making it Greater! I confirmed that this bedroom was not part of the original house: the old, closed-in doorway to the kitchen is behind the fridge. (RED, in the floor plan image above). Also discovered that this room was re-sized at least twice and possibly 3 times, based on marks/nail holes in the ceiling where the walls were previously framed in, eg the green mark extending toward to the top left:
__________________
.
|
|
|
|
|
12-05-12, 04:26 PM
|
#49 |
|
Infrequent noob
Join Date: Aug 2008
Location: 1000 Islands region, Ontario, Canada
Posts: 402
Thanks: 37
Thanked 20 Times in 19 Posts
|
I have no idea what this mystery box is, above the fridge:
Strangeness: 1) See the steroidal vertical steel bar (holes drilled in it) on the left side of the opening? There's one on the right side as well (not shown). They go up through the ceiling and are attached to rafters! Like they put something seriously heavy in this box, or hung something below it. 2) The box has a false "ceiling", above which may be the original attic access. Cellulose insulation fell through the opening into the false ceiling of this box when they did the attic sometime in the last 20 years. Mysterious! Any ideas? Regardless, it's coming out, obviously. And I'll be opening up the wall behind it into the kitchen one of these years. Open concept, baby!
__________________
.
|
|
|
|
|
12-05-12, 06:21 PM
|
#50 |
|
Infrequent noob
Join Date: Aug 2008
Location: 1000 Islands region, Ontario, Canada
Posts: 402
Thanks: 37
Thanked 20 Times in 19 Posts
|
Here's what I've been up to in the West Wing (containing the bathroom & master bedroom - BLUE walls):
 I've removed wall paneling, taken down all the drywall from the walls & ceilings, and expropriated a couple of old mice nests (long since empty, from the walls). No vapour barrier, and about 2.5 inches of paper-backed fiberglass insulation: I discovered a few interesting things about the West Wing: 1) It was added on years after the original part of the house (1910) was built. I know this because the bedroom "encapsulates" the northwest exterior corner of the house, and there were already several coats of paint on the exterior clapboard (maroon paint, left side of above pic), and on top of that a later layer of fake brick asphalt siding was there when the addition wall was nailed over top of all that. This addition is at least 50 years old. In one section of drywall, I found a repair where someone had fixed a hole by wadding up newspaper, stuffing it in the hole & plastering over top. Date on the newspaper: May 31, 1963. 2) The house was already crooked by the time the West Wing / bedroom addition was built. My plans for the bedroom are to: 1) rip up the floorboards to fix some rotten floor joists / wall bottom plate (water damage in one corner of the room from a leak in the roof, since replaced) 2) insulate the "crawl" space 3) add a window in the southwest wall (bottom left corner of the floor plan) 4) add 2 inches more insulation space to the inside of the walls, possibly also foam board on the exterior. 5) rewire (no grounded outlets) BUT! Before I start any of that, I'm going to the west coast for a couple of months. Woohoo! 10 year project!
__________________
.
|
|
|
|
|
|
|


 Linear Mode

