
 |
|
|
#31 | |
|
Apprentice EcoRenovator
Join Date: Nov 2011
Location: NC
Posts: 117
Thanks: 6
Thanked 27 Times in 25 Posts
|
Quote:
Even still with asphalt it's the sub-layers that are the most important. For example at my grandparents house the asphalt was laid down directly on the soil (basically sand) and it was torn up almost immediately. Had the asphalt been laid over a good gravel base, with drainage taken care of that driveway would still be in good shape 40 years later, that likely would not be the case in your climate though. Asphalt has some give to it, so in someways it is better able to cope with slightly imperfect conditions and heavy loads, since asphalt has some ability to give a bit. All that said, I'm not trying to criticize your brother's decision. Not knowing how it was built and knowing it was not in great condition I probably would have made the same decision. Erring on the side of caution is a good thing as long as it doesn't put a halt to what you are trying to achieve. |
|
|
|

|
|
|
#32 |
|
Home-Wrecker
Join Date: Sep 2008
Location: SE Wisconsin
Posts: 546
Thanks: 3
Thanked 165 Times in 96 Posts
|
Another video and blog update.
Black Friday - We put up the walls! Blog Link: Benís Garage: Wall Day Also, I'd love some input on lighting. In my previous garage, I experimented with LED Tubes. Those are the LED sticks that take the place of a four-foot fluorescent bulb in a standard fixture. Overall, I really liked them. The downsides were that they tended to be expensive, and they didn't work with all fixtures, but boy were they bright, energy efficient, and came on instantly to full brightness (unlike fluorescent when it's cold outside.) This weekend, there are LED shoplight fixtures for sale at the big box store for $20 each. They are 3,000 lumen with a standard plug. (So, they would work well on switched outlets installed in the ceiling.) They also can daisy-chain together, to reduce the number of outlets needed. I think I would like to just purchase a pile of those fixtures while they are on sale. (Normal price is $40 each, so half off right now.) I'm not quite sure how many I want to get. I've tried finding some info on brightness levels for workshops, and have found numbers ranging from 50 - 150 lumens per square foot. If the lamps produce 3,000 lumens, and the garage is 783 square feet, I need anywhere from 40,000 to 120,000 total lumens, or 13 to 40 fixtures! That sure sounds like a lot! Just looking at my garage plan, and spacing out some fixtures in my head, I could see a dozen shop lights going in. It would be easy to space out three rows of four fixtures across the garage. I think I'll buy a dozen this weekend on sale. I can easily see using that many. If I put them up and decide I need more light, I still have some of the original fixtures I used in the old garage, and I could always purchase more of the matching fixtures.
__________________
To view links or images in signatures your post count must be 0 or greater. You currently have 0 posts. To view links or images in signatures your post count must be 0 or greater. You currently have 0 posts. |
|
|

|
| The Following User Says Thank You to bennelson For This Useful Post: | Daox  (11-26-16) (11-26-16) |
|
|
#33 |
|
Steve Hull
Join Date: Dec 2012
Location: hilly, tree covered Arcadia, OK USA
Posts: 826
Thanks: 241
Thanked 165 Times in 123 Posts
|
Go with the 1/2 price specials - and lots of them. You will NEVER regret putting in more light. I put in banks of lights wired in thirds.
One switch turns on every third light, turning on the second switch turns on two of the three banks and the third switch has them all on. This would work out well with your proposed three rows of four lights. A bit more time and $ wiring these up to works in thirds, but it was my time and not an electrician. For most every day stuff, I use the 1/3 bank. But I have found it VERY handy to turn on all when I have a project where I need uniform and bright light. With all banks on, there are no shadows and it is almost like noon daylight. In my case I used T-8 fluorescent bulbs, but the new LED "sticks" are just about the same price, put out more light for less cost and last FAR longer. At 1/2 off, that is a no brainer. Bottom line - do it all now and enjoy. Steve
__________________
consulting on geothermal heating/cooling & rational energy use since 1990 |
|
|

|
|
|
#34 |
|
Apprentice EcoRenovator
Join Date: Sep 2008
Posts: 116
Thanks: 29
Thanked 12 Times in 11 Posts
|
Is that 3000 lumen per fixture or per tube (x2?)? If it's per tube, I'd go for it as long as you can either see them in store or they have a decent return policy. If those are ~1500 lumen per tube and 2 per fixture, I'd get these instead.
https://www.earthled.com/collections...ant=2403570948 They're a little more expensive, but they provide a decent amount of light. It's slightly below what a normal T8 bulb provides at 32W, but way more than a 25W fluorescent, and they seem to use a little less than 24W. LED bulbs in general are all over the place in terms of their actual specs. I've bought LED tubes at Costco that were listed at 17W and used way more power than the 24W bulbs in the link. Granted, they also put out a lot more light. I think it's a good idea to test the power consumption and brightness of any bulbs you're thinking about before buying a bunch of them. |
|
|

|
|
|
#35 |
|
Home-Wrecker
Join Date: Sep 2008
Location: SE Wisconsin
Posts: 546
Thanks: 3
Thanked 165 Times in 96 Posts
|
I ended up buying 12 fixtures. I went to the closest store, and they were all completely sold out. Well, they were sort of a Black Friday special....
I used my smart phone to check out the store's web page and found that at the next nearest store they had 17 in stock. When I got there, there were 12 fixtures still left on the shelf, so that's what I bought. 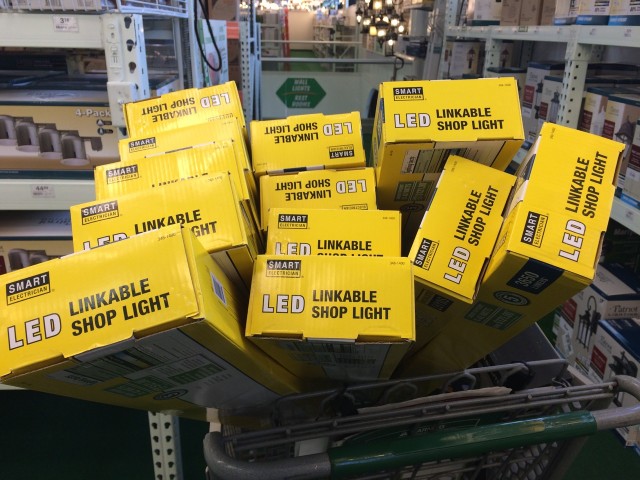 I agree that there's a BIG range of prices and quality when it comes to LED lighting. These are LED fixtures. They do NOT hold tubes. So, the lumens rating is for the whole fixture not for one tube or two tubes. The store has a good return policy and these were on sale NOW, so I bought what I could. When I got them home, I did pop the cover off one to peek inside. It's basically an LED strip directly on an aluminum extrusion which acts as the backbone of the fixture and as a heat sink for the LEDs. Electronics inside are pretty minimal. These run on 120VAC, and have a connector to daisy-chain multiple lights from a single cord. These fixtures are smaller than a typical fluorescent shop light and weigh probably half as much. 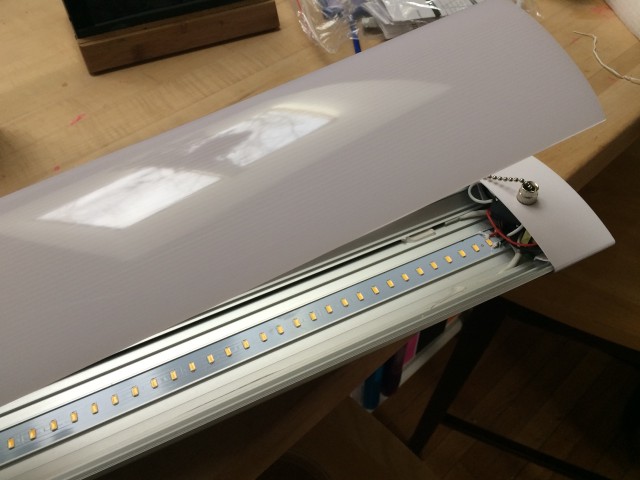 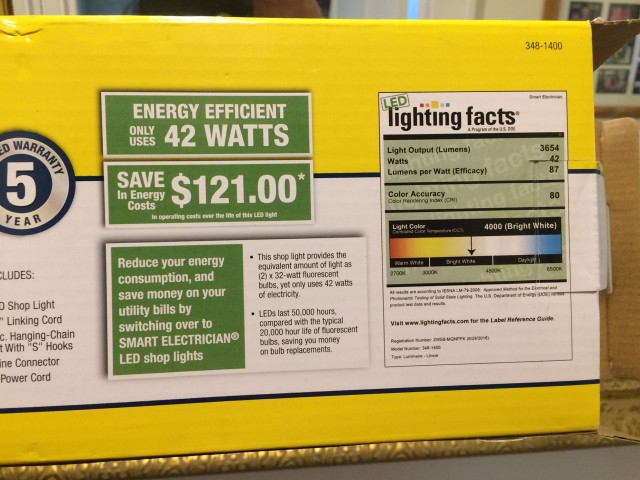 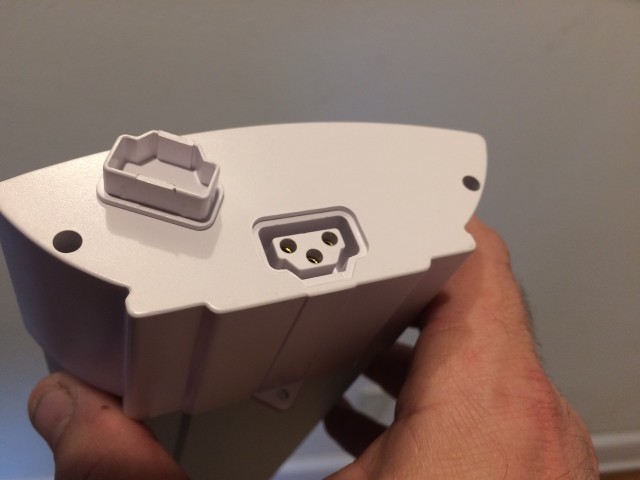
__________________
To view links or images in signatures your post count must be 0 or greater. You currently have 0 posts. To view links or images in signatures your post count must be 0 or greater. You currently have 0 posts. |
|
|

|
| The Following 4 Users Say Thank You to bennelson For This Useful Post: |
|
|
#36 |
|
Home-Wrecker
Join Date: Sep 2008
Location: SE Wisconsin
Posts: 546
Thanks: 3
Thanked 165 Times in 96 Posts
|
We got the electrician to stop by today.
I told him about what I wanted for electric heat (micro-boiler for the Pex in-floor heat) and an electric car charging station and a FUTURE electric car charging station. My current EVSE is good for 30A 240V, even though my car only has the 3.3K (16A) charger. That's not to say that my NEXT car won't have a faster charger. Also, when we eventually replace the Prius, that will be with some sort of plug-in car, and at that point we'll want a second EV charger. Current wiring to the garage was individual 8 ga wires for 50A at 240V. We decided that we will upgrade the wiring from the house to the garage to either 4 ga copper wiring or 2 ga aluminum. The garage breaker box will also be upgraded and will be for 100A/240V instead of 50A/240V I'm also looking into getting an estimate on SPRAY-ON FOAM insulation. The original plan was to have the garage insulated by a professional insulating company with typical fiberglass. With the right company, a person can get a building insulated for LESS than one could simply purchase the insulation for at a big box store. No joke! Due to the shape of the upstairs with the engineered trusses, the roofline is already a good candidate for spray foam insulation. There's not much space up there for fiberglass and venting together. Foam would take less space and seal it up nice. Of course, if a person is going with spray foam, it would be for the whole building and done in one fell swoop. The beam for the top of the south wall (across the man door and both garage doors) is on order. I'm hoping it's delivered by the end of the week, and we can build the fourth wall soon. I also have to finish digging the trench deeper so that when the electrician does show up, it's ready for the power and conduit.
__________________
To view links or images in signatures your post count must be 0 or greater. You currently have 0 posts. To view links or images in signatures your post count must be 0 or greater. You currently have 0 posts. |
|
|

|
| The Following User Says Thank You to bennelson For This Useful Post: | Daox  (11-29-16) (11-29-16) |
|
|
#37 | |
|
Apprentice EcoRenovator
Join Date: Aug 2012
Location: North Alabama
Posts: 167
Thanks: 0
Thanked 40 Times in 20 Posts
|
Quote:
Good idea! My parents had a heck of a time getting Tiger Foam to stick to ceilings, so a company that does it for a living will likely know what they are doing and do a better job. |
|
|
|

|
|
|
#38 |
|
Home-Wrecker
Join Date: Sep 2008
Location: SE Wisconsin
Posts: 546
Thanks: 3
Thanked 165 Times in 96 Posts
|
I'm toying around with how the lighting will be laid out in the garage. I cropped in on part of my architectural diagram and kept it to scale. Then I drew in a shop light. I duplicated it and spread them out evenly.
The lights are spaced apart about five feet from end to end and about six feet side to side. A few things that I noticed is that the pull-down attic door will always interfere with a light. Seems to make the most sense just to run a light along side it, which should illuminate the staircase well. The other thing that I never liked with my old garage is that the overhead doors block lights I would have on the ceiling. I often work at night in the summer with the doors open/up. The doors then block the light. I think maybe just having a shop light running the length of the door on either side. So, attached is an image of ONE WAY I could do the lighting. The power cords on the shop lights I bought are five feet long. Opposite pairs of lights could share a switched outlet in the ceiling (represented by the black circles, within 5 feet of a shop light.) I think that this layout would work best on two circuits. The farthest left column of lights would be on the the left column of switched outlets. The center and right column of lights would be connected to the right column of outlets. That would let me turn on just the left third of lights as I come in through the man door (for being at a work bench on the left/west wall or going to the stairs.) Otherwise, I could turn on both switches for all lights on. Each shop light also has a pull chain on it, so there's nothing stopping me from manually turning OFF any lights I don't want. If I just wanted two lights on, in opposite corners of the room, I could. 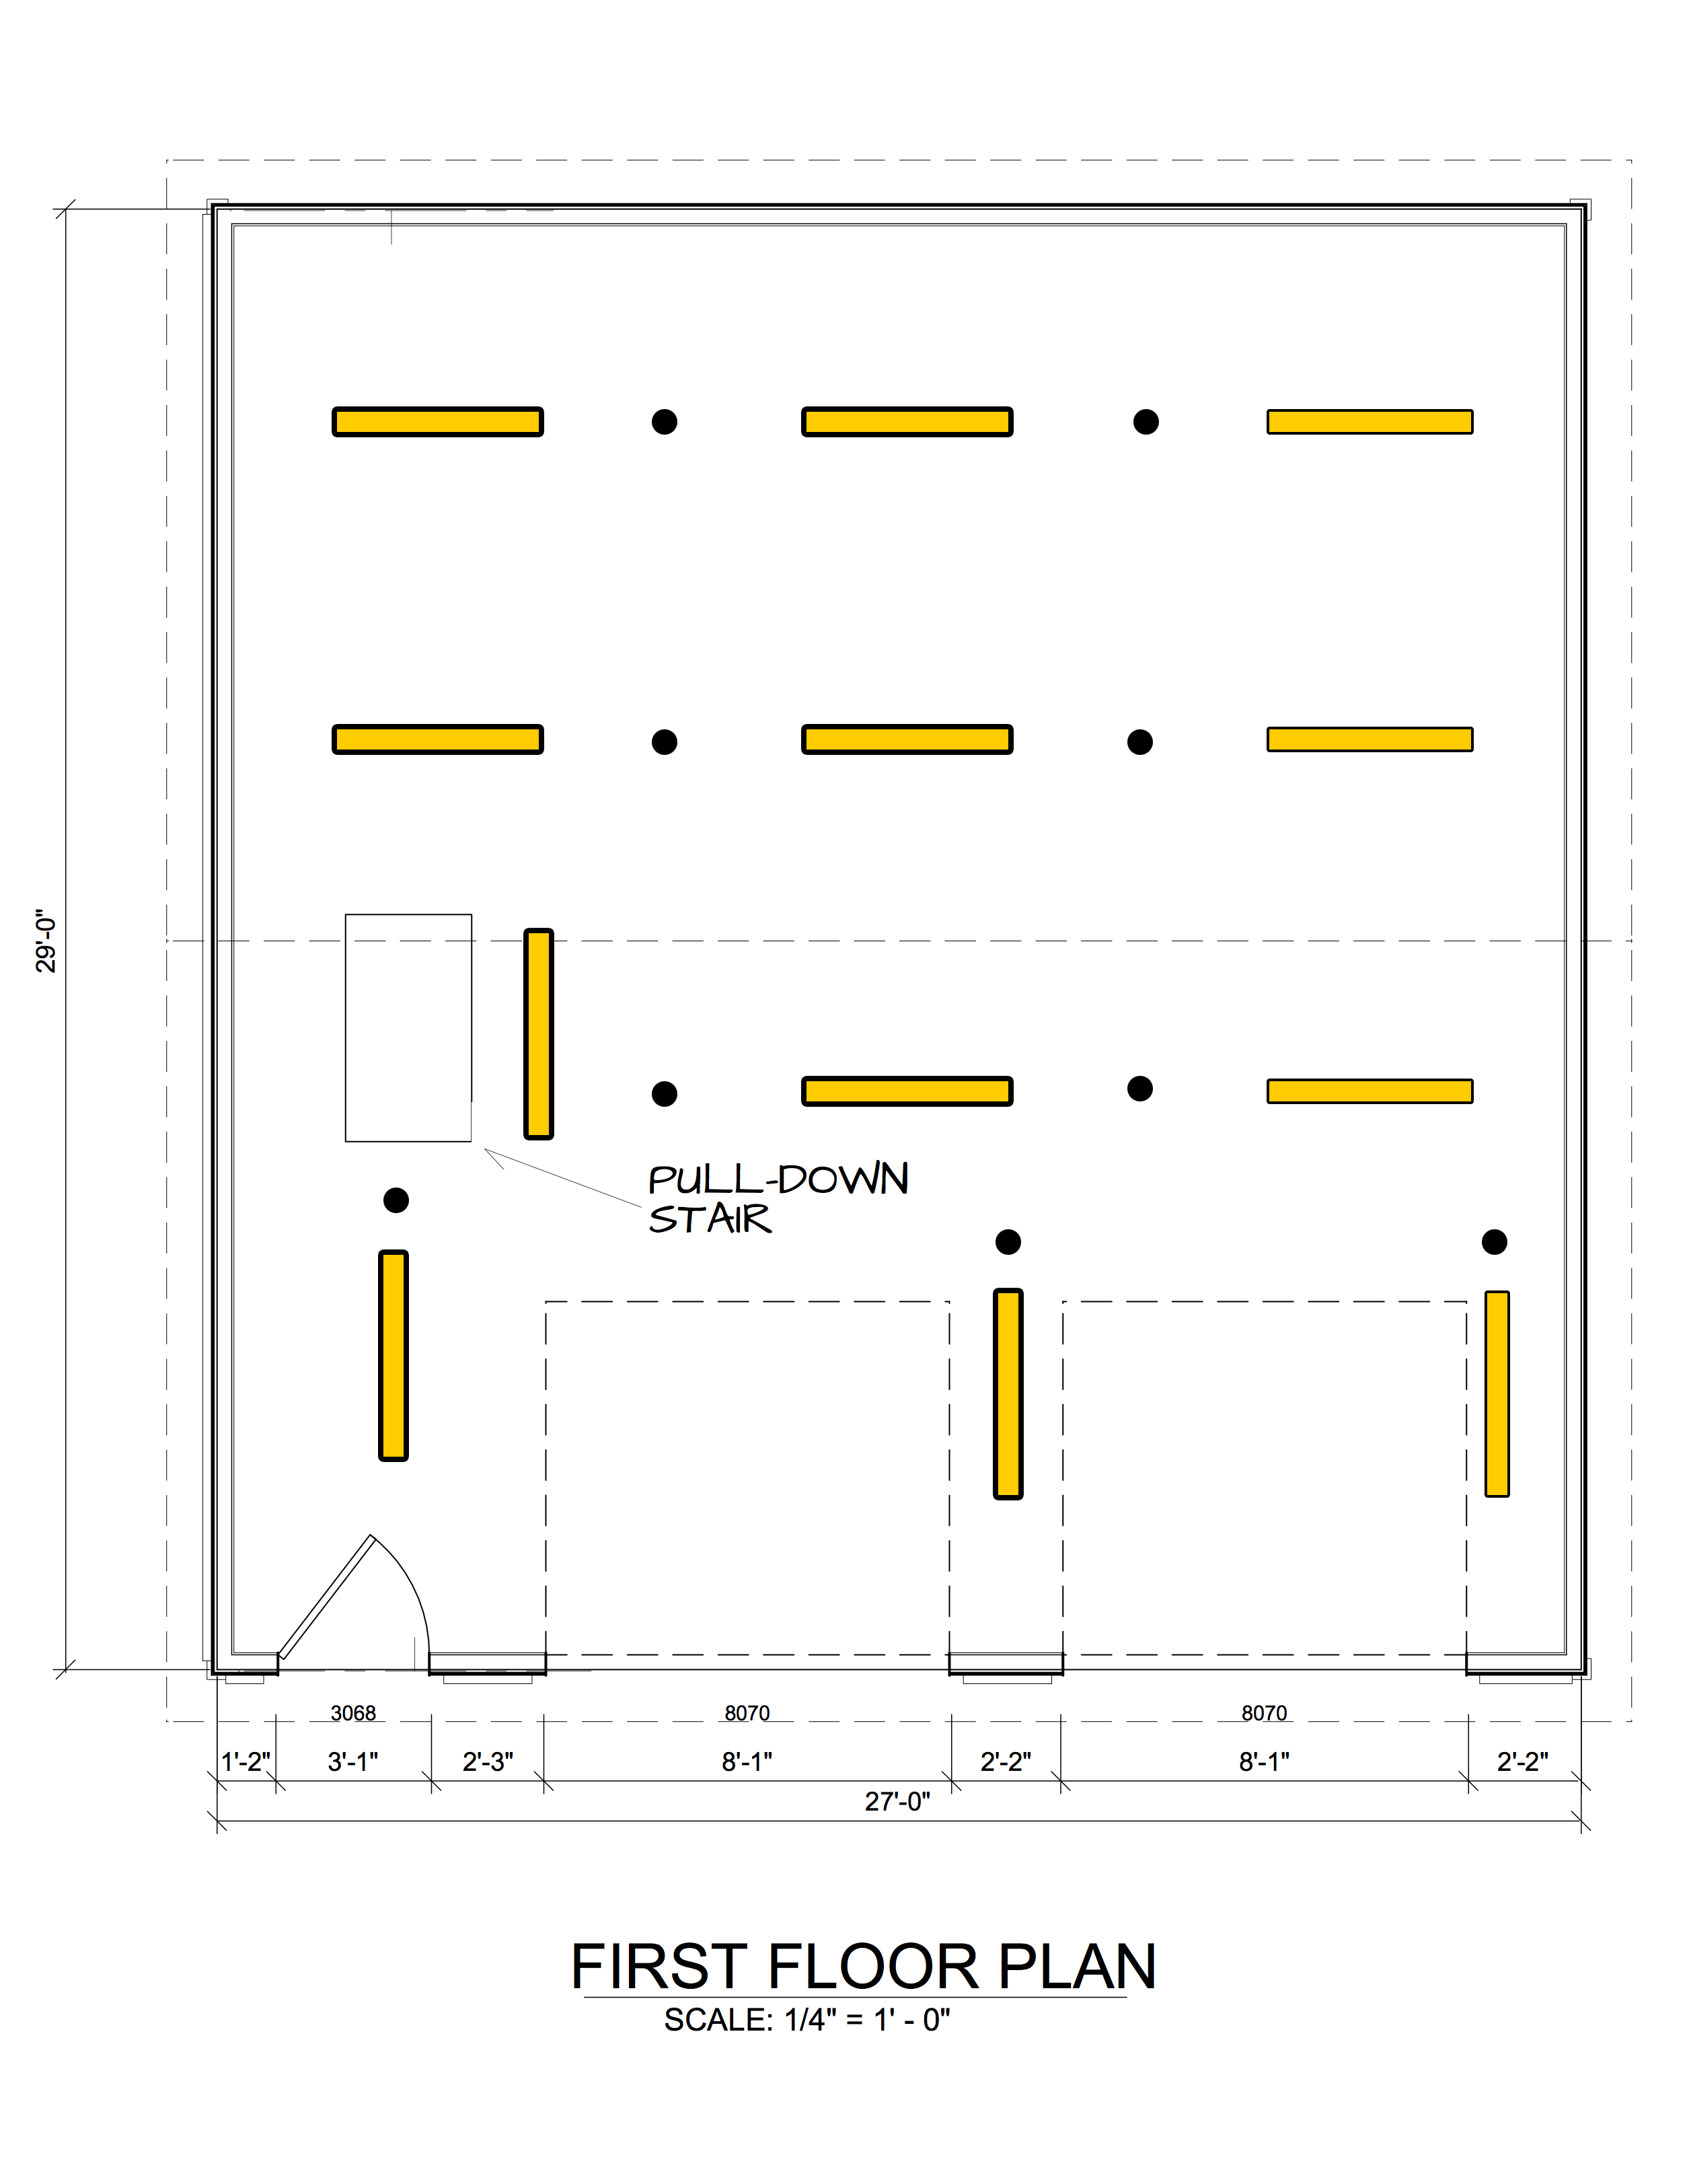
__________________
To view links or images in signatures your post count must be 0 or greater. You currently have 0 posts. To view links or images in signatures your post count must be 0 or greater. You currently have 0 posts. |
|
|

|
| The Following User Says Thank You to bennelson For This Useful Post: | Daox  (11-29-16) (11-29-16) |
|
|
#39 |
|
Steve Hull
Join Date: Dec 2012
Location: hilly, tree covered Arcadia, OK USA
Posts: 826
Thanks: 241
Thanked 165 Times in 123 Posts
|
PLEASE use copper wire (as opposed to aluminum). You might want to get 3G copper compared to AWG 4. I just bought some AWG 3 and it was 4 cents a foot more than AWG 4.
Copper is really cheap now. Yes, them ampacity of aluminum and copper can be assessed and made equal, but copper will never, ever corrode. Steve
__________________
consulting on geothermal heating/cooling & rational energy use since 1990 |
|
|

|
|
|
#40 |
|
Home-Wrecker
Join Date: Sep 2008
Location: SE Wisconsin
Posts: 546
Thanks: 3
Thanked 165 Times in 96 Posts
|
Here's another image with cars drawn in. I think I got pretty close to the right scale. This was just using some stock images from the internet, and scaling them based on how long they are supposed to be. Scale might not be perfect, but should be pretty close.
On the left is a Prius pointed nose out. On the right is a Mitsubishi i-MiEV pointed nose in. The Mitsubishi has the J1772 charging port on the "wrong" side, as it was originally a Japanese right-hand drive vehicle. With the nose in, the charging port is near the south-east corner of the garage. If the Mitsubishi was parked in the left bay, and nose out, the charge port would be towards the west wall, but that area will be either walking path or have a workbench right against the wall there - not an ideal location for a charging station. One alternative would be to mount the EVSE to the wall, but then have hooks or something to run the cable overhead to the car. On some other car that we might own in the future, the charging port is likely to be on the front of the car (Leaf style), or the front left fender. Either of those would work better for a car pulled straight in forward in the left bay without the charging cord getting in the way of the driver. I think that I'll want to have my current EVSE installed in the south-east corner (as shown in the diagram.) I'll also install a 50A circuit for future EV charging somewhere on that west wall. I could even just do that with a 50A NEMA 14-50 (RV Park style connector) as many Tesla drivers right now often use that connection. 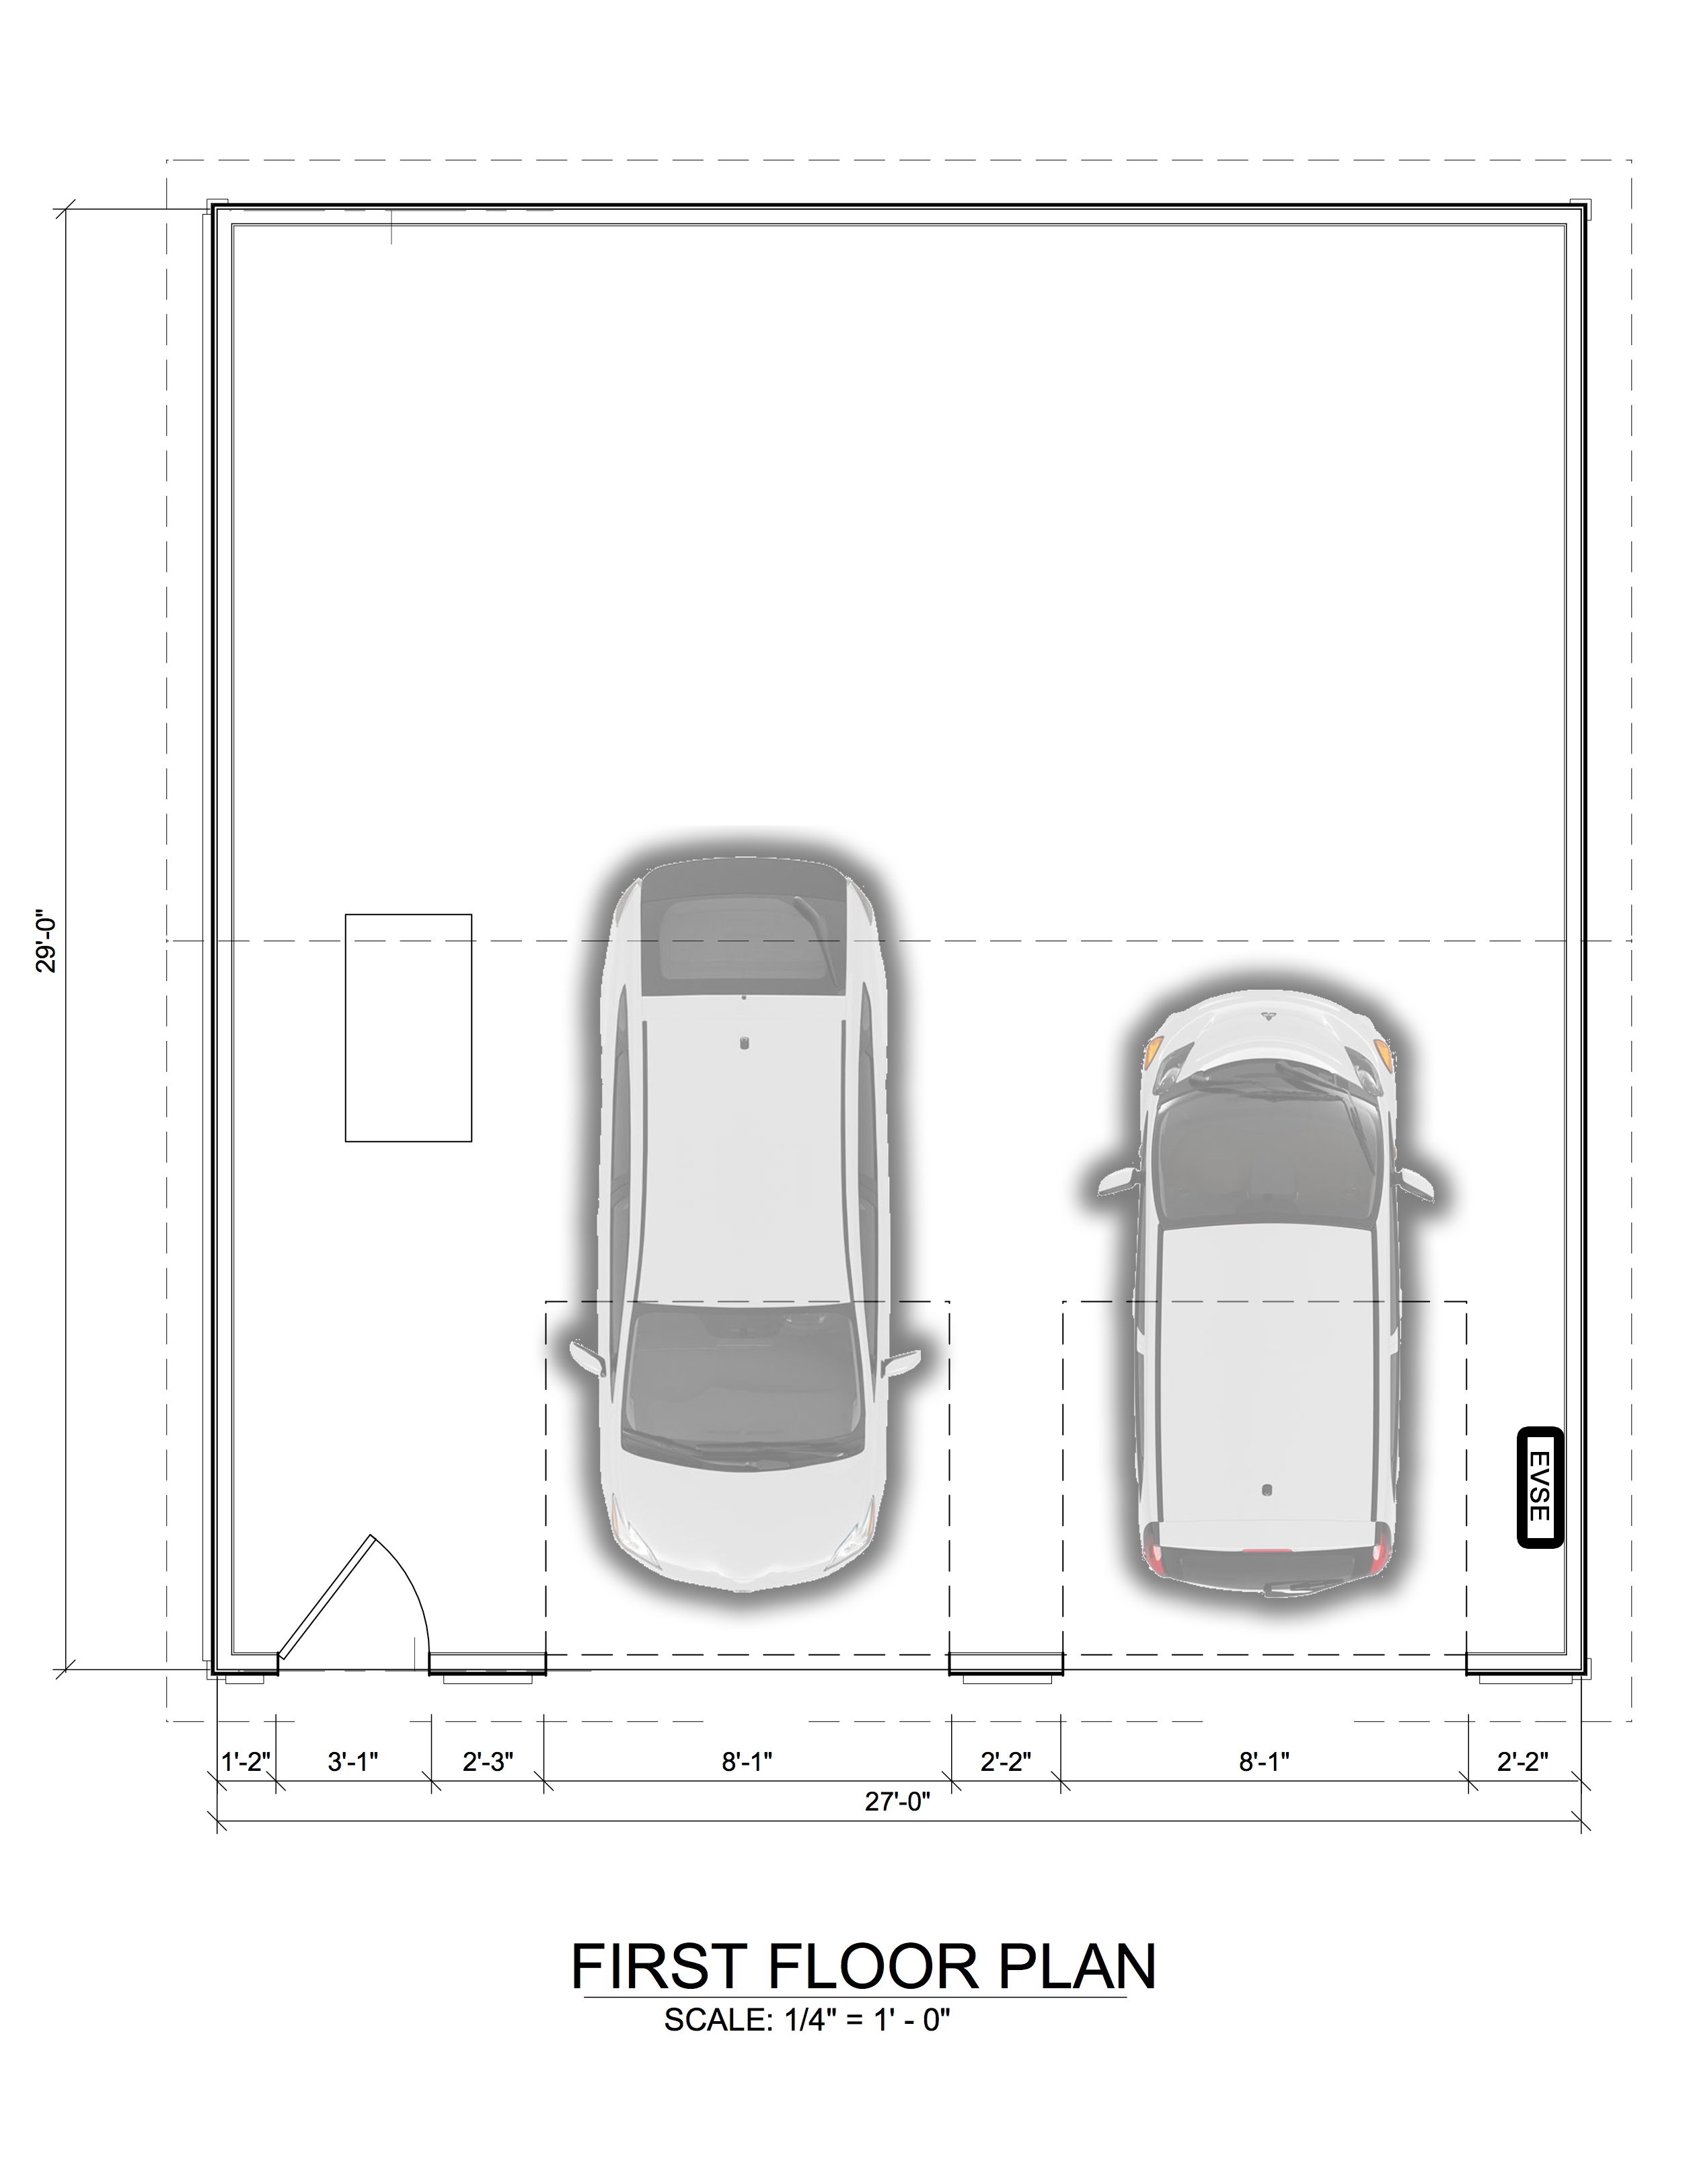
__________________
To view links or images in signatures your post count must be 0 or greater. You currently have 0 posts. To view links or images in signatures your post count must be 0 or greater. You currently have 0 posts. |
|
|

|
| The Following User Says Thank You to bennelson For This Useful Post: | Daox  (11-29-16) (11-29-16) |
 |
| Tags |
| diy, garage, heated slab, pex, solar |
|
|