
|
|
|
 04-21-09, 10:52 AM
|
#1 |
|
Apprentice EcoRenovator

Join Date: Dec 2008
Location: mid michigan
Posts: 191
Thanks: 0
Thanked 0 Times in 0 Posts
|
Very helpful info
 . . |

|

|
|
04-21-09, 11:14 AM
|
#2 |
|
Helper EcoRenovator
Join Date: Apr 2009
Posts: 30
Thanks: 0
Thanked 2 Times in 2 Posts
|
I'm not a HVAC tech, nor do I play one on TV, but I just wanted to add my 2 (or 10) cents to the matter. Wanting to comment on this thread (and other ground-source heat/air threads) was what prompted me to reform my evil lurking ways and register.
A touch of background to start: The last year I've been helping to install a ground-source system at my place of employment. As a result, I've had some hands-on experience welding polyethylene pipe -- over 2000 welds of both butt and socket fusion. So lets talk about the fusion: The butt fusion I was doing was in the 2-4" pipe size, with this machine <http://www.mcelroy.com/fusion/no14/>. We did socket fusion for the smaller stuff mainly because of all the tees used, I would guess, but for the scale you're talking about I wouldn't expect that you'll be needing many fittings. Here are some things that come to mind about welding in general, and specifically about DIY welding: - Most definitely make some sort of sliding jig to hold the pipes for heating and assembly. - You want to keep both ends of the pipe parallel with each other. - You want both ends of the pipe aligned with each other. like this: == not this: =--- - The ends of the pipe should cut be square (to each other, and to the heater) We had a contraption with rotating blades to square up the ends (and get to clean pipe) - The ends of the pipes need to be cleaned (if not trimmed, but that wasn't an option for us: proper procedure was to ALWAYS trim/square (even if you've already trimmed and you just adjust the pipe in the clamps to align the ends)) - Our heater was set for about 500 deg F. Time-wise, I didn't do any butt fusion smaller than 2" (heating time was around 20 or 30 sec for 2", but not sure off the top of my head) so I don't know what to tell you about the time: experiment till you get a bead that's the right size - There should actually be two beads - one from each pipe, and they should be about the same size (probably 1/8-1/4" for your pipe size) and even all the way round: if its a joint that counts (ie you can't cut it up to look at the cross section) the bead is how you tell if its likely to be a good weld or not. - Practice before you do welds that'll be permanent: especially to determine your heating time. Then cut the pipe in half longways to look at the cross section of your welds: the bead should wrap around to the pipe, there should be no line: ie. if the bead wasn't there you shouldn't be able to tell where one pipe starts and the other ends. (also, before you cut, try bending the pipe back on itself to test strength) - The evenness of your bead (or lack therof) will tell you if the end faces of the pipes were square to each other - Let the joint sit and cool for awhile (3 min was specified) before you remove from the alignment jig to keep from putting stress on the joint until it's cooled some -- even after removal, be gentle with it until it's cool to the touch This is getting longer than I intended, so let me leave it at that for now, and come back later. I'm definitely not trying to rain on your parade, just want to make sure you don't have to go leak hunting in a year or two. Edit: I guess this doesn't address the original issue of what to use to do the welds, but it'll be important to keep in mind (IMO) as you build your alignment tool, and put it to use. Good luck welding! I much preferred the butt fusion to the socket fusion: socket doesn't use an alignment machine. If you make yourself a good aligner you can take your time lining up and clamping, so the only thing you adjust in the heat of fusing is the pressure/distance of the pipes from each other. With socket, you have to align the pipe and fitting on the heater, then put them together and keep them aligned during cool down. Much more prone to error. Have fun, but don't breathe the plastic smoke (anymore than you have to, at least)  Last edited by Hugh Jim Bissel; 04-21-09 at 11:25 AM.. Reason: additional points to ponder |
|
|
|
| The Following User Says Thank You to Hugh Jim Bissel For This Useful Post: | castlusion (03-02-13) |
|
04-21-09, 05:01 PM
|
#3 |
|
Supreme EcoRenovator

Join Date: Mar 2009
Location: Portland, OR
Posts: 4,004
Thanks: 303
Thanked 723 Times in 534 Posts
|
Hugh Jim Bissel,
Thanks for the post! This is really great info. I was thinking along the lines of your suggestions, but it is really helpful to have someone like you with your experience, to verify that I'm headed the right way. Regarding temperature levels, all I have to go on is what I've read, and the suggested heat of the heat iron is Minimum = 400°F; Optimum = 425°F; Maximum = 450°F. But in your experience, you had good results with 500°F? I'm making pretty good progress with my welding tools. It looks like butt welding equipment isn't going to be so difficult, but I don't even know what a socket welder even looks like yet. _ _ _ Thanks again, HJB for your feedback, the reason I'm doing this blog is so people can share their ideas & experience, and so we can all benefit by being more informed & capable. The way things are looking, we're really gonna need all the capability we can get. Best Regards, -AC_Hacker |
|
|
|
|
04-21-09, 06:03 PM
|
#4 | ||
|
Helper EcoRenovator
Join Date: Apr 2009
Posts: 30
Thanks: 0
Thanked 2 Times in 2 Posts
|
Quote:
 we replaced it as soon as we could, but as I recall we still could do the welds, just had to drop the time down) we replaced it as soon as we could, but as I recall we still could do the welds, just had to drop the time down) That 425 should be fine. Your time will be a bit longer, but as long as it's a good bit above melting temperature (which sounded like it was about 300 from your previous posts) you should be fine. Quote:
In your case, you're probably just going up and down each borehole in series: therefore you won't need any tees, whereas all our wells were in parallel (since each was 250' down), so each well teed off a horizontal line. Loooots of fittings. My friend and I drove each other crazy welding endless fittings in the bottom of 4' trenches in the heat of Texas summer!  Its a miracle I'm still sane (though that could have been debated even before that ordeal) Its a miracle I'm still sane (though that could have been debated even before that ordeal) |
||
|
|
|
|
04-22-09, 10:47 AM
|
#5 |
|
Supreme EcoRenovator
Join Date: Mar 2009
Location: Portland, OR
Posts: 4,004
Thanks: 303
Thanked 723 Times in 534 Posts
|
(This reply actually was posted by Glenn in a Yahoo group, where I cross-post portions of this blog. I'm copying it here as it is of interest. -AC_Hacker)
A.C. and all, A few top of the head comments:? I'm interested and have done a little investigation. ? AC, you have, of course, identified two of the main problems, capability to drill through hard rock, and fusion welding of the polyethlene tubing, to be used in either vertical wells or in trenche installation. ? Hard rock drilling might be the more difficult problem, not readily adaptable as a DIY project.?? Requires an equipment size of something like a Bobcat.? I have one, and got an estimate of around $10k to convert it.? Seems that for small lot size, around half acre here in Maryland, you would need vertical drilling.? Lot sizes are too small for the alternate trench system.? You estimate in the Oregon area that two 200-ft wells would be required.? I assume, alternatively, four 50-ft wells.? Putting these in line with a simple header arrangement would allow the wells to be easily connected together.? You mention another problem, that of fusion welding.? Perhaps this would not be such a difficult problem with 50-ft wells, where the piping could easily be lifted out and replaced if necessary, allowing, I would suppose, joining sections of small diameter polyethlene tubing using stainless steel clamps? (it was, for instance, not very difficult, in a 500-ft water well, to replaced the pvc lines). Doing a google search you come up with different kinds of equipment for doing fusion welds.? I presume one would use butt welding. Note also that Oklahoma State University? has an ongoing ground coupled heat pump installation program where fusion welding is one of the topics covered.?? Several of these classes are listed below: I have need for two such installations, one at my residence which is situated on a half acre and another at a farmhouse I own where there is sufficient ground area for a trench type.? Also, considering adapting my Bobcat (since I have one) to do vertical drilling to 50-ft.? And, I imagine the adaptation could be done for less than the $10k price that somebody quoted me)? And at that 50-ft depth, as indicated, I would assume maintenance, in event of leaks, would present no particular problems with the more conventional methods of pipe connection.? Aside from the ground coupling technology, the rest of the installation, I believe, could be handled by most any qualified HVAC installer.? Am I right?? If interested, please comment. Glenn Ellis glenne1949@ol. com |
|
|
|
|
04-22-09, 12:24 PM
|
#6 |
|
Supreme EcoRenovator
Join Date: Mar 2009
Location: Portland, OR
Posts: 4,004
Thanks: 303
Thanked 723 Times in 534 Posts
|
Glenn,
Thank you for your interest... > You estimate in the Oregon area that two 200-ft wells would be > required.? I assume, alternatively, four 50-ft wells.? Putting these > in line with a simple header arrangement would allow the wells to > be easily connected together.? Thanks for spotting my error... In western Oregon where I live: 1 Ton (12,000BTU/jhr) = 200 ft borehole (or) 2 each 100 ft boreholes (or) 4 each 50 ft boreholes (etc) %%%%%%%%%%%%%%%%%%%%%%%%%%%%%% [UPDATE: When I first wrote this, I thought it was correct, but experience has shown that the idea needs modification. The deeper you go, the less seasonal temperature fluctuations will affect the temperature of the earth. The opposite is also true, and the shallower, the more seasonal temperature shifts will affect the temperature of the earth. The following picture illustrates this principle: 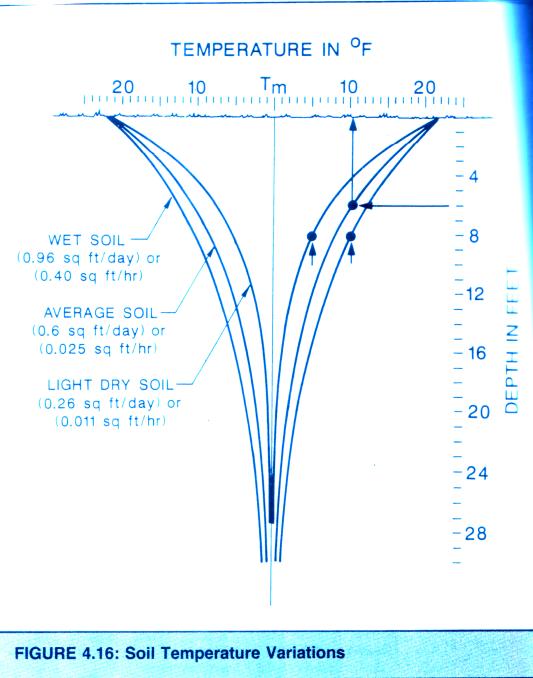 In my case, I ended up drilling 16 holes, with an average depth of 17 feet each. The top of each borehole was 2 feet under the surface of the earth, so the effective depth of each borehole was 15 feet. So my total borehole length was 16 X 15 = 240 feet. But since this was close to the surface of the earth, it was certainly not as effective as a 240 foot deep hole. During the winter of 2010-2011, I ran a very small heat pump 24 hours a day. I was able to extract useful heat but I was not able to log so much useful data. Nonetheless, it is clear to me that the idea works. It is also clear to me that drilling shallow holes, as I did, will require that more holes must be drilled. %%%%%%%%%%%%%%%%%%%%%%%%%%%%%% In the part of Oregon where I live, temperature swings are not as large as they are in many other parts of the country, so the heating and cooling load is generally less than in many other places. The information I have gotten from quite a few local sources is that the rule of thumb, when estimating the amount of borehole required here is 200 ft. of borehole for every Ton (12,000 BTU/hr) of cooling/heating required. Because my house is small and well insulated, my design heat load is somewhat less than 12,000 BTU/hr. I have found that respectful conversation with GSHP installers and water well drillers who also drill wells for GSHP installations (most do), will readily yield this rule-of-thumb information for your particular area. Also, I show how you can experimentally derive this information for your own specific location yourself at this URL: http://ecorenovator.org/forum/introd...nifesto-2.html. The blog posting also cites a document that I took as the source for my test. You would do well to read and understand that document before you do your own test. One aspect of my test that may appear as a source of error is that the test hole I used was only 12 ft. deep. It would likely give you misleading results to only use a 12 ft. test hole in your location. As the source document points out, your test hole should be as close in size and construction detail as the actual boreholes you plan to use. In my case however, I live in a very small house, which I have re-insulated very well, and I live in a relatively mild climate, and most importantly I am actually planning to use many 12 to 15 foot deep boreholes. So in fact, the borehole I used does resemble the boreholes as they will finally be constructed. The rest of your thinking is correct regarding using a branching loop field. > ...where the piping could easily be lifted out and replaced if necessary... Generally, the piping is designed to go in the ground and to stay in the ground. > ...considering adapting my Bobcat (since I have one) to do vertical > drilling to 50-ft.? And, I imagine the adaptation could be done for > less than the $10k price that somebody quoted me)? This sounds great! I wish you the best on this one. Please post photos as this progresses. I guarantee that you will have considerable respect for loop field installers when your own loop field is complete and working! But if you're actually thinking about doing this yourself, you need to give yourself the benefit of all the information you can lay your ambitious hands on. So if you're expecting to save the better part of $10,000 you'd be well advised to spend $100 and go straight to the source of information: Publications | Manuals. In fact, they offer a ground source installer course at a pretty reasonable cost. My advise is to go for it! > I would assume maintenance, in event of leaks, would present no > particular problems with the more conventional methods of > pipe connection.? I think that there's probably a good reason why most states require fusion welding and pressure testing of GSHP loop fields. I'm not saying that you're incorrect, but I'd advise you to do more research. There are also other issues such as being able to achieving flow turbulence and minimizing friction losses, etc. that might not be apparent at this stage of your thinking.  GSHP_guide > ...the rest of the installation...could be handled by most any qualified > HVAC installer.? Am I right?? There's probably less cost and drama in the HVAC portion of the project, but your best bet would be to hire someone with successful experience in GSHP installation. But overall, you have correctly identified that the majority of the cost & work is in the loop-field. But Glenn, if you are going to go to this length, I would advise you to also consider abandoning forced air and going with hydronic radiant floor heating. Not 'staple up', not the panels that go on top of the floor, but what's known as 'wet system' where the PEX is embedded in a 1.5 inch layer of concrete. When properly done, this offers substantial advantages over forced air, as the heat pump is not called on to raise the working fluid (water) to as high a temperature.  hydronic-heating Hope this has answered your questions. Regards, AC_Hacker Last edited by AC_Hacker; 05-19-11 at 06:49 PM.. Reason: CORRECT OVER-SIGHT... |
|
|
|
|
04-22-09, 11:12 AM
|
#7 | |
|
Helper EcoRenovator
Join Date: Apr 2009
Posts: 30
Thanks: 0
Thanked 2 Times in 2 Posts
|
Quote:
It doesn't have heat times though, but you should be able to figure that out easily enough once you start test-welding: for 3/4" pipe 30 sec is probably way overkill: keep making welds and adjusting the time by a few seconds until the bead is close to the right size per that website. When you get close, you might go in each direction by a second until you know min and max time (per bead size), then use the middle of that range for the welds that count. (the range will change by a few seconds depending on the weather conditions: temperature of the pipe and if there's a lot of wind). |
|
|
|
|
| The Following User Says Thank You to Hugh Jim Bissel For This Useful Post: | coyotesentado (02-20-11) |
|
04-22-09, 01:12 PM
|
#8 |
|
Supreme EcoRenovator
Join Date: Mar 2009
Location: Portland, OR
Posts: 4,004
Thanks: 303
Thanked 723 Times in 534 Posts
|
I'm not sure if this stuff is getting out of sequence or not, but HJB (AKA: Hugh Jim Bissel) shared a great link to information on pipe fusion technique here: (Polypipe - Heat Fusion and Joining Intro). It's the best and clearest info I have seen and I didn't want it to get lost in the shuffle.
Best Regards, -AC_Hacker Last edited by AC_Hacker; 01-02-11 at 02:45 AM.. |
|
|
|
|
04-22-09, 11:47 AM
|
#9 | |||
|
Helper EcoRenovator
Join Date: Apr 2009
Posts: 30
Thanks: 0
Thanked 2 Times in 2 Posts
|
Caught me while I was typing
Quote:
Quote:
But, yes, once the math is right, one big well could be divided into smaller wells: thats why we were able to do 230 wells at 250' down instead of having to do one 57,500' well! (and have to put 6" pipe down it instead of the 1" we used!)Quote:
Last edited by Hugh Jim Bissel; 04-22-09 at 11:50 AM.. Reason: clarification of my phrasology |
|||
|
|
|
 |
| Tags |
| air conditioner, diy, gshp, heat pump, homemade |
|
|


 Hybrid Mode
