
|
 09-28-10, 06:42 PM
|
#201 |
|
Administrator

Join Date: Aug 2008
Location: Germantown, WI
Posts: 5,525
Thanks: 1,162
Thanked 374 Times in 305 Posts
|
The pulleys arrived tonight, so I grabbed the motor to see how they fit. I'm actually very happy with how they fit. I will be modifying them a little, but not much which is great news.
 The top pulley here doesn't fully go on, its only about halfway on the shaft. I'll have to modify them to get it to slide on farther. The general rule we use in the industry I work in (industrial conveying equipment) is you need 1X diameter engagement on couplings and pulleys. So, that is what I will be aiming for. 
__________________
Current project - To view links or images in signatures your post count must be 0 or greater. You currently have 0 posts. To view links or images in signatures your post count must be 0 or greater. You currently have 0 posts. & To view links or images in signatures your post count must be 0 or greater. You currently have 0 posts. |

|

|
|
09-28-10, 08:01 PM
|
#202 |
|
Apprentice EcoRenovator
Join Date: Jul 2010
Location: East Coast of Florida, USA
Posts: 149
Thanks: 2
Thanked 5 Times in 5 Posts
|
Can you cut the setscrew flange off of one pulley and weld that pulley to the other pulley?
|
|
|
|
|
09-28-10, 08:35 PM
|
#203 |
|
Infrequent noob
Join Date: Aug 2008
Location: 1000 Islands region, Ontario, Canada
Posts: 402
Thanks: 37
Thanked 20 Times in 19 Posts
|
Woohoo!
Will there be any more grass cutting to do when these are on? Seems like the grass growing season is rapidly drawing to a close.
__________________
.
|
|
|
|
|
09-28-10, 09:23 PM
|
#204 | |
|
Journeyman EcoRenovator

Join Date: May 2009
Location: Buffalo, NY
Posts: 344
Thanks: 3
Thanked 17 Times in 15 Posts
|
Quote:
|
|
|
|
|
|
09-29-10, 09:50 AM
|
#205 | |||
|
Administrator
Join Date: Aug 2008
Location: Germantown, WI
Posts: 5,525
Thanks: 1,162
Thanked 374 Times in 305 Posts
|
Quote:
Quote:
Speaking of which, I still have to run this motor in to seat the brushes completely. Quote:
__________________
Current project - To view links or images in signatures your post count must be 0 or greater. You currently have 0 posts. To view links or images in signatures your post count must be 0 or greater. You currently have 0 posts. & To view links or images in signatures your post count must be 0 or greater. You currently have 0 posts. |
|||
|
|
|
|
09-29-10, 12:48 PM
|
#206 |
|
Administrator
Join Date: Aug 2008
Location: Germantown, WI
Posts: 5,525
Thanks: 1,162
Thanked 374 Times in 305 Posts
|
I threw the motor on to seat the brushes today. Being so new, the brushes need to be worn down so they fully contact the commutator or you can have problems when you try putting a lot of power through it. To do this, all I did was hook it up to a 12V battery and let it spin for a while. I'll stop it after a while and check each brush to make sure that they are fully contacting.
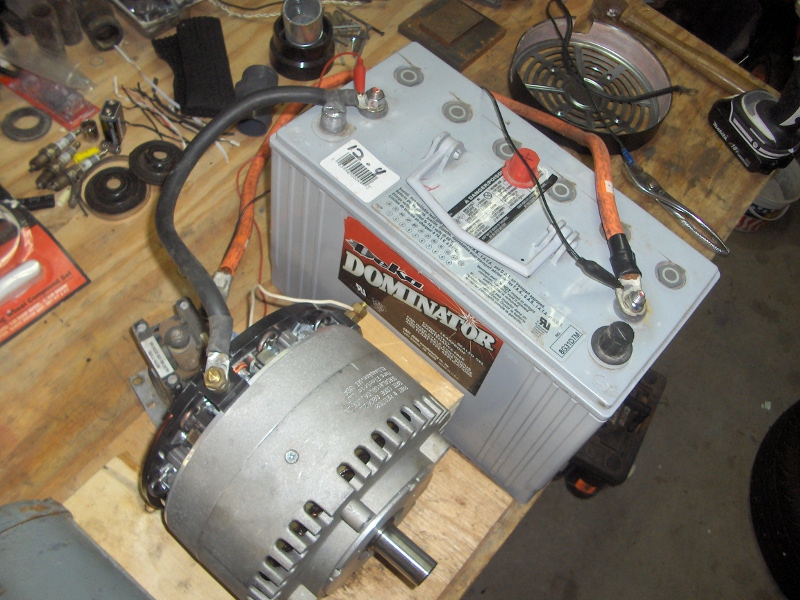 As you can see here, none of the brushes are close to being broken in as none of them have even touched the duller band on the right side of commutator. 
__________________
Current project - To view links or images in signatures your post count must be 0 or greater. You currently have 0 posts. To view links or images in signatures your post count must be 0 or greater. You currently have 0 posts. & To view links or images in signatures your post count must be 0 or greater. You currently have 0 posts. |
|
|
|
|
09-29-10, 03:00 PM
|
#207 |
|
Apprentice EcoRenovator
Join Date: Jul 2010
Location: East Coast of Florida, USA
Posts: 149
Thanks: 2
Thanked 5 Times in 5 Posts
|
Are you sure the brushes are that wide? Normally you are looking for an arc in the brushes that matches the arc of the commutator segments. Once the two arcs are the same you have full contact and are good to go. You really need a view from the end of the shaft or a small mirror to view this. You can also pull the brushes out periodically during your break-in and see if any of the original flat area across the bottom (where the brushes touch the commutator) is left. If it's all gone your motor is ready.
|
|
|
|
|
09-29-10, 03:36 PM
|
#208 |
|
Administrator
Join Date: Aug 2008
Location: Germantown, WI
Posts: 5,525
Thanks: 1,162
Thanked 374 Times in 305 Posts
|
Yup, I'm sure. I've already had the brushes out when I replaced the springs on it.
__________________
Current project - To view links or images in signatures your post count must be 0 or greater. You currently have 0 posts. To view links or images in signatures your post count must be 0 or greater. You currently have 0 posts. & To view links or images in signatures your post count must be 0 or greater. You currently have 0 posts. |
|
|
|
|
10-05-10, 08:36 AM
|
#209 |
|
Administrator
Join Date: Aug 2008
Location: Germantown, WI
Posts: 5,525
Thanks: 1,162
Thanked 374 Times in 305 Posts
|
I just talked with an engineer at work. We did some quick calculations on key stress and found that even with only the 5/8" or so engagement I'm getting on the second pulley I'll be more than fine transmitting the torque that the motor puts out. So, I'll just add the bolt on the end to make sure everything is held together nice and tight.
__________________
Current project - To view links or images in signatures your post count must be 0 or greater. You currently have 0 posts. To view links or images in signatures your post count must be 0 or greater. You currently have 0 posts. & To view links or images in signatures your post count must be 0 or greater. You currently have 0 posts. |
|
|
|
|
10-06-10, 12:24 AM
|
#210 |
|
Apprentice EcoRenovator
Join Date: Jun 2010
Posts: 206
Thanks: 1
Thanked 18 Times in 17 Posts
|
You could cut the boss off one pulley, and drill and tap the set screw into the v of the pulley, so that the belt clears the top of the set screw.
|
|
|
|
 |
| Tags |
| conversion, electric, lawn mower, tractor |
|
|


 Linear Mode

