
|
 09-25-08, 01:02 PM
|
#1 |
|
Administrator

Join Date: Aug 2008
Location: Germantown, WI
Posts: 5,525
Thanks: 1,162
Thanked 374 Times in 305 Posts
|
 The very first improvement to my house was done less than a week after we had moved in. My in-laws (including my father in law, who is a master electrician) came to help us move the last of our things over to the house, and do a few things around the house. Since we had looked at the house with my father in law, he already knew what I wanted done. The problem we had was that the lights in the basement were all on pull chain switches or just plugged into a wall socket. This meant turning everything on or plugging it in individually. The previous owners didnt like this solution, so they simply kept the lights on in the basement 24/7! Thankfully, there werent a lot of lights down there. There were four 14W CFLs and two four foot flourescents which Ive heard run at about 20W each. A little rough estimation shows that they were wasting around 70 kWh every month just from those four lights! Yikes. Obviously, something had to be done. That is where our story begins today. So, we have all know a simple solution, right? One switch at the top of the stairs sounds like a great idea, doesnt it? I thought so. So that is exactly what we did. Unfortunately, Im not well versed in wiring so I cant give even a descent explination of the actual wiring process. I can tell you what else we had to do though. The first step was to mount the switch. Thankfully, there was even an electrical box at the top of the stairs already. Unfortunately, there were no wires running to it. So, we ended up using some wire molding to go up and over the doorway. 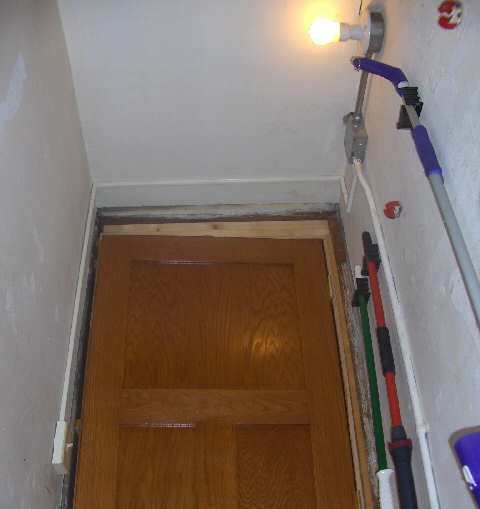 That all went great, but we also noticed that the top of the door hit the light if you opened it up far enough. So, we ended up moving the light over and up to get it out of the way too.  With the switch all tidied up and ready to go we continued down into the basement to wire up the rest of the lights to the switch. After doing the two on the one side of the basement we ran into another snag. The four foot flourescent tube light was not wired to anything, it was simply plugged into the wall. Being the master electrician that he is, my father in law simply ran out to his truck to grab a receptical, installed it in a junction box, and wired it in with the switch. Now the large tube light also works on the switch, brilliant!  So, a few hours of work and a few cheap materials and were done. The cost to me was a bit lower than average as I had some materials already laying around, and my father in law also provided some free of charge. Im already reducing my carbon footprint, so that benefit started that fateful day. I also calculate that it will take just under four months to break even money wise. Sounds like a win win to me. Materials list:
Total: $30.78 Energy savings: ~70 kWh per month Payback: ~3.7 months
__________________
Current project - To view links or images in signatures your post count must be 0 or greater. You currently have 0 posts. To view links or images in signatures your post count must be 0 or greater. You currently have 0 posts. & To view links or images in signatures your post count must be 0 or greater. You currently have 0 posts. |

|

|
|
05-15-10, 05:25 AM
|
#2 |
|
Helper EcoRenovator
Join Date: Apr 2010
Location: Wellington, New Zealand
Posts: 61
Thanks: 0
Thanked 6 Times in 5 Posts
|
You can purchase wireless switches, they look like a standard switch/mounting block but has a coded radio signal that transmits to a receiver where ever you have your load. Thus in situations like described you dont need to run extra cables everywhere. Some of the units have up to 4 codes and switch buttons so can control 4 isolated receivers.
|
|
|
|
|
05-16-10, 04:20 AM
|
#3 |
|
Super Moderator

Join Date: May 2009
Location: Warsaw, Poland
Posts: 964
Thanks: 189
Thanked 111 Times in 87 Posts
|
This reminds me of what I did in our basement 2 years ago. The on/off switch was only at the top of the stairs, so if someone went through the basement to the garage, and from there outside to the garden, the light would stay on. And if someone else turned it off in the mean time, you have to crawl back in the dark. So I bought two 'stair' switches, found some old wires and now the basement lights can be turned on/off either from the top of the stairs, or from the door to the garage. Cost was only for the two switches, about $4 each.
|
|
|
|
 |
| Tags |
| switch |
|
|


 Linear Mode

