
|
 01-04-17, 06:47 PM
|
#11 | |
|
Lurking Renovator
Join Date: Dec 2016
Location: Texas
Posts: 14
Thanks: 3
Thanked 3 Times in 2 Posts
|
Hi Xringer,
Sorry for the late response, I took a little vacation time off away with family, the internet, my cell phone etc.. I had my son come to the house and close off the valves (again thanks for the diagram). Happy 71st BTW.... I did read through the link, wow - just awesome you were able to repair the unit and use it as a secondary. I'm actually just north of Dallas... So glad it's not summer as this unit was in the master bedroom. Update: I checked my messages today and the company indicated that the unit is under warranty and they will perform the repair for $695.00 (labor). Um, I don't think so. In looking online, I can purchase a replacement indoor unit for $460.00 ($323 if I was looking to just replace the evaporator coil). I'm thinking of purchasing the equipment to charge the unit. Of course I'll ask my son to assist. I'll report back once I've discussed this with him... As always, thanks so much for all your help. --Shelby Quote:
|
|

|

|
|
01-11-17, 04:19 PM
|
#12 |
|
Lurking Renovator
Join Date: Dec 2016
Location: Texas
Posts: 14
Thanks: 3
Thanked 3 Times in 2 Posts
|
Spoke with my son this weekend and he wants to replace the heat ex. himself. He's ordered the part ($230.00) online and it should be here in the next week or so. He indicated he'll need to purchase a recovery tank and machine to pull the refrigerant out of the outdoor unit (assuming anything is left). He's installed many of these for my daughter in Houston so he has most everything else. He really didn't want to touch it (warranty and all) but I'm on a budget and he believes the warranty for parts is fine but the labor is just too high. He figures between me and my daughter, it's inevitable that these units need servicing outside of their 1 year labor coverage.
I'd really like to document and post this process for anyone else who might run into this some day. I'll start a new 'thread' once the first process is complete (disassembly, remove & re-install). Thanks to all (Xringer/WyrTwister) for your posts. --Shelby |
|
|
|
|
01-11-17, 05:59 PM
|
#13 |
|
Lex Parsimoniae

Join Date: Feb 2009
Location: Woburn, MA
Posts: 4,918
Thanks: 114
Thanked 250 Times in 230 Posts
|
Okay Shelby,
It's not in the manual, but that indoor unit (IDU) isn't a big deal to change out. Just needs to be disconnected from the power and comm (Terminals under a cover right side of the IDU) and the line set. (Ladder work: The bent IDU line-set tubes will need to be straightened out). Don't forget, there are two (marked) pressure points on the bottom cover near the wall. Press both of those little finger pads upwards to un-clip the bottom edge of the cover. First pull the bottom cover away from the wall (about 1") then, Lift the IDU up (1") off the wall-plate upper hooks, as you pull the unit away from the wall. ~~~ I received a Recovery machine and Tank for Christmas. Have not used it yet! (I posted about it here somewhere). I tend to agree with you, there isn't any R410a left in that system. I think you guys are going to mainly need a vacuum pump, a good scale and a tank of R410a. (With at least a couple of pounds in it).. If it was me, I would get the new IDU installed, (leave the service valves closed) then get the line-set and new IDU pressure, and vacuum checked. Once the new setup looks good, then open both service valves and vacuum the whole system.. That might take a while.. After that, you can charge the (vacuumed) system. To the plate spec.. My guess is less that 2 pounds will be needed. So, a good scale will be needed. Flushing or vacuuming the air out of the fill-hose is important. You don't want to allow any air inside that system.. One way of removing air from a fill hose, is to use a hose with a cut-off valve on the end going to the service port of the ODU. With the hose valve closed, crack the R410a tank valve, to let some R410a into the hose. Holding the hose vertical, will allow the air to go upwards to the hose valve. Let it settle for a while, then slowly crack open the hose valve, to bleed off the air. When the R410a starts to come out, you can tell it's not air, because it's super cold and white as a cloud. Turn off the hose valve instantly.. 
__________________
My hobby is installing & trying to repair mini-splits EPA 608 Type 1 Technician Certification ~ 5 lbs or less.. |
|
|
|
| The Following User Says Thank You to Xringer For This Useful Post: | Shelby (01-12-17) |
|
01-12-17, 04:45 PM
|
#14 | |
|
Lurking Renovator
Join Date: Dec 2016
Location: Texas
Posts: 14
Thanks: 3
Thanked 3 Times in 2 Posts
|
Xringer,
I just wanted to stop in and thank you for all the detail you provided. I know my son will find this useful as he was commenting about the service manual not covering specific aspects of a repair regarding the refrigerant removal and replacement. Forgot to mention that I was wrong about the indoor unit, it's discontinued and I gave up trying to find one that's compatible with the outdoor unit. However, my son was nice enough to purchase the correct part (I got that wrong too) and I'm very thankful for that. There's no turning back now, the fun (err work) begins Saturday as he's going to remove the unit so he can prepare it for the new part. So the journey begins... --Shelby Quote:
|
|
|
|
|
|
01-12-17, 05:50 PM
|
#15 |
|
Lex Parsimoniae
Join Date: Feb 2009
Location: Woburn, MA
Posts: 4,918
Thanks: 114
Thanked 250 Times in 230 Posts
|
When pulling the vacuum, you'll need an adapter to match the service port to the standard 1/4" hose fitting..
The best kind of adapters have a cut-off valve.. (see red valve handle) Highly recommended. https://www.amazon.com/Adapter-R410a...dp/B00M0VL5B0/ 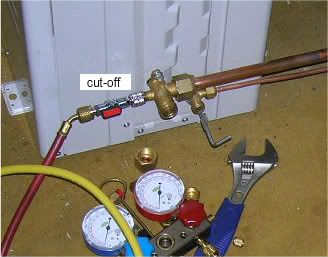 When you connect the fill-hose(with cut-off) to that adapter, there will be some air trapped inside. So, leave it a little loose, and bleed a tiny bit of R410a into the connection as you tighten it up. Flushing out the air.. I hope your son has a good scale to 'weigh in' the R410a. The tank has to be upside down on the scale, so that liquid flows, not gas.. (You could rock the tank around a little before starting, to mix it up a bit). The R410a should be sucked right into an evacuated system.. (Should be under 200 microns at least). You have to watch the scale and allow a very slow in-flow, so there's no over-filling.. If the vacuum doesn't allow enough weight to be pulled in, then start running the unit in cooling mode. That will enable the compressor to pull in the R410a. It will flow into the 4way valve, into the accumulator, and onto the compressor.. You have to go slow, so that liquid is not injected into the compressor. It's made to pump gas.. Once the right weight is indicated on the scale, shut off the fill hose cut-off. Then shut the tank valve. Re-open the fill-hose cut-off (10 seconds) to allow the compressor to lower the pressure inside the fill hose. Close all cut-offs and use gloves to very quickly remove the Adapter from the service port.. Some R-410a will vent for a second.. If you fail to be quick, a lot of it will vent.. Not good. Global warming.. If you have an extra long line-set, (over 25 feet) you will have to add extra weight R410a.. The ounces per-foot (above 25) amount is shown in the install manual. If you line set is under 15 feet, you might want to under-fill the system a bit. Per the install manual.. Hope your son also has a micron gauge too! Really necessary to get a good vacuum.. That's all I can think of now.. Maybe the other guys have a better way of doing this..
__________________
My hobby is installing & trying to repair mini-splits EPA 608 Type 1 Technician Certification ~ 5 lbs or less.. |
|
|
|
|
01-12-17, 06:08 PM
|
#16 |
|
Master EcoRenovator
Join Date: Jun 2013
Location: USA
Posts: 543
Thanks: 6
Thanked 44 Times in 38 Posts
|
You do not know how much refrigerant remains in the system ? As long as you still have at least a few pounds or even ounces of positive pressure inside the system , it will keep air / moisture out of the system .
If you still have some refrigerant left , there is a procedure cal pumping down the unit / system . Do not know if it will work for a MS ? I know it works on traditional residential split systems . Short version is you close off the high pressure / liquid service valve . Run the unit on A/C ( with your gauges / hoses / manifold hooked up om the low side service port ) . Watching the low pressure / suction gauge , When it goes below zero pressure ( into a vacuum ) Close off the low side / suction service port & then kill the unit . All the refrigerant is now in the condenser coil & compressor ( and you have both service valves closed ) . You van now un-hook the In Door Unit to work on it . You might have a slight vacuum inside the IDU and / or line set . God bless Wyr |
|
|
|
|
01-12-17, 06:13 PM
|
#17 |
|
Master EcoRenovator
Join Date: Jun 2013
Location: USA
Posts: 543
Thanks: 6
Thanked 44 Times in 38 Posts
|
Excellent instructions , Xinger . But , your instructions are always great ! :-)
Have you heard of the 3rd world method ? :-) God bless Wyr |
|
|
|
|
01-12-17, 07:16 PM
|
#18 |
|
Lex Parsimoniae
Join Date: Feb 2009
Location: Woburn, MA
Posts: 4,918
Thanks: 114
Thanked 250 Times in 230 Posts
|
Wry, they had a hole in the coil on the indoor unit..
It sat there a long time before the service valves were shut off.. I asked they be shut off, to keep the sun from making the system breathe air in and out. We've discussed the 3rd world method here before.. I'm pretty sure it's just about impossible to do a 3rd world install, without some air ending up inside the system.. Trial and Error learning. It seems to me..
__________________
My hobby is installing & trying to repair mini-splits EPA 608 Type 1 Technician Certification ~ 5 lbs or less.. |
|
|
|
|
01-12-17, 07:56 PM
|
#19 |
|
Master EcoRenovator
Join Date: Jun 2013
Location: USA
Posts: 543
Thanks: 6
Thanked 44 Times in 38 Posts
|
I could not remember it for sure , but I thought it had a leak . Could not remember how bad . From what you just said , doubtful it has any remaining refrigerant to recover .
And please do not get me wrong . I am not advocating the " 3rd world method " . Keep up the good work ! :-) God bless Wyr |
|
|
|
|
01-12-17, 09:10 PM
|
#20 |
|
Lex Parsimoniae
Join Date: Feb 2009
Location: Woburn, MA
Posts: 4,918
Thanks: 114
Thanked 250 Times in 230 Posts
|
Not real sure about the time-line, but I suspect it leaked down to zero..
It will be easy to tell, before they disconnect the line-set up at the IDU. Just stick a gauge on the service port and open that service port (hex key) valve. Listen for a hiss, or see the pressure jump up on the meter.. If it does have any R410A left inside, it's not going to be very much, considering the unit started off with about 24 ounces maybe? But, it will a problem. More R410a could be added using superheat method..? Or recover the old R410a and charge it up with a fresh bottle.. That 3rd World method is just something to keep in mind, if you are ever stuck way out in the sticks, and it's an emergency. I believe the method is mostly used in very hot climate areas.. Maybe..
__________________
My hobby is installing & trying to repair mini-splits EPA 608 Type 1 Technician Certification ~ 5 lbs or less.. |
|
|
|
 |
| Thread Tools | |
| Display Modes | |
|
|


 Linear Mode

