Gathering up the tools and materials is really most of the job, and once that is done, you might as well pack up and go home (just kidding).
Here is a close-up of the gas port. Note that I have already put brazing flux on the joint. I put a liberal amount of flux on the tube (which I had lightly sanded with very fine sand paper), then I slowly rotated the tube into the gas port, taking the flux down with it.
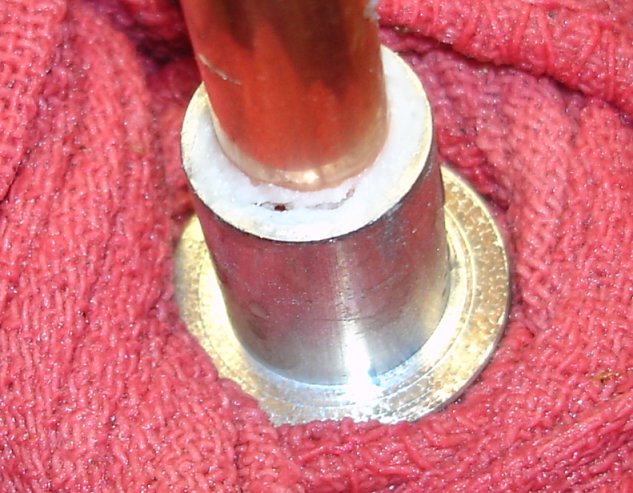
brazing flux on joint, saturated rag
Also please note that I really wasn't kidding about the rag being saturated and not just damp. In fact just before I put heat to the joint, I drizzled a bit more water into the rag just to make sure...
Here is a picture of the tubing getting cherry red. Sorry about the picture, it was tough snapping photos and working the torch at the same time... The brazing was perfect, the pictures, not so good... probably best that way.
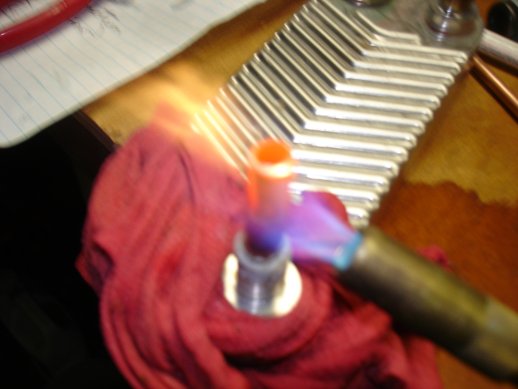
hotter than the tongs of hell...
So, shaky as it is, here's what it looks like when you really put the heat to it. I'm using the yellow bottle of MAPPS gas here and the tubing heats up pretty quick, compared to propane. Now that I look at the photo, and remember what color the hot copper tube was (the photo color is pretty accurate), I'd have to say that "cherry red" is maybe too mild a term. Probably more accurate would be "hotter than the tongs of hell".
I wasn't able to photograph the next step, which was moving the torch and the glowing red area down to the stainless steel gas port on the heat exchanger, because I needed to use both hands... One hand to hold the torch, the other to apply the brazing rod. This is really the most critical moment, and you'll want to get a good, smooth braze flow and then back the heat out as quickly as possible.
I had the luxury of having two heat exchangers from the project that is on hold, that I started on first, to get my technique perfected (and possibly destroy the heat exchanger in the process), not a bad idea really. But in this case, it wasn't needed and the described procedure yielded perfect results...

insufficient heat for good braze flow
...with the exception that when I brazed the second gas port, I was a bit cowardly in my application of heat and didn't get good flow. This I can easily fix by repeating the procedure only turning up my heat (and courage) slightly higher.
Below is a photo of a proper joint after everything is cooled down and buffed up just a bit with a fine wire brush.

what a proper joint should look like
Nice, smooth braze flow, no pinholes, no discontinuities.
So I did my small exchangers first and by the time I was working on the second set, it was very smooth sailing.
Here's a shot of all the finished heat exchangers...

brazing all finished
Once I got going, all the brazing took maybe 30 minutes.
Regards,
-AC_Hacker
* * *