For some time now, the members of the forum have been testing and reporting back on LED lights they’ve bought and tried out. These are almost always some form of retrofit bulb with a standard E26 or similar screw base. However, Opiesche, a forum user, decided to take a different route. He went ahead and make his own fixture for a string type LED light modules.
Opiesche claims these fixtures cost around $20 each to make from the following materials:
- 1/4″ plywood
- A strip of acrylic
- 1/2″ – 3/4″ binding posts and matching bolts
- Adhesive
- Aluminum L-profile
- LED modules
- LED power supply

The first thing that must be done is calculate how much light you want the LED fixture to put out. With the chart above, you can see a standard incandescent 60W light bulb puts out about 800 lumens. Each of the LED modules in the string puts out 70 lumens. So, you need roughly 11 of these LED modules to put out the same amount of light as a 60W fixture. If you want more light you need more modules in the string.
Now that we know how many modules we want, its time to size a power supply. These LED lights run off of 12V DC power, not 110V AC household power, so we need a 12V power supply. According to the specifications of these LED modules, each module consumes .7W (the reseller’s site is wrong). So, if we have 11 modules, we need at least a 7.7W power supply. For safety sake its definitely recommended to round upwards around 10%, so a 9W supply should be the minimum. If you have 3 or 4 of these fixtures running off the same power supply increase the power supply’s output accordingly.

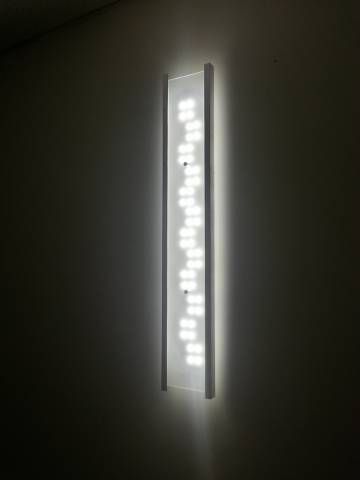
Now, on to building the fixtures. Opiesche started with a 1/4″ thick plywood strip of wood as the backing plate. The shape of the plywood depends on the shape of the fixture you want. You’ll also want to figure out where the mounting holes and mounting points for the acrylic glazing will go, and drill holes for them at this time. Painting the plywood is optional depending on what you want the fixture to look like.

Next, a piece of acrylic is cut roughly 1″ (25cm) larger in each dimension than the plywood piece. Opiesche used a jigsaw with a fine blade to cut it. It is then cleaned and sprayed with a frosted glass spray on each side. Two coats are recommended for a nice frosted look.

Now, you need to figure out how you want the lights arranged. Keep in mind they are all attached, and you also need points to mount the light to the wall with a screw or something, and you also need mounting points for the acrylic glazing. Once you have figured it out, use your adhesive to glue the modules to the plywood. Be careful not to tug on the next module before the first is secure. Opiesche used locktite power grab, and said it worked pretty good.


Install the glazing mounting points. Once they are installed you can set the acrylic glazing on the mounting points and mark out where the holes need to be drilled. When drilling, start with a smaller drill bit than needed and use very little pressure to avoid cracking the acrylic. Once the smaller hole is drilled, move on to the necessary drill bit size and again use very little pressure to avoid cracking.
After the holes are drilled, you may mount the backing plate with LEDs on it to the wall or ceiling.


Finally, cut two pieces of aluminum L-profile to the length of the acrylic or slightly longer. Use your adhesive to glue it to the sides of the acrylic.
Once it is cured you are ready to bolt the acrylic glazing up to the LED fixture and you’re done!

The last step is purely cosmetic, and leaves plenty of room to make the fixture your own design. The trim could be replaced with a wood you like that is painted or stained, or any other material you like. Opiesche even made one without a trim piece around the sides if you’re just looking for a simpler look.
For more info on the LED fixture build, see Opiesche’s forum thread.


Comments on this entry are closed.